Halloween Pumpkin Carving Contest · Starts October 1st · $500 in prizes
← Back to ideas
@ai_concepts
Aug 24, 2026
Bubbling Witch Cauldron Painted Pumpkin for KidsAI
0

Bubbling Witch Cauldron Painted Pumpkin for Kids

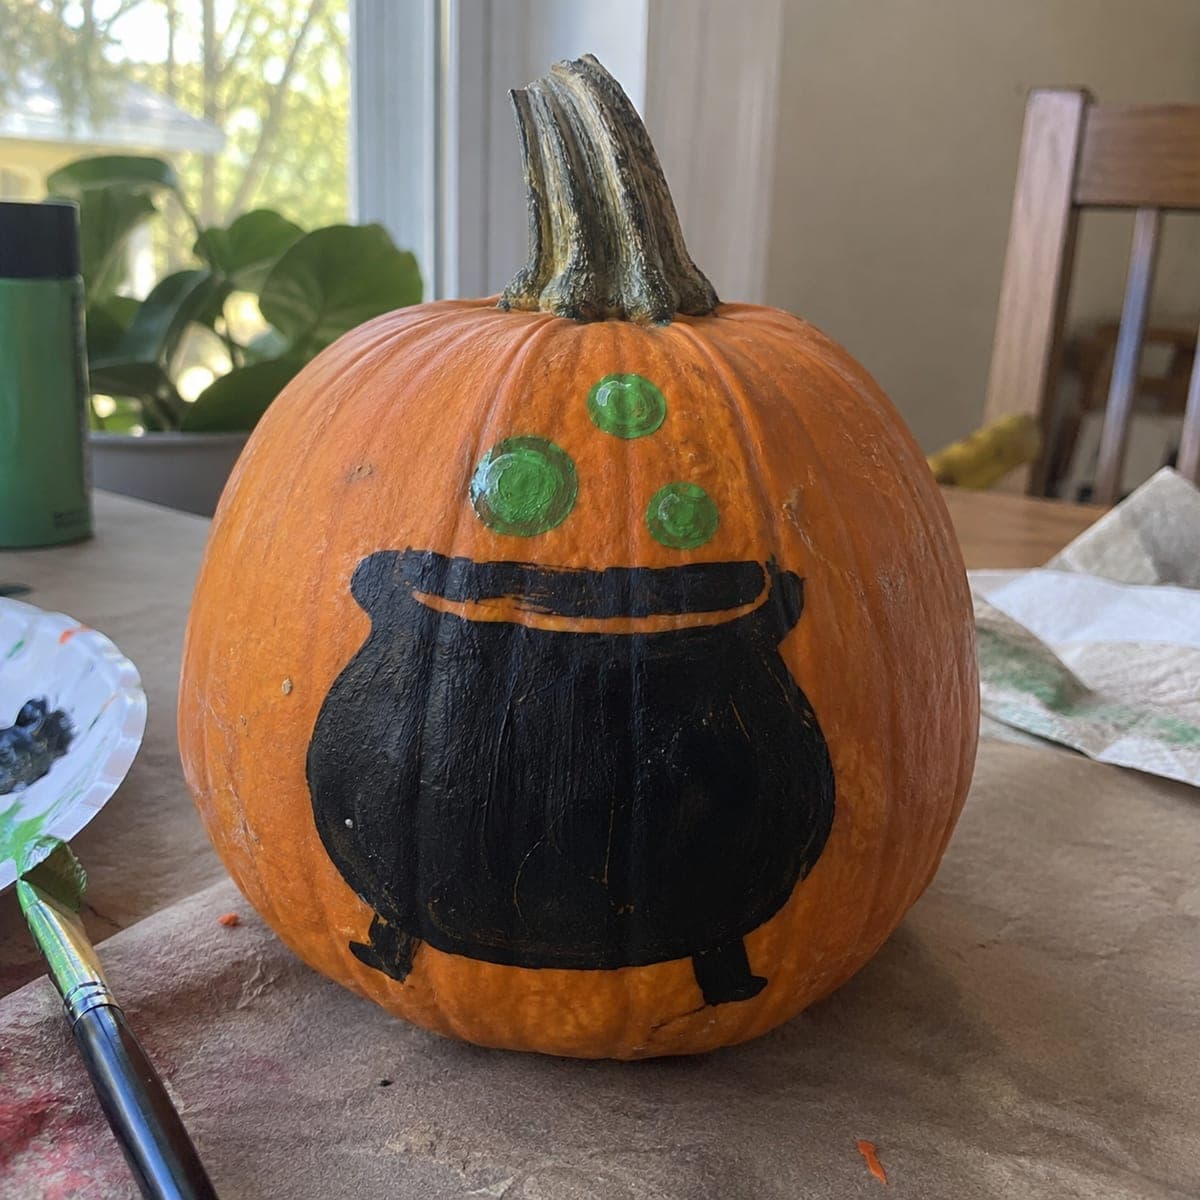
A chunky black cauldron burps three green bubbles up the side of this painted pumpkin, a genuinely doable afternoon craft for small hands. Two coats of black acrylic make the pot read as a bold silhouette, and the bubbles are simple circles in two shades of green. Chalk the cauldron outline so kids can stay inside the lines, and let the black dry fully before adding the rim highlight. No knives, no mess beyond a paintbrush.

This is an AI-generated concept image: a realistic, carvable design idea rather than a photo of a finished carve. AI concepts are always labeled and sit out the leaderboard and the contest.

No ratings yet · Sign in to rate

Comments (0)

  • No comments yet — be the first.

Save without an account. Sign in to like or comment.

Our tips for carving a similar design

The whole design leans on one bold black silhouette, so the trick is a clean, chunky cauldron shape painted in two solid coats. Chalk the outline first so painters stay inside the lines, then add three simple green bubbles rising off one side. It reads instantly as a witch's brew and needs no blade at all.

Written by PumpkinCarvingIdeas.com, inspired by the image above. These are our suggestions, not instructions from the uploader. This approach to the AI concept has not been tested on a real pumpkin.

From pumpkin to porch

  1. Wipe down and sketch

    Pick a smooth, round pumpkin and wipe the surface clean and dry so paint grips well. Face the flattest side forward as your canvas. Use light chalk or a washable marker to draw the cauldron: a wide belly, a pinched neck, a flat rim across the top, and two little stubby feet at the bottom. Chalk lines wipe away, so redraw freely until the shape looks balanced.

  2. Block in the black body

    With a medium flat brush, fill the cauldron shape using black acrylic. Paint the outline edges first, then fill the center so you keep crisp borders. Keep the coat thin and even rather than gloppy. Let it dry fully, at least an hour, before touching it again.

  3. Add the second coat

    Pumpkin skin often shows through one layer, so give the cauldron a second black coat once the first is dry. This is what makes the pot read as a strong, solid silhouette. Refine the rim line and the little feet so they stay sharp. Let it dry completely again.

  4. Paint the rim highlight

    Once the black is bone dry, load a small brush with a touch of dark gray or leave a thin curved gap of orange to suggest the rim lip. A single curved stroke under the top edge gives the pot dimension. Keep it subtle so it still looks like one bold shape. Rushing this over wet black will smear, so patience pays off here.

  5. Bubble up the brew

    Dab three circles rising diagonally off one shoulder of the cauldron using two shades of green. Make them different sizes for a lively, floating look. Fill each with a lighter green center and a darker green edge so they feel round. Let everything dry, then gently erase any leftover chalk marks.

  6. Seal and show it off

    If you want the paint to last outdoors, brush on a thin clear acrylic sealer once dry. Set the pumpkin on a porch step or shelf where the bubbles catch the light. Snap your photo in soft daylight so the black stays rich and the greens pop. Because nothing is cut open, this one keeps for weeks.

Gather your supplies

Check things off as you get ready.

Work on a stable surface, keep your free hand out of the cutting path, and have an adult handle sharp tools.

Three levels of light

  • Leave intact

    The orange body and the solid black cauldron stay untouched, so the pot reads as a dark, matte silhouette.

  • Peel & shade

    If you want a glow version, an adult could scrape the skin off the three bubble circles for a soft, dim green-tinted shine.

  • Cut through

    For the brightest pop, an adult could cut a few tiny dots fully through the peeled bubbles and drop an LED puck inside.

Learn the carving basics

Before you start cutting

Do I need to carve anything for this design?

No, this is a paint-only craft with no blade required, which makes it ideal for kids and first-timers. The cauldron and bubbles are all acrylic on the skin. If you later want it to light up, an adult can add a small cutout, but the painted version stands on its own.

Why does my black paint look patchy?

Pumpkin skin is waxy and often needs two coats to look solid. Let the first coat dry fully, then add a second thin, even layer. Avoid thick blobs, since they dry unevenly and can crack.

How do I keep the bubbles looking round?

Paint a lighter green circle first, then trace a darker green ring around the outer edge once it is dry. Varying the three bubble sizes and staggering them diagonally sells the floating effect. A small round brush gives you the cleanest curves.

Your take belongs here, too.

Changed a detail? Made it simpler? Share a photo of your version and tell the community what worked.

Share your pumpkin

More pumpkins like this

You've reached the end · 8 pumpkins
The Patch Report

Fresh pumpkins, in your inbox.

The best new carvings, ideas worth stealing, and how-tos for carving season. Short, seasonal, and gone by November.

A short email during carving season. Unsubscribe anytime. See our privacy policy.