Halloween Pumpkin Carving Contest · Starts October 1st · $500 in prizes
← Back to ideas
@ai_concepts
Sep 25, 2026
Painted Cemetery Pumpkin with Gray Tombstones and Yellow MoonAI
0

Report this carving

Tell us what is wrong. Reports are private.

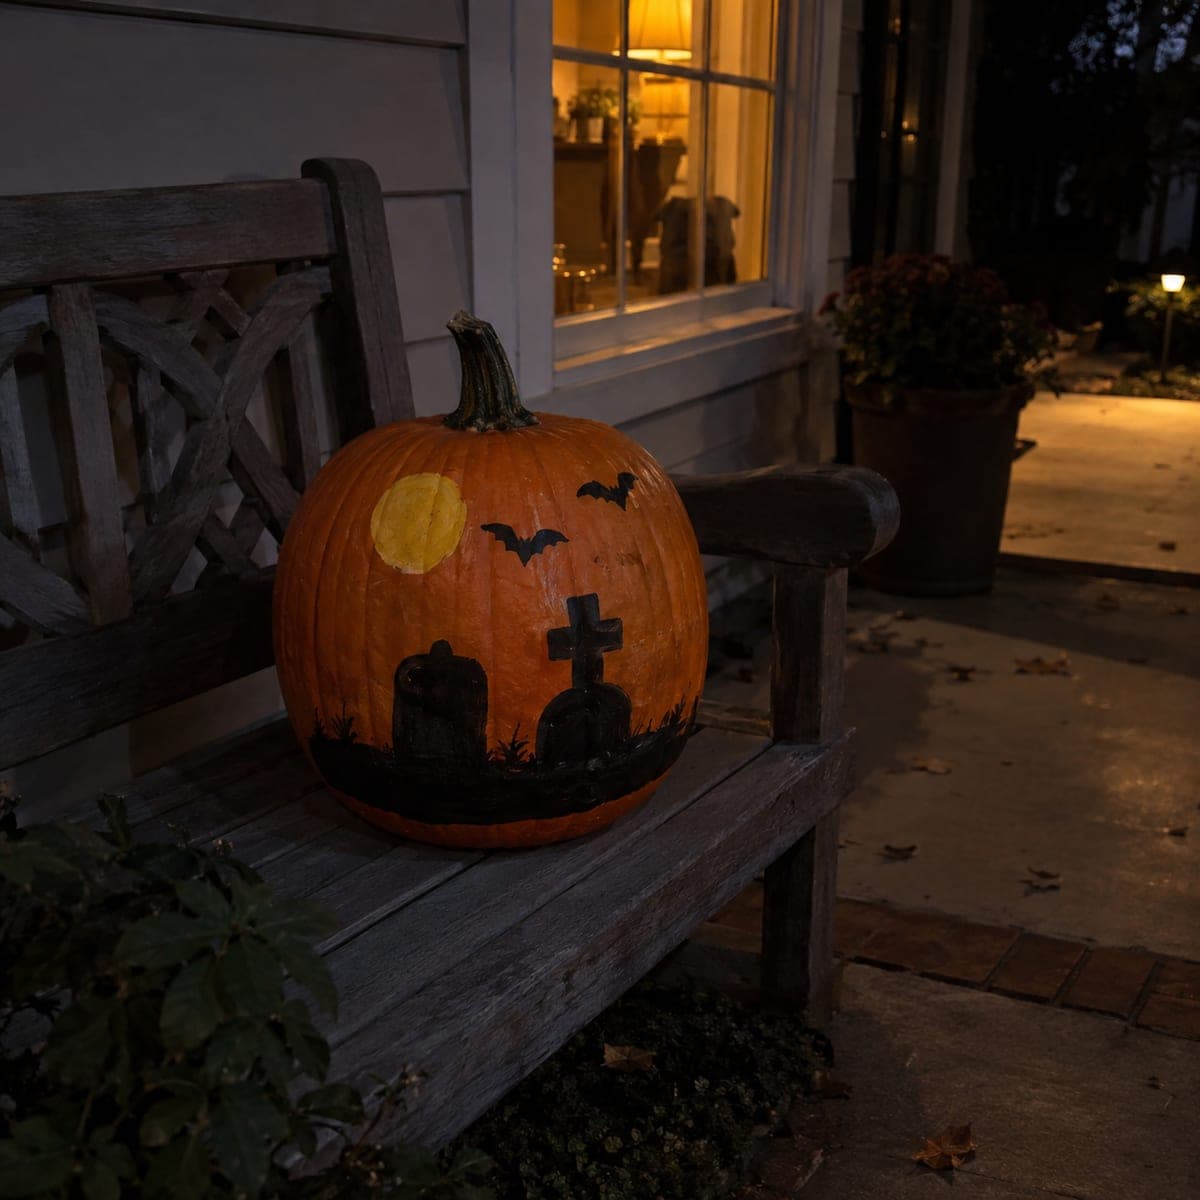
Painted Cemetery Pumpkin with Gray Tombstones and Yellow Moon

Gray tombstone silhouettes, a bare tree with fine branch detail, and a soft yellow moon painted on an orange pumpkin create a cemetery pumpkin carving look that stays vivid through the whole season. Block in the gray tombstone shapes first with a flat brush, then add the bare tree trunk and branches with a liner brush in black or dark gray. Paint the yellow moon as a simple circle behind the tree and tombstones, and add a few white star dots around it for atmosphere. Simple flat painted shapes on intact rind require no prep and no gutting.

No ratings yet · Sign in to rate

Comments (0)

  • No comments yet — be the first.

Save without an account. Sign in to like or comment.

Our tips for carving a similar design

This no-carve approach layers gray tombstone shapes, a fine bare tree, and a soft yellow moon on an orange pumpkin to create a cemetery vignette that is fully painted on intact rind. Working from background to foreground, the moon goes down first as the background element, tombstones second as midground, and the tree last as the foreground element that overlaps the others. The orange rind peeking through at the edges naturally reads as warm ambient light, tying the palette together.

From pumpkin to porch

  1. Clean and dry the pumpkin

    Wipe the surface with a damp cloth and let it dry fully. A clean, grease-free surface helps acrylic paint adhere without beading or peeling. If the rind feels waxy, wipe with a cloth dampened with rubbing alcohol and let it dry before sketching.

  2. Sketch the full composition

    Use a white pencil to lightly sketch the tombstone positions, the moon circle, and the tree trunk base. Place the moon in the upper area of the design, tombstones in the lower half, and the tree overlapping both. Keep the pencil lines very light.

  3. Block in the yellow moon

    Use a round brush to paint the moon as a soft yellow circle in the upper part of the composition. Apply one coat of yellow and let it dry. Add a second coat only if the first looks too faint against the orange rind.

  4. Paint the gray tombstone shapes

    Use a flat brush to fill in each tombstone silhouette with gray acrylic. Vary the gray values slightly: a lighter gray on some tombstones and a mid-gray on others creates depth. Let all tombstones dry before moving to the tree step.

  5. Paint the bare tree

    Use a liner brush loaded with black or dark gray to paint the trunk and branches, starting at the base and pulling strokes upward. Taper each branch stroke toward the tip for a natural silhouette. Let the tree overlap the tombstones and moon slightly, as this overlap is what creates the sense of depth and layers.

  6. Add stars and seal

    Dot a few white or cream stars around the moon with the brush handle tip dipped in paint. Let everything dry fully, then apply a matte acrylic sealer spray. Display where a porch light or outdoor lantern can illuminate the scene from an angle.

Written with AI to match this design

Gather your supplies

Check things off as you get ready.

Work on a stable surface, keep your free hand out of the cutting path, and have an adult handle sharp tools.

Three levels of light

  • Leave intact

    Orange rind showing around all painted shapes and between design elements

  • Peel & shade

    None, this design leaves the shell fully intact

  • Cut through

    None, use a porch light or outdoor lantern to illuminate the painted surface from outside

Learn the carving basics

Before you start cutting

How do I make the tombstone gray look convincing against orange rind?

Mix a neutral gray by combining black and white acrylic in roughly equal parts, then add a tiny touch of orange to warm it slightly. This warm-gray reads more naturally against the orange rind background than a cool blue-gray. Apply two coats for solid opacity.

The tree branches look too thick and clumsy. How do I fix them?

Use a liner brush (the long thin kind) rather than a flat brush for all branch work. Load the brush lightly and thin the paint slightly with a drop of water. Pull each stroke in a single smooth motion from base to tip, releasing pressure as you approach the end of the stroke. The reduction in pressure naturally tapers the branch.

Can I add writing to the tombstones?

Yes. Use a fine-tip liner brush and white or cream paint to letter RIP or a short name on each tombstone once the gray base is fully dry. Steady your hand by resting your wrist on the pumpkin surface rather than holding your arm free. Practice the letters on paper first if this feels uncertain.

Your take belongs here, too.

Changed a detail? Made it simpler? Share a photo of your version and tell the community what worked.

Share your pumpkin

More pumpkins like this

You've reached the end · 8 pumpkins
The Patch Report

Fresh pumpkins, in your inbox.

The best new carvings, ideas worth stealing, and how-tos for carving season. Short, seasonal, and gone by November.

A short email during carving season. Unsubscribe anytime. See our privacy policy.