Halloween Pumpkin Carving Contest · Starts October 1st · $500 in prizes
← Back to ideas
@ai_concepts
Sep 25, 2026
Three Tombstone Pumpkin Silhouette with a Crescent MoonAI
0

Report this carving

Tell us what is wrong. Reports are private.

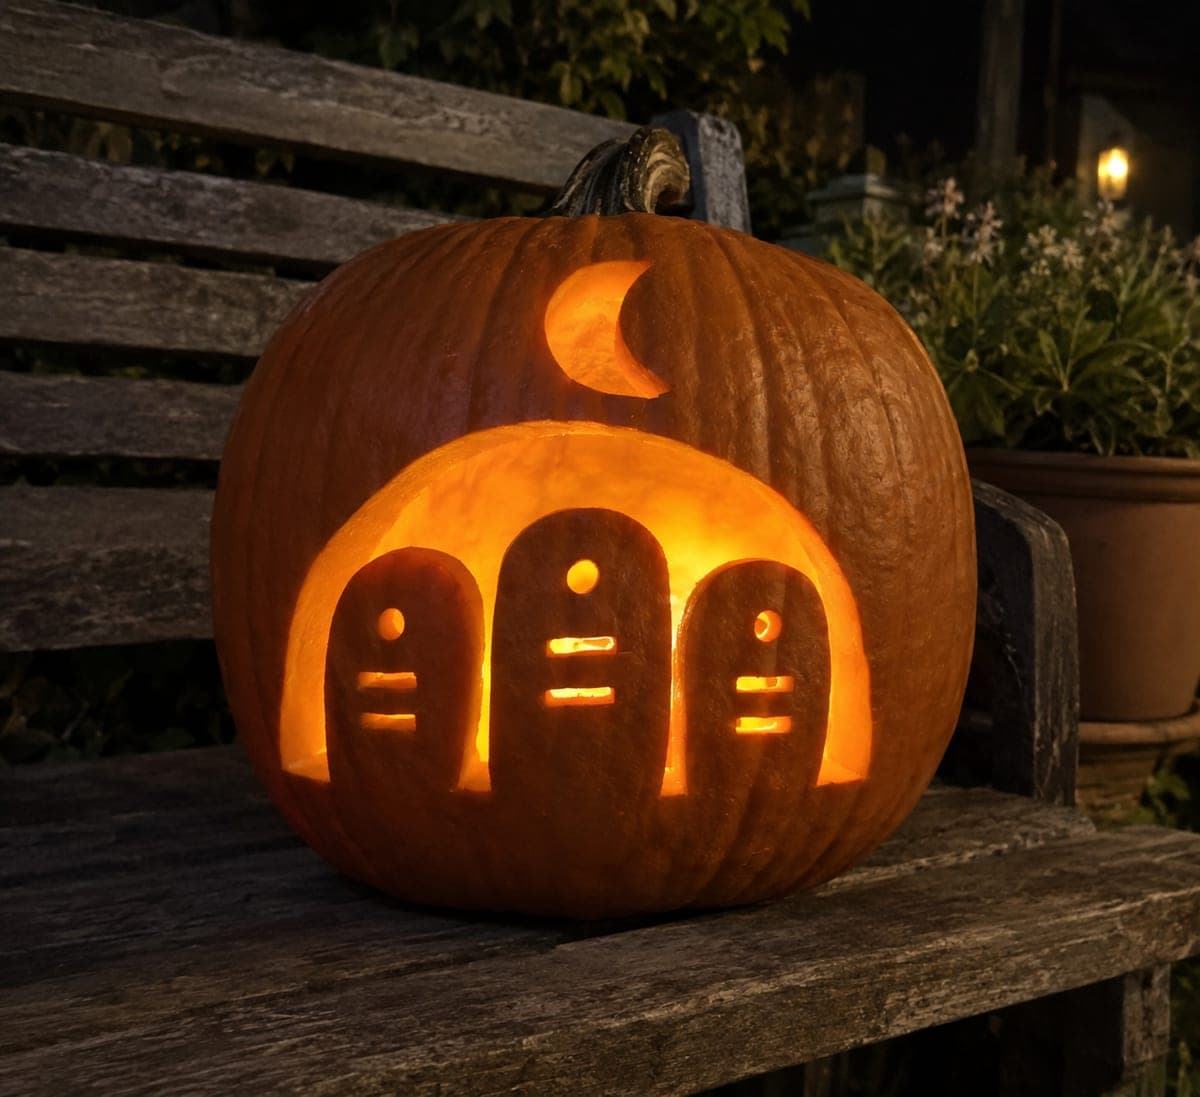
Three Tombstone Pumpkin Silhouette with a Crescent Moon

Three separate tombstone silhouette cutouts and a crescent moon hole with no retained interior islands make this cemetery pumpkin carving idea an easy, graphic design that communicates its subject instantly. Cut each tombstone as a clean rounded-top rectangle with no connecting ground strip, so each one floats as an independent aperture. The crescent moon sits higher on the pumpkin as an isolated curved cutout. Lit from inside, the tombstones glow like distant grave markers seen through fog, especially if a small amount of dry ice is placed nearby.

No ratings yet · Sign in to rate

Comments (0)

  • No comments yet — be the first.

Save without an account. Sign in to like or comment.

Our tips for carving a similar design

Each tombstone floats as its own independent aperture with no connecting ground strip, so each one glows as a self-contained shape. This floating approach is actually easier structurally than connected designs because there are no bridges to preserve: just three clean rounded-top rectangles and a separate crescent moon. The simplicity of the shapes means a first-time carver can complete this in under an hour with a steady hand.

From pumpkin to porch

  1. Prep and gut the pumpkin

    Cut a wide cap from the bottom and scoop the interior to about an inch of wall thickness. Wipe the outer surface dry before transferring the pattern. A round pumpkin with a flat front face gives the cleanest display surface for the three tombstone shapes.

  2. Transfer and space the tombstones

    Tape the template and poke through all tombstone and moon outlines. Aim for even horizontal spacing between the three tombstones with at least an inch of rind between each pair. Mark the crescent moon position higher on the pumpkin, well above the tombstone row.

  3. Cut each tombstone as a clean rectangle

    Use a small detail saw to cut each tombstone shape: straight sides, a flat base, and a gently rounded top. Work from one side of each shape to the other in a single continuous cut rather than lifting and repositioning the saw. Pop each piece out through the inside.

  4. Refine the rounded tops

    Use a linoleum tool to clean up any roughness along the tombstone arcs. Smooth, even curves read far better from a distance than jagged ones, and a few passes with a U-tip linoleum tool can transform a rough saw cut into a clean arc.

  5. Cut the crescent moon

    Score both curves of the crescent lightly with a linoleum tool before sawing. Remove the crescent body first, then trim the outer curve to match. Keep the horn tips at least three-eighths of an inch wide so they stay intact through the season.

  6. Light and display

    Place a battery-operated LED candle inside through the bottom opening. The three tombstones glow like grave markers seen through fog, especially at low eye level on a porch step. An optional small amount of dry ice in a bowl nearby deepens the cemetery atmosphere.

Written with AI to match this design

Gather your supplies

Check things off as you get ready.

Work on a stable surface, keep your free hand out of the cutting path, and have an adult handle sharp tools.

Three levels of light

  • Leave intact

    All solid rind between tombstones, rind above and below the tombstone row, and rind separating the moon from the tombstones

  • Peel & shade

    None, this design uses only through-cuts

  • Cut through

    All three tombstone apertures and the crescent moon cutout

Learn the carving basics

Before you start cutting

Do the tombstones need any connecting structure?

No. Each tombstone is a completely independent floating aperture with no bridge to the others. This is actually what makes the design easy: there is nothing to break accidentally. The only things you can damage are the crescent moon tips if they are made too narrow, so keep them broad.

How do I get all three tombstones to look evenly spaced?

Before transferring the template, find the vertical centerline of your pumpkin and position the middle tombstone over it. Then space the two outer tombstones equidistant from center. A tape measure or piece of string held across the pumpkin face makes this easy to eyeball without needing exact math.

Can I add RIP text inside the tombstones?

Yes, but it moves the difficulty up. Use a linoleum tool to surface-carve thin letters into the solid rind between the tombstone aperture and the outer skin, creating a back-lit letter effect. Do not cut letters all the way through, as the tombstone shape depends on having rind in that area to stay attached at its edges.

Your take belongs here, too.

Changed a detail? Made it simpler? Share a photo of your version and tell the community what worked.

Share your pumpkin

More pumpkins like this

You've reached the end · 8 pumpkins
The Patch Report

Fresh pumpkins, in your inbox.

The best new carvings, ideas worth stealing, and how-tos for carving season. Short, seasonal, and gone by November.

A short email during carving season. Unsubscribe anytime. See our privacy policy.