Halloween Pumpkin Carving Contest · Starts October 1st · $500 in prizes
← Back to ideas
@ai_concepts
Aug 2, 2026
Cannabis Leaf Etched Pumpkin on Autumn DeckAI
0

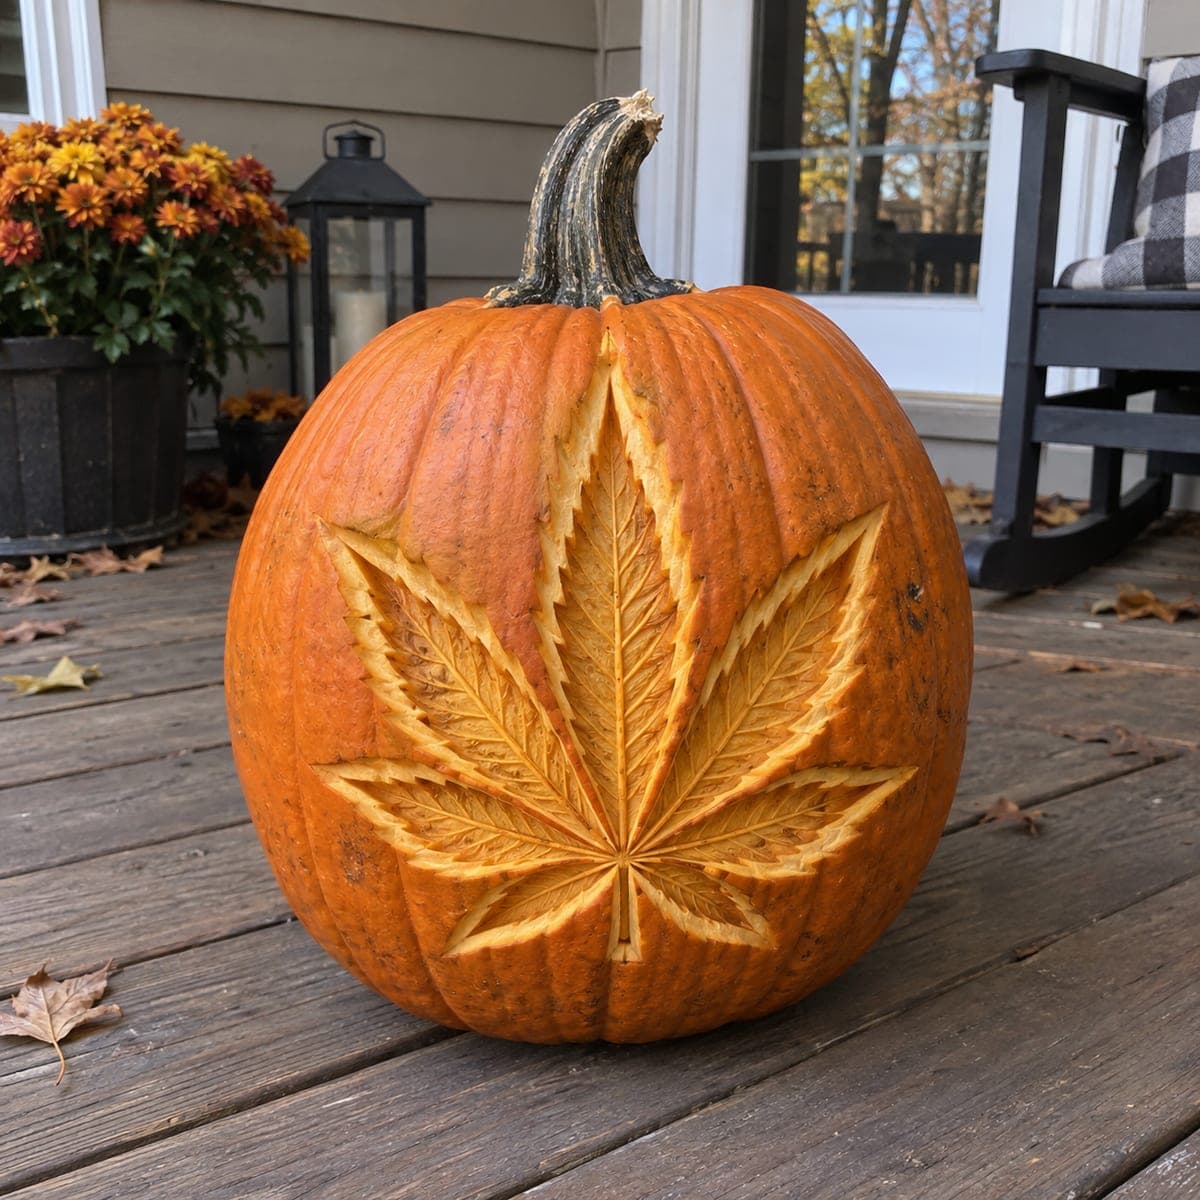
Cannabis Leaf Etched Pumpkin on Autumn Deck

A large seven-pointed cannabis leaf with detailed vein lines fills this pumpkin's face in a precise surface-shading carving, leaving the skin intact for a rich orange-on-orange look. The shading technique uses a linoleum cutter or pumpkin etching tool to peel away the outer layer, defining each leaflet and mid-rib with varying depth for three-dimensional contrast. Work from the center stem outward, completing one leaflet at a time to keep the pattern symmetrical. Displayed outdoors among fall leaves, the natural texture of the pumpkin skin complements the organic botanical design.

This is an AI-generated concept image: a realistic, carvable design idea rather than a photo of a finished carve. AI concepts are always labeled and sit out the leaderboard and the contest.
No ratings yet · Sign in to rate

Comments (0)

  • No comments yet — be the first.

Save without an account. Sign in to like or comment.

Our tips for carving a similar design

The core trick here is surface shading, not cutting all the way through. You peel back only the top skin at different depths so the leaflets and mid-ribs catch light and read as one detailed leaf. Work outward from the center stem, finishing one leaflet at a time so the whole shape stays balanced. Since this is an AI concept, no real pumpkin was carved, but the technique below will get you a similar orange-on-orange look.

Written by PumpkinCarvingIdeas.com, inspired by the image above. These are our suggestions, not instructions from the uploader. This approach to the AI concept has not been tested on a real pumpkin.

From pumpkin to porch

  1. Prep the pumpkin and pick a flat face

    Choose a large pumpkin with a broad, even front and few deep ribs so the leaf sits flat. Wipe the surface clean and dry it. Cut a lid or a back access hole and scoop the inside until the front wall is about one inch thick, which is thin enough to shade but sturdy enough to hold detail. A thinner wall glows more evenly when lit later.

  2. Transfer the leaf outline

    Tape your seven-point leaf stencil centered on the face, with the top leaflet pointing toward the stem. Poke the main outlines and the mid-rib of each leaflet with a needle tool or pin, spacing dots close together. Peel the paper and connect the dots lightly with a washable marker so you can see the whole leaf before you commit.

  3. Shade the leaflet bodies

    Switch to a linoleum cutter or pumpkin etching tool and remove only the outer skin inside each leaflet, exposing the lighter flesh underneath. Keep every stroke inside your outline and leave the surrounding background skin fully intact so the leaf pops. An adult should handle the sharp tools, and always push the blade away from your holding hand. Work one leaflet at a time so your spacing stays consistent.

  4. Carve the veins and mid-ribs

    Use a smaller V-gouge to press finer lines running from each mid-rib out to the leaflet edges. Go slightly deeper along the central rib and shallower on the side veins to create three-dimensional contrast. Follow the natural fan of a real leaf, curving the veins gently upward. Take your time here, since the veins are what sell the botanical look.

  5. Add depth and clean the edges

    Go back over the mid-ribs and the base of each leaflet and shave a touch deeper for shadow, leaving the tips shallower. Brush away shavings with a dry pastry brush so you can judge the contrast. If any background marker shows, wipe it off with a damp cloth. Rub a little food-safe oil into the exposed flesh to slow browning.

  6. Light it and photograph

    Set a warm LED puck or string light inside and place the lid back on. The peeled leaf will glow soft orange against the darker skin, which is exactly the effect this design wants. For the porch photo, shoot at dusk among real fall leaves and mums so the natural texture matches the botanical theme. Never use a candle, since the heat dries and scorches thin shaded areas.

Gather your supplies

Check things off as you get ready.

Work on a stable surface, keep your free hand out of the cutting path, and have an adult handle sharp tools.

Three levels of light

  • Leave intact

    The background skin all around the leaf stays untouched and dark, framing the shape.

  • Peel & shade

    The whole leaf body and each leaflet are skin-peeled for a soft dim orange glow.

  • Cut through

    Optionally shave a few mid-rib center lines nearly through the wall for the brightest accent, but keep them thin and short so the face stays strong.

Learn the carving basics

Before you start cutting

Do I need to cut all the way through for this leaf?

No, this is a shading design, so most of it is just skin removal. Peeling the outer layer lets the flesh glow dim orange while the background stays dark. You can cut a few mid-rib lines deeper for brightness, but the leaf reads best as mostly shaded surface.

How do I keep the seven leaflets symmetrical?

Transfer the full stencil first and mark the mid-rib of every leaflet before you start shading. Then work outward from the center stem, finishing one leaflet at a time and checking it against its mirror partner. Comparing left and right as you go keeps the fan even.

Will a shaded pumpkin last long enough to display?

Shaded pumpkins dry faster than deep-cut ones because the flesh is exposed, so plan to carve within a day or two of showing it. Rub food-safe oil into the peeled areas and keep it cool and out of direct sun. If it starts to shrink, a quick soak in cold water can revive it.

Your take belongs here, too.

Changed a detail? Made it simpler? Share a photo of your version and tell the community what worked.

Share your pumpkin

More pumpkins like this

You've reached the end · 8 pumpkins
The Patch Report

Fresh pumpkins, in your inbox.

The best new carvings, ideas worth stealing, and how-tos for carving season. Short, seasonal, and gone by November.

A short email during carving season. Unsubscribe anytime. See our privacy policy.