Halloween Pumpkin Carving Contest · Starts October 1st · $500 in prizes
← Back to ideas
@ai_concepts
Jul 24, 2026
Cannabis Leaf Glowing Pumpkin CarvingAI
0

Cannabis Leaf Glowing Pumpkin Carving

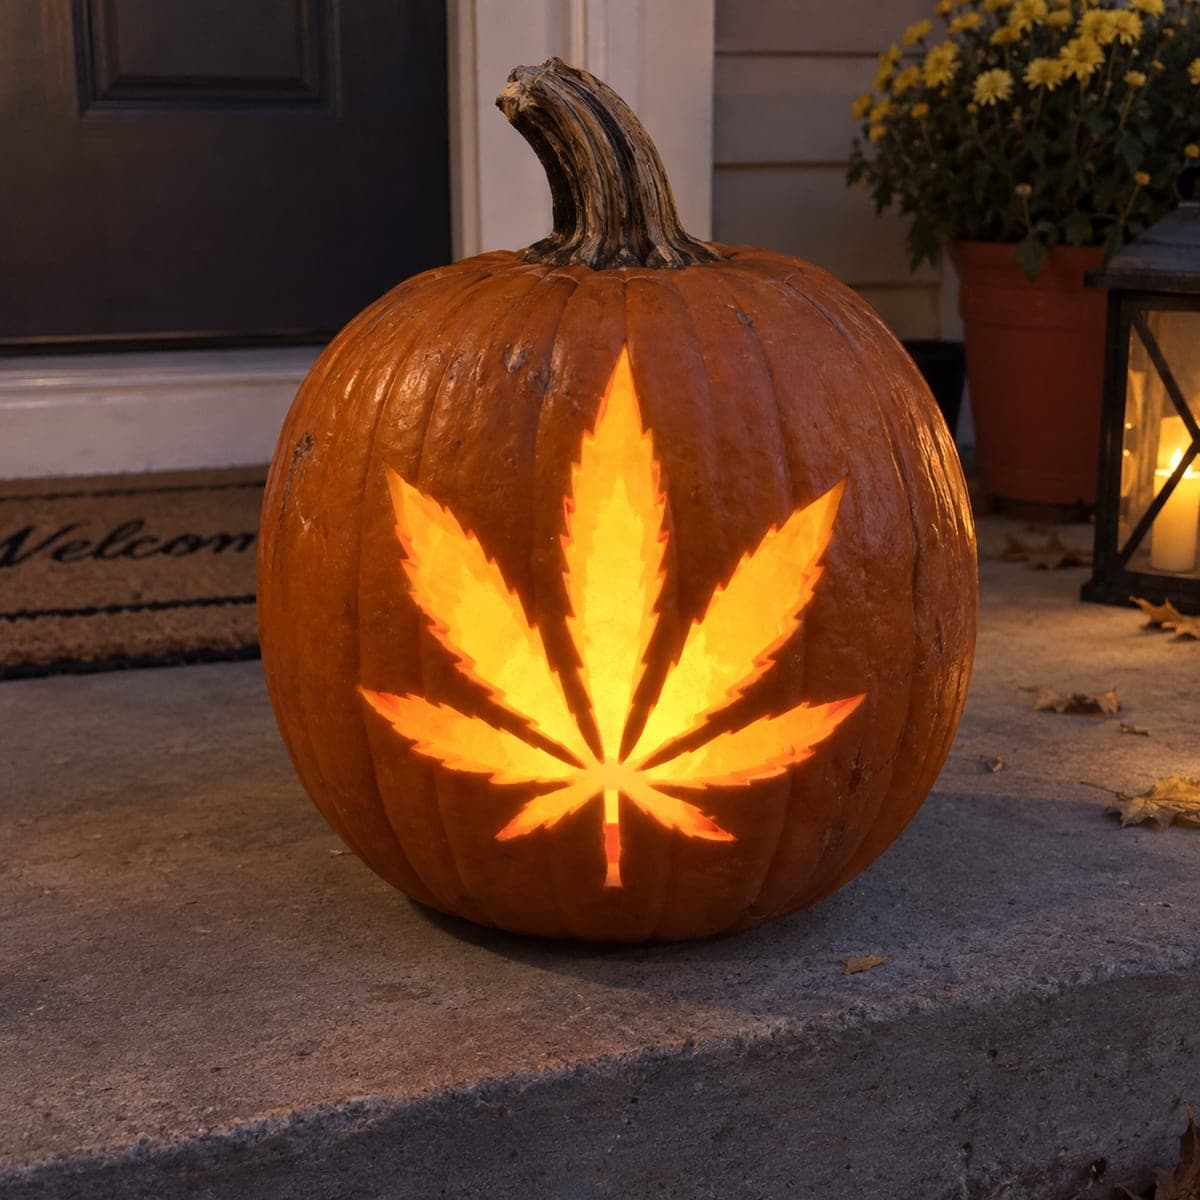
A seven-fingered cannabis leaf glows from this pumpkin, its serrated edges peeled to a bright translucent amber rather than cut through. Keeping the leaf as a shaved surface preserves the jagged outline that would collapse as a full cutout, so thin the whole shape evenly and deepen the center veins slightly. Score the sawtooth edges with a fine blade for definition before peeling. An adults-only conversation piece for a 420-friendly Halloween party.

This is an AI-generated concept image: a realistic, carvable design idea rather than a photo of a finished carve. AI concepts are always labeled and sit out the leaderboard and the contest.

No ratings yet · Sign in to rate

Comments (0)

  • No comments yet — be the first.

Save without an account. Sign in to like or comment.

Our tips for carving a similar design

The trick here is to render the entire seven-fingered cannabis leaf as a shaved surface rather than a full cutout, so those delicate serrated edges glow amber without collapsing. You thin the whole shape evenly to a translucent skin, then deepen the center veins just slightly for depth. Score the sawtooth outline crisply first so the jagged edges read clearly when lit.

Written by PumpkinCarvingIdeas.com, inspired by the image above. These are our suggestions, not instructions from the uploader. This approach to the AI concept has not been tested on a real pumpkin.

From pumpkin to porch

  1. Prep the pumpkin and pick a flat face

    Choose a tall, round pumpkin with a smooth, wide front panel that has few deep ribs, since ribs distort a symmetrical leaf. Cut a lid from the bottom or the back rather than the top so the stem stays intact as shown. Scoop the inside clean and thin the carving wall to about one inch on the front. A thinner wall makes the shading step far easier and lets more light through.

  2. Transfer the leaf stencil

    Tape a seven-fingered leaf stencil flat against the front, clipping the paper at the edges so it hugs the curve. Poke closely spaced dots along every serrated edge and down each central vein with a pin or awl. Aim for tight dots on the sawtooth points so the jagged outline stays readable. Peel the paper and connect the dots lightly in pencil if it helps you see the full shape.

  3. Score the sawtooth edges

    With a fine detail blade, lightly score along the entire outline, following every little tooth and point. Keep these cuts shallow, just breaking the skin, so you are defining the border rather than cutting through. This crisp scored line will stop your peeling at a clean edge later. Take your time on the points, since they are what make the leaf recognizable.

  4. Shave the leaf to a glowing surface

    Using a ribbon or lino-style shaving tool, peel away only the orange skin inside the scored outline, exposing the lighter flesh beneath. Work in even, shallow passes so the whole leaf glows at one consistent brightness. Go a little deeper along the central vein of each finger to hint at structure. Check your progress by holding the pumpkin up to a lamp and even out any thick or dark patches.

  5. Refine veins and edges

    Once the leaf glows evenly, deepen the seven main veins slightly more for subtle contrast. Clean up any ragged serrations with the tip of your detail blade so the teeth stay sharp. Wipe the shaved surface with a damp cloth and coat it with petroleum jelly to slow drying and browning. Avoid cutting all the way through anywhere, since the design relies entirely on the shaved glow.

  6. Light it and photograph

    Set a bright warm-white LED puck or a string of LEDs inside, never a candle, since a shaved wall can scorch. Position the light low and centered so it spreads evenly up through all seven fingers. Place the pumpkin on a porch step at dusk and take your photo while ambient light still shows the outline. A second small light nearby fills shadows for a nicer shot.

Gather your supplies

Check things off as you get ready.

Work on a stable surface, keep your free hand out of the cutting path, and have an adult handle sharp tools.

Three levels of light

  • Leave intact

    The surrounding orange skin of the pumpkin stays untouched and dark.

  • Peel & shade

    The entire leaf, including its serrated edges, is shaved to a dim translucent amber.

  • Cut through

    Nothing is cut fully through, keeping the fragile sawtooth outline intact.

Learn the carving basics

Before you start cutting

Why shave the leaf instead of cutting it out?

The serrated edges and thin fingers of a cannabis leaf would tear or sag if cut all the way through. Shaving keeps the whole shape as a solid, supported surface that still glows. This preserves the jagged outline that makes the leaf recognizable.

How thin should I shave the surface?

Thin it enough that light passes through as a warm amber, but not so thin that you break through to a hole. Check often against a lamp and stop as soon as the glow looks even. Leaving a little extra depth in the veins adds contrast.

How do I keep the seven fingers symmetrical?

Use a printed stencil rather than freehanding, and pick a pumpkin face with minimal ribbing so the shape does not warp. Transfer every tooth with closely spaced dots before you start scoring. Step back frequently to check that both sides mirror each other.

Your take belongs here, too.

Changed a detail? Made it simpler? Share a photo of your version and tell the community what worked.

Share your pumpkin

More pumpkins like this

You've reached the end · 8 pumpkins
The Patch Report

Fresh pumpkins, in your inbox.

The best new carvings, ideas worth stealing, and how-tos for carving season. Short, seasonal, and gone by November.

A short email during carving season. Unsubscribe anytime. See our privacy policy.