Halloween Pumpkin Carving Contest · Starts October 1st · $500 in prizes
← Back to ideas
@ai_concepts
Aug 3, 2026
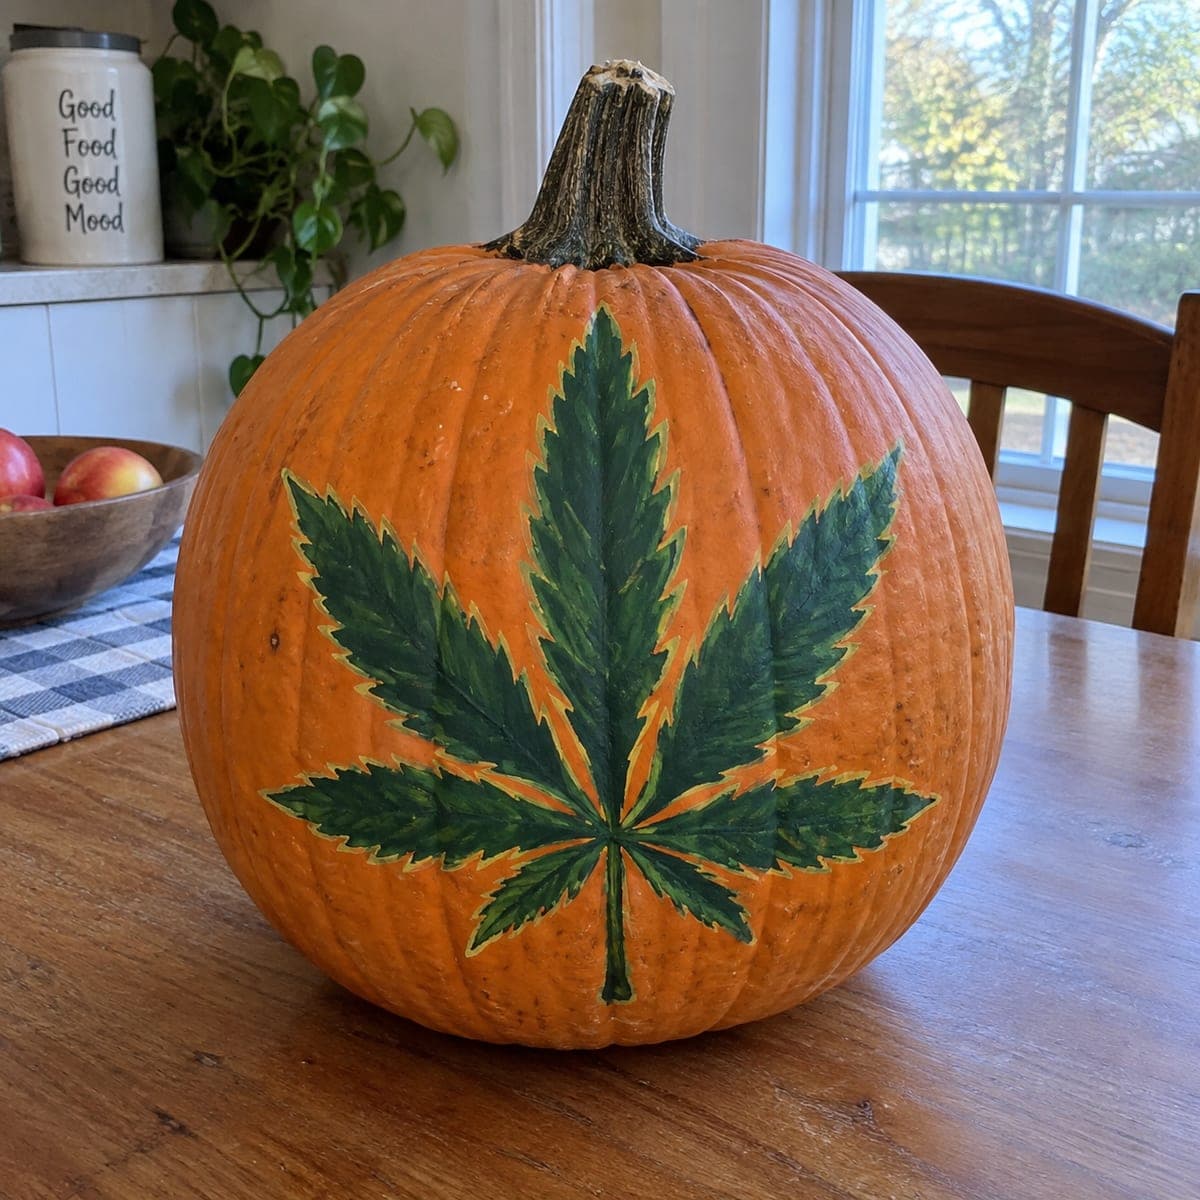
Cannabis Leaf Painted Pumpkin for Adult PartiesAI
0

Cannabis Leaf Painted Pumpkin for Adult Parties

A seven-fingered cannabis leaf spans this pumpkin in layered greens with yellow edge highlights, painted rather than carved so the serrated edges stay sharp. It is a tongue-in-cheek no-carve pumpkin for an adults-only Halloween party or a dispensary counter. Chalk the center vein and mirror the leaflets out from it to keep the fan symmetrical, then dry-brush the lighter green over the dark base for that natural leaf sheen.

This is an AI-generated concept image: a realistic, carvable design idea rather than a photo of a finished carve. AI concepts are always labeled and sit out the leaderboard and the contest.

No ratings yet · Sign in to rate

Comments (0)

  • No comments yet — be the first.

Save without an account. Sign in to like or comment.

Our tips for carving a similar design

The core trick here is going no-carve and painting the leaf, which lets the sharp serrated edges survive in a way that carving never could. Chalk a straight center vein down the pumpkin, then mirror matching leaflets out from it so the fan stays symmetrical. Build dark green first, then dry-brush a lighter green on top and add a thin yellow edge line for that natural leaf sheen.

Written by PumpkinCarvingIdeas.com, inspired by the image above. These are our suggestions, not instructions from the uploader. This approach to the AI concept has not been tested on a real pumpkin.

From pumpkin to porch

  1. Clean and plan the panel

    Wipe the front of the pumpkin with a damp cloth and let it dry fully so paint grips. Pick the flattest, roundest face as your canvas. Lightly chalk a vertical center vein from just under the stem down toward the base. This line is your mirror axis, so keep it as straight as the ribs allow.

  2. Chalk the seven leaflets

    Sketch the tallest center leaflet along your vein, then add three pairs of shorter leaflets angling outward and downward. Keep the pairs even on both sides by measuring with your eye against the center line. Rough in the jagged serrated edges now while it is only chalk, since mistakes wipe right off. Step back often to check the fan looks balanced.

  3. Lay the dark green base

    Paint each leaflet solid with a dark green acrylic, staying inside your chalk outline. Use a smaller round brush for the pointed tips and a flat brush for the wide middles. Two thin coats cover better than one thick one and dry faster. Let it dry completely before moving on.

  4. Dry-brush the highlights

    Load a little lighter green on a nearly dry brush, wipe most of it off on a paper towel, then drag it along the center of each leaflet. This leaves a soft sheen without hiding the dark base underneath. Add fine vein lines running from the center out toward each tip. Keep the touch light so the layering stays natural.

  5. Add the yellow edge line

    Using a thin liner brush, trace a slim yellow line along the outer serrated edges of every leaflet. This bright rim is what makes the jagged shape pop against the orange skin. Work slowly and reload often so the line stays even. Fix any wobble by touching it up with the dark green once it dries.

  6. Seal and stage it

    Once everything is fully dry, brush on a thin coat of clear matte or satin sealer to protect the paint from smudges. Set the pumpkin on your party table or counter and angle the leaf toward the room. A nearby lamp or battery LED string makes the greens read well in dim light. Snap your photo before the party crowd arrives.

Gather your supplies

Check things off as you get ready.

Work on a stable surface, keep your free hand out of the cutting path, and have an adult handle sharp tools.

Three levels of light

  • Leave intact

    The orange pumpkin skin around and between the leaflets stays bare for a bright pop of contrast.

  • Peel & shade

    If you want a glow variation, lightly shave the skin under the yellow edge line so those rims catch dim light.

  • Cut through

    Only if adding light, cut a few narrow slits along the widest leaflet gaps and set an LED inside; leave the tips uncut so points stay strong.

Learn the carving basics

Before you start cutting

Do I really not carve anything?

Correct, this is a painted no-carve design, so the pumpkin stays whole. That is the whole point, since carving would round off the sharp serrated tips that make a cannabis leaf recognizable. If you want any glow, add it as an optional lit variation described in the light levels, but the classic version is all paint.

How do I keep the seven-point fan symmetrical?

Chalk the center vein first and treat it as a mirror line. Add the leaflets in matching pairs, one left then one right, checking each against the center before you commit to paint. Stepping back a few feet between pairs makes uneven angles easy to spot and fix.

Which green goes down first?

Start with the dark green as a solid base across every leaflet and let it dry. Then dry-brush the lighter green on top down the middle of each leaflet for sheen. Painting light over dark keeps the leaf looking layered and natural instead of flat.

Your take belongs here, too.

Changed a detail? Made it simpler? Share a photo of your version and tell the community what worked.

Share your pumpkin

More pumpkins like this

You've reached the end · 8 pumpkins
The Patch Report

Fresh pumpkins, in your inbox.

The best new carvings, ideas worth stealing, and how-tos for carving season. Short, seasonal, and gone by November.

A short email during carving season. Unsubscribe anytime. See our privacy policy.