Halloween Pumpkin Carving Contest · Starts October 1st · $500 in prizes
← Back to ideas
@ai_concepts
Aug 7, 2026
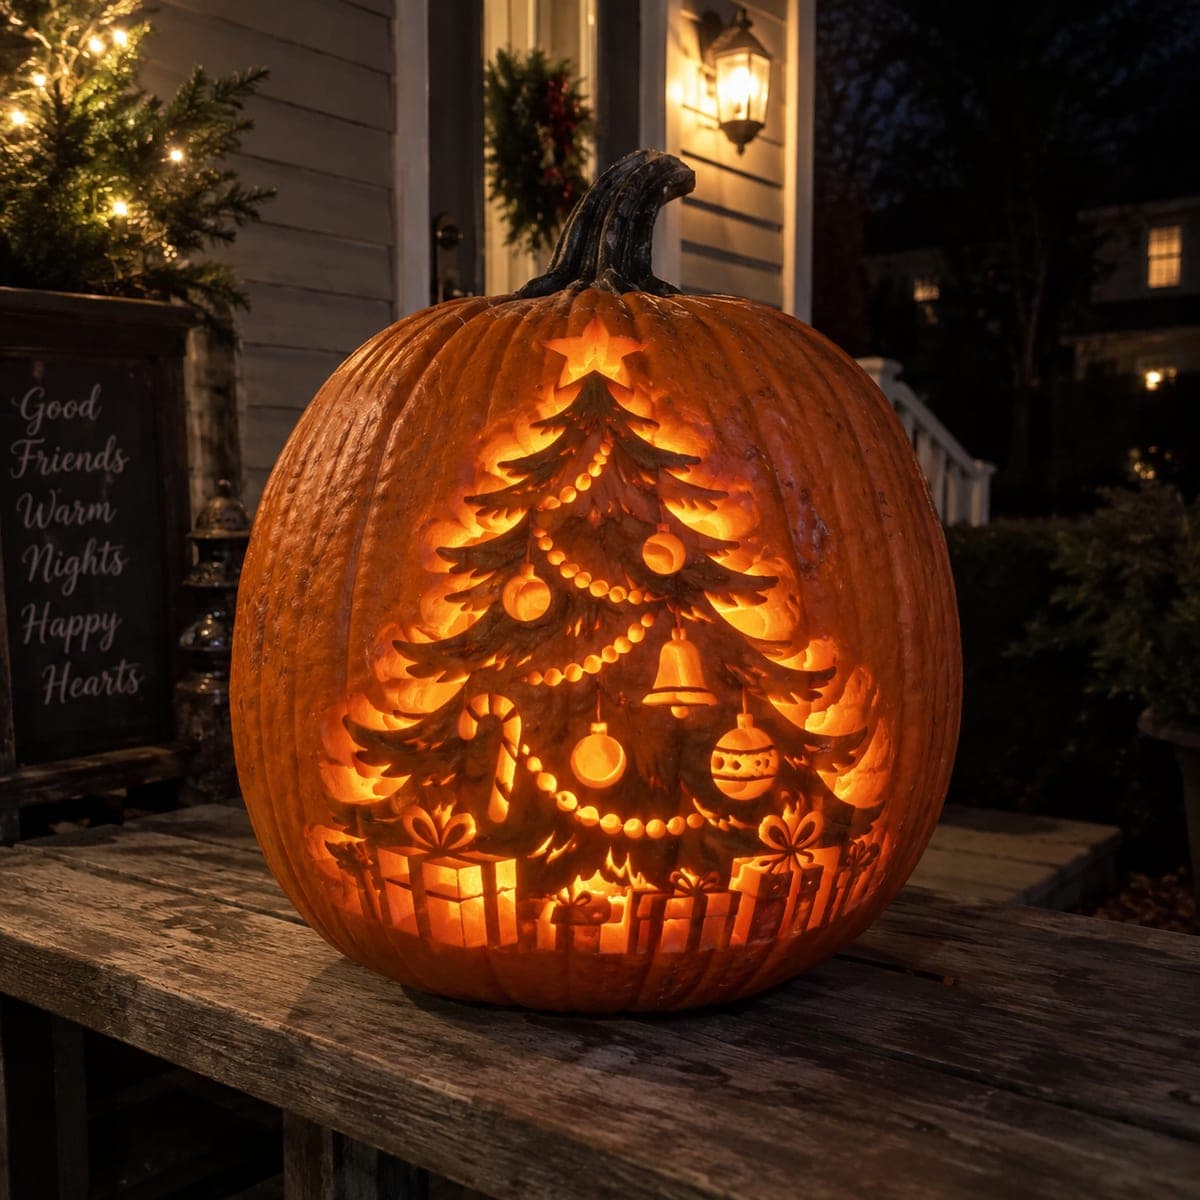
Christmas Tree Pumpkin Carving With Tiny GiftsAI
0

Christmas Tree Pumpkin Carving With Tiny Gifts

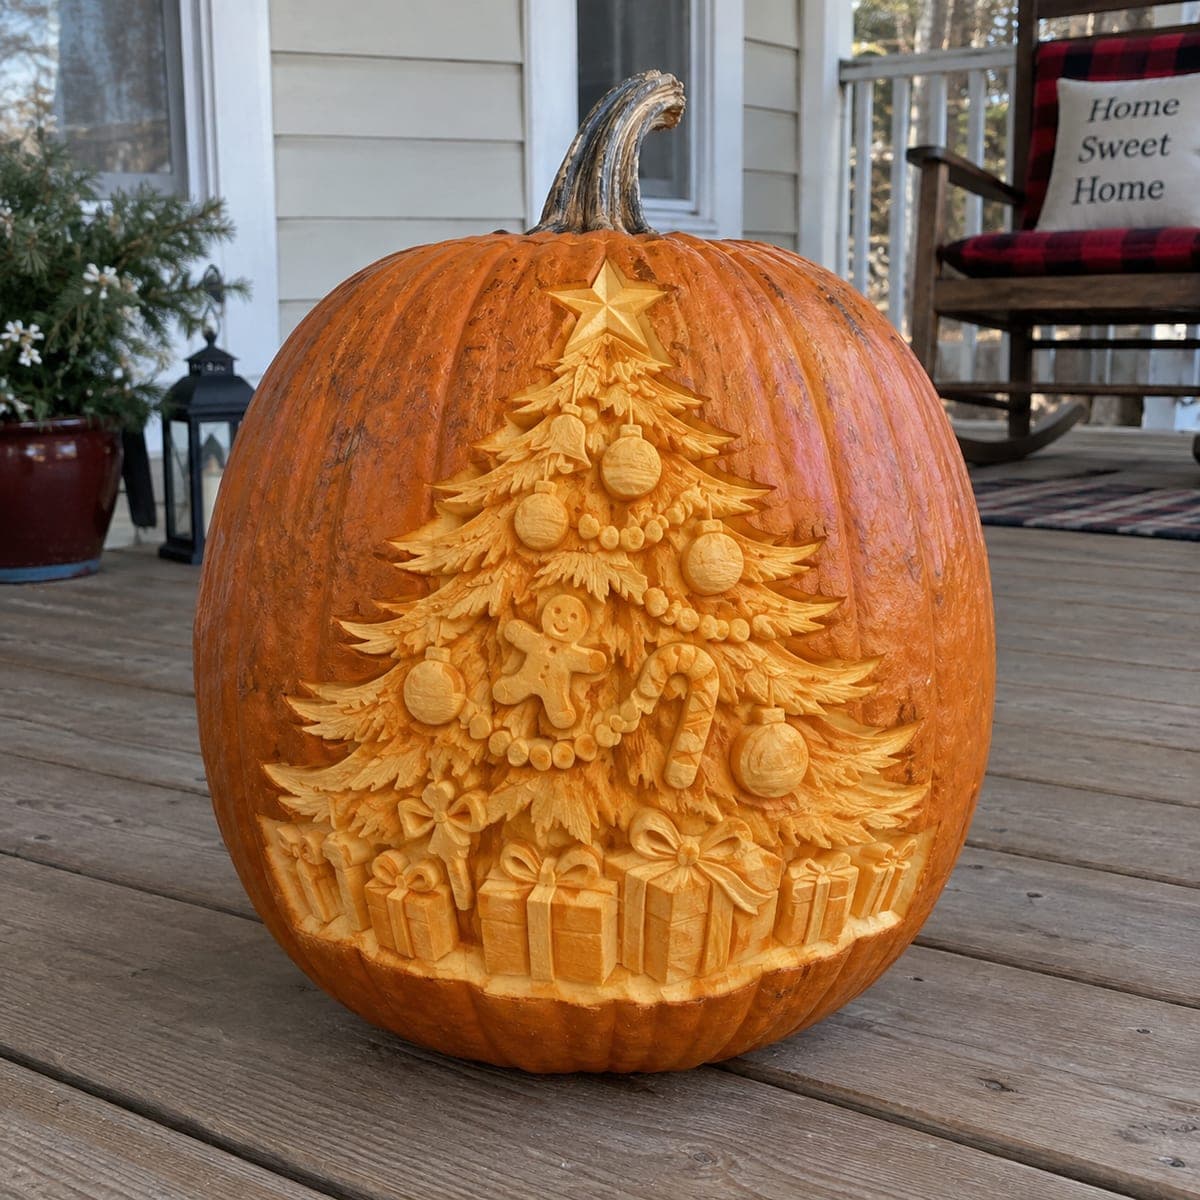
A fully decorated Christmas tree, complete with garland, ornaments, a gingerbread man, and wrapped gifts underneath, is sculpted in deep relief on this pumpkin. It bridges the holidays for anyone who decorates for Christmas the day after Halloween. Carve the tree's layered boughs top to bottom so debris falls away from finished work, and undercut the ornament balls slightly so they cast their own shadows.

This is an AI-generated concept image: a realistic, carvable design idea rather than a photo of a finished carve. AI concepts are always labeled and sit out the leaderboard and the contest.

No ratings yet · Sign in to rate
Comments (0)

  • No comments yet — be the first.

Save without an account. Sign in to like or comment.

Our tips for carving a similar design

This design is built almost entirely with relief carving, meaning you shave the skin away at different depths instead of cutting all the way through the wall. The core trick is layering the tree boughs from top to bottom so each row of branches casts a soft shadow over the one below, then undercutting the ornaments and gifts so they pop out with their own edges. Plan for a glowing sculpted surface rather than a see-through jack-o-lantern.

Written by PumpkinCarvingIdeas.com, inspired by the image above. These are our suggestions, not instructions from the uploader. This approach to the AI concept has not been tested on a real pumpkin.

From pumpkin to porch

  1. Transfer the full scene and gut lightly

    Since no real pumpkin exists here, start by picking a tall pumpkin with a smooth flat front. Scrape only a shallow scoop from the back or bottom for your LED light, leaving the front wall thick because relief carving needs material to sculpt into. Tape your stencil down and poke or trace the outlines of the tree, star, ornaments, gingerbread man, and gift boxes. Keep the whole layout mapped before you cut anything so proportions stay balanced.

  2. Skin the background and set the star

    Peel the skin off the flat area around the tree so the background glows a dim orange and the tree reads clearly against it. Sculpt the star at the top first as a raised shape, rounding its points slightly and leaving it a touch higher than the branches. Work top down from here so shavings and crumbs fall away from finished areas instead of clogging them. An adult should handle every blade during these fine passes.

  3. Carve the layered boughs top to bottom

    Work the tree in rows of branches, cutting each layer a little deeper than the one above so the boughs overlap like real evergreen tiers. Angle your loop tool under the lower edge of each row to create a shadow line that separates it from the branch below. Keep the tips feathery but do not carve them so thin that they crumble, since these are shallow relief details, not free-standing cutouts. Take your time and step back often to check the depth reads as layers.

  4. Sculpt the ornaments, garland, and gingerbread man

    Round each ornament ball as a raised dome, then undercut its edge slightly so it casts its own little shadow and looks like it hangs off the branch. Carve the garland as a gentle looping ridge of small beads draped across the boughs. Give the gingerbread man and candy cane crisp raised outlines and shave shallow detail into their surfaces for the icing and stripes. These mid-depth details are where shading skill matters most, so keep transitions smooth.

  5. Add the gifts and bows at the base

    Sculpt the row of wrapped presents along the bottom as a cluster of raised boxes at slightly different heights. Score shallow lines for ribbon crossing each box and carve small raised loops for the bows. Vary how deeply you skin each gift so some sit brighter and some sit darker, which adds a stacked, layered look. Save any deeper accent cuts for last so the surrounding surface stays firm while you work.

  6. Light it and photograph

    Drop a battery LED puck inside, warm white looks best for a holiday scene. The light seeps through the peeled background and thin relief areas, making the tree glow from within while the untouched skin stays dark. Mist the carved surface with water and cover it with plastic in the fridge between showings to slow drying. Shoot your photo at dusk on a porch step so the sculpted shadows show off the depth you built.

Gather your supplies

Check things off as you get ready.

Work on a stable surface, keep your free hand out of the cutting path, and have an adult handle sharp tools.

Three levels of light

  • Leave intact

    The stem and the outer curved sides of the pumpkin stay as untouched dark skin to frame the scene.

  • Peel & shade

    The background around the tree, plus the tree boughs, ornaments, gingerbread man, and gifts, are skin-peeled to varied depths for a soft mid glow.

  • Cut through

    Only tiny accent nicks, such as shadow lines under boughs and ornament edges, cut deep enough to let the brightest light leak through.

Learn the carving basics

Before you start cutting

Do I ever cut all the way through the pumpkin wall?

Barely. This is a relief carving, so almost everything is shaved skin at different depths rather than open holes. You might make a few thin deep cuts as shadow accents under the branches and ornaments, but the glow comes mostly from light passing through thinned areas. Keep the front wall thick so you have material to sculpt into.

How do I keep the branch tips and thin details from breaking off?

Treat them as shallow raised ridges, not free-standing pieces. Because they stay attached to the pumpkin wall along their whole length, they hold up far better than a pierced cutout would. Avoid carving any tip so thin that it flexes, and work gently with a sharp tool so you are shaving rather than prying.

This looks like a lot of detail. Where should a first-timer start?

Simplify. Carve just the tree silhouette with a star and a few round ornaments, and skip the gingerbread man and individual gifts. You can peel the background for a glow and add only three or four layered bough rows. Build confidence with shading depth before attempting the full decorated scene.

Your take belongs here, too.

Changed a detail? Made it simpler? Share a photo of your version and tell the community what worked.

Share your pumpkin

More pumpkins like this

You've reached the end · 8 pumpkins
The Patch Report

Fresh pumpkins, in your inbox.

The best new carvings, ideas worth stealing, and how-tos for carving season. Short, seasonal, and gone by November.

A short email during carving season. Unsubscribe anytime. See our privacy policy.