Halloween Pumpkin Carving Contest · Starts October 1st · $500 in prizes
← Back to ideas
@ai_concepts
Jul 21, 2026
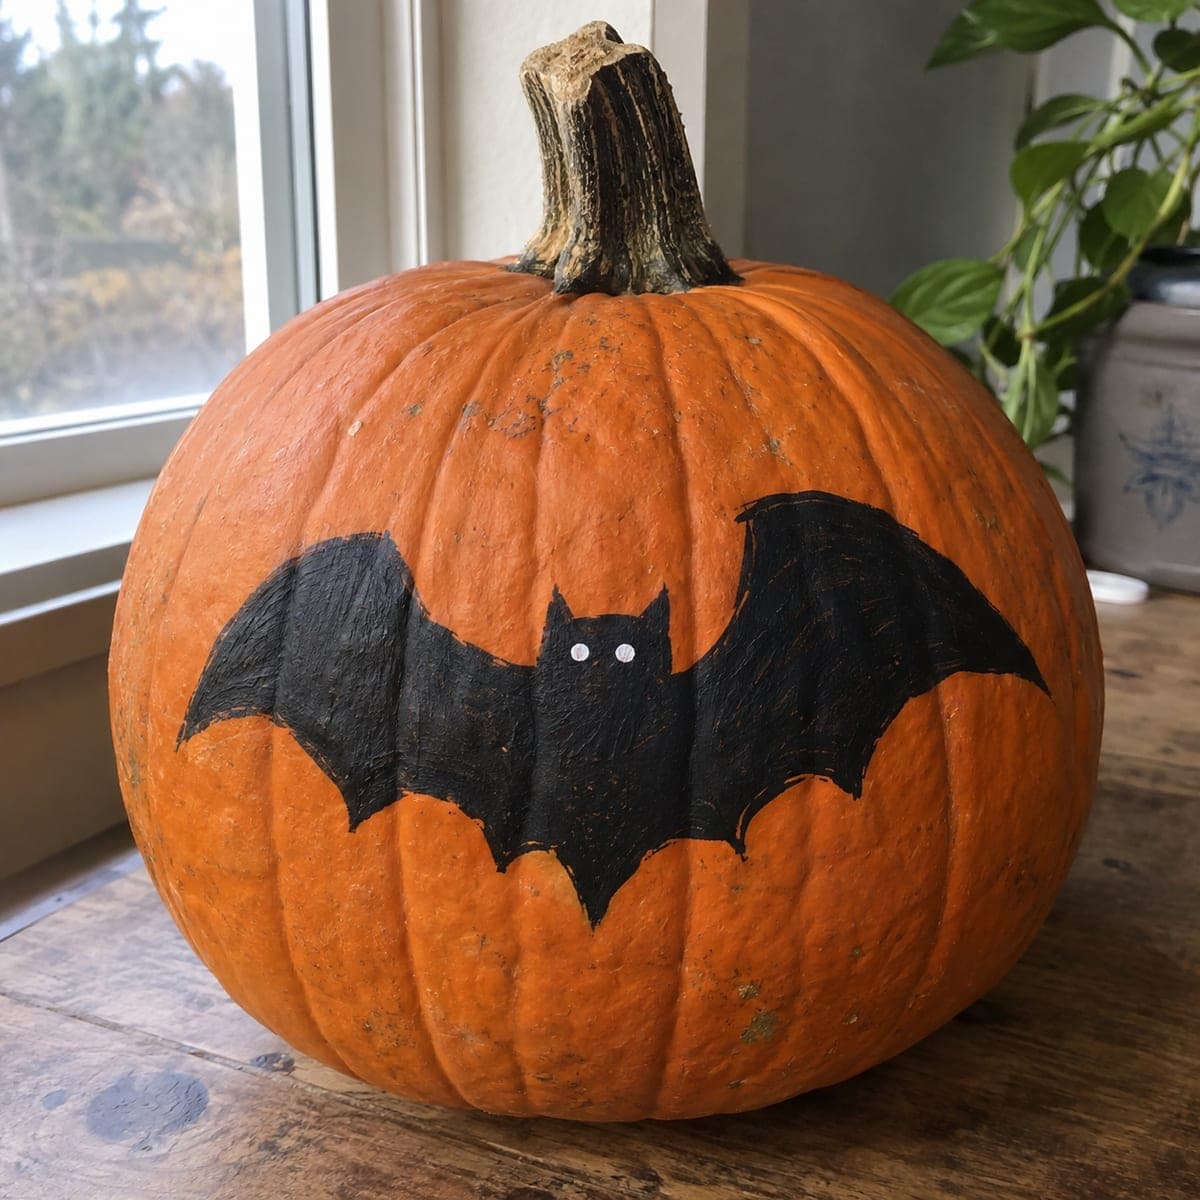
Classic Black Bat Painted No-Carve PumpkinAI
0

Classic Black Bat Painted No-Carve Pumpkin

A wide-winged black bat with little white eyes stretches across this no-carve pumpkin, a design you can finish in one sitting with a single bottle of paint. Chalk the bat outline on first, keeping the wings symmetrical by measuring from the center rib of the pumpkin. Two coats of black acrylic cover the ridges cleanly, and a dab of white for each eye keeps the bat friendly instead of frightening.

This is an AI-generated concept image: a realistic, carvable design idea rather than a photo of a finished carve. AI concepts are always labeled and sit out the leaderboard and the contest.

No ratings yet · Sign in to rate
Comments (0)

  • No comments yet — be the first.

Save without an account. Sign in to like or comment.

Our tips for carving a similar design

The whole trick here is symmetry from a center line, letting the pumpkin's natural ribs guide the two wings. Chalk the bat first, then fill it with solid black acrylic so the shape reads clearly from across the room. Two tiny white eyes at the end keep it cute rather than spooky.

Written by PumpkinCarvingIdeas.com, inspired by the image above. These are our suggestions, not instructions from the uploader. This approach to the AI concept has not been tested on a real pumpkin.

From pumpkin to porch

  1. Wash and dry the pumpkin

    Wipe the whole pumpkin with a damp cloth and let it dry fully so paint grips the skin. Pick the flattest, cleanest face to be your canvas. Set the stem side up and rotate the pumpkin until the widest smooth panel faces you. A dry surface stops the acrylic from beading or streaking.

  2. Find your center and chalk the body

    Look for the vertical rib running down the middle of your chosen face and treat it as the bat's spine. Draw the rounded body and two little ears along that line with chalk or a washable marker. Chalk wipes off with a damp finger, so redraw freely until the body sits centered. Keeping the body on the rib makes the next step, matching wings, much easier.

  3. Mirror the wings outward

    Sketch one wing from the body outward, giving it two or three scalloped points along the bottom edge. Measure the reach with your fingers or a strip of paper, then copy that same distance and shape on the other side. Step back often to check both wings balance around the center line. Adjust the chalk before any paint touches the pumpkin.

  4. Paint the first coat

    Fill the outline with black acrylic using a medium flat brush, working in the same direction over the ribs. The first coat will look thin and patchy over the orange, which is normal. Get the edges crisp now while the paint is wet and easy to shape. Let it dry completely, usually twenty to thirty minutes.

  5. Add the second coat and the eyes

    Lay down a second even coat of black to cover the ridges and deepen the color. Once that dries, dip the tip of a small brush or a cotton swab in white and dot two round eyes near the top of the body. Keep the eyes small and evenly spaced so the bat looks friendly. Let everything cure before moving the pumpkin.

  6. Seal and stage your photo

    Brush on a thin coat of matte outdoor sealer if it will sit outside, which protects the paint from dew. Set the pumpkin on a wooden surface or windowsill in soft daylight. Angle the widest wing toward the camera so the full spread shows. A plain background keeps all the attention on the bat.

Gather your supplies

Check things off as you get ready.

Work on a stable surface, keep your free hand out of the cutting path, and have an adult handle sharp tools.

Three levels of light

  • Leave intact

    The painted black body and wings stay solid and dark, reading as a crisp silhouette against the orange skin.

  • Peel & shade

    For a soft glow you could lightly scrape the skin just inside the wing edges before painting only the center, letting a dim orange rim frame the bat.

  • Cut through

    If you want real light, an adult can drill the two eye dots all the way through so pinpoints of LED light shine out.

Learn the carving basics

Before you start cutting

Do I really not need to cut anything?

No cutting is required for the painted version, which makes it a great pick for kids and first timers. You can display it whole with no scooping or blades. If you later want a glow, treat carving the eyes as an optional add-on for an adult.

How do I keep the two wings even?

Use the vertical rib down the middle of the pumpkin as your spine and draw everything out from there. Sketch one wing, then measure its reach with a paper strip and copy that exact distance on the other side. Chalk wipes off easily, so keep adjusting until both wings match before you paint.

Will acrylic paint cover the orange in one coat?

Usually not. The first coat looks thin and streaky over bright orange, so plan on two coats with drying time between them. The second coat is what gives you a smooth, solid black that hides the ridges.

Your take belongs here, too.

Changed a detail? Made it simpler? Share a photo of your version and tell the community what worked.

Share your pumpkin

More pumpkins like this

You've reached the end · 8 pumpkins
The Patch Report

Fresh pumpkins, in your inbox.

The best new carvings, ideas worth stealing, and how-tos for carving season. Short, seasonal, and gone by November.

A short email during carving season. Unsubscribe anytime. See our privacy policy.