Halloween Pumpkin Carving Contest · Starts October 1st · $500 in prizes
← Back to ideas
@ai_concepts
Sep 25, 2026
Cute Easy Pumpkin Carving With a Glowing Cut-Through DesignAI
0

Report this carving

Tell us what is wrong. Reports are private.

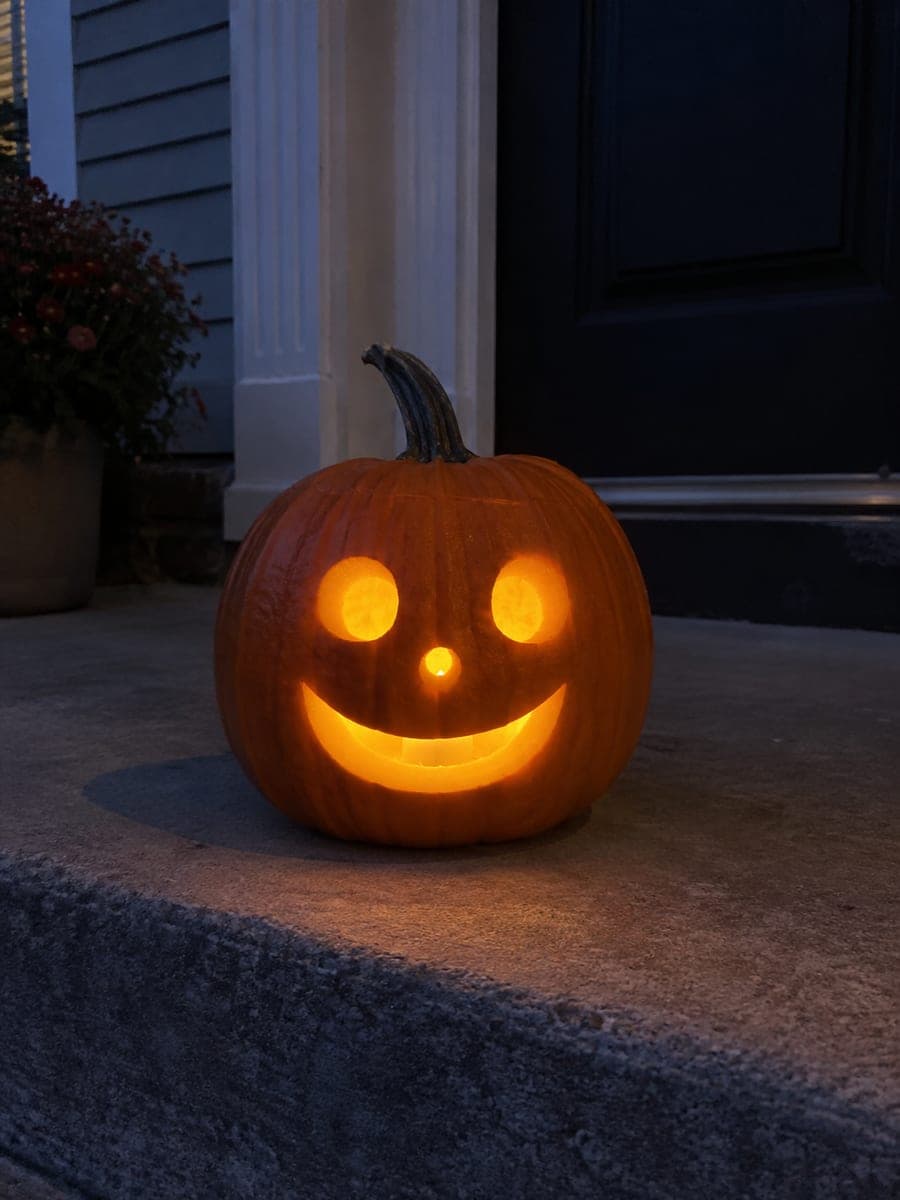
Cute Easy Pumpkin Carving With a Glowing Cut-Through Design

Simple cut-through apertures lit from inside make this easy cute pumpkin carving idea accessible to first-time carvers while still producing a charming glowing result. Transfer the motif outline with a tracing stylus or poker tool so the shapes are clear before the first cut, then use a small serrated saw to follow each line steadily. Preserve every connecting strip between openings and the outer border to keep the design from cracking, and use a battery lantern inside for safe, consistent glow throughout the night.

No ratings yet · Sign in to rate
Comments (0)

  • No comments yet — be the first.

Save without an account. Sign in to like or comment.

Our tips for carving a similar design

The design relies on a small number of clean cut-through openings that together read as a charming face. Every aperture is fully separated from its neighbors by solid rind, so the wall stays sturdy from the first cut to the last. A battery lantern inside does the rest, pushing warm light through each opening evenly.

From pumpkin to porch

  1. Prep the pumpkin

    Cut a lid from the bottom of the pumpkin rather than the top so the lantern sits on the floor of the cavity. Scoop out seeds and stringy pulp until the inner wall is about an inch thick. Wipe the outer surface dry with a cloth so the transfer holds cleanly.

  2. Transfer the motif

    Print or sketch the face shapes at the correct scale and tape the paper to the pumpkin. Run a stylus or poker tool along every line to leave a dotted impression in the rind. Remove the paper and connect the dots with a marker so each shape is fully outlined.

  3. Cut the openings

    Start with the smallest opening as a warm-up, using a small serrated pumpkin saw held perpendicular to the surface. Follow each marked line in one smooth pass and avoid rocking the blade sideways, which widens cuts and weakens bridges. Pop each piece free from inside with a finger rather than forcing it with the blade.

  4. Check the bridges

    After each cut, press gently on the surrounding rind to confirm it still feels solid. If any strip between openings feels thin or flexible, leave the adjacent shape uncut for now and check whether the overall design still reads. Every connecting strip should be at least 8 mm wide.

  5. Light and display

    Place a battery-operated LED lantern inside and replace the lid. Carry the pumpkin to its display spot before turning on the lantern so you are not walking with open flame. Step back about three metres to confirm every opening glows evenly and the face reads as intended.

  6. Preserve the carving

    Rub a thin layer of petroleum jelly around all cut edges to slow dehydration. Turn the lantern off when the display is over each night and store the pumpkin in a cool place. A carved pumpkin displayed outdoors typically lasts five to seven days.

Written with AI to match this design

Gather your supplies

Check things off as you get ready.

Work on a stable surface, keep your free hand out of the cutting path, and have an adult handle sharp tools.

Three levels of light

  • Leave intact

    All solid rind between and around the face openings stays fully dark

  • Peel & shade

    None, this is a pure cutout design with no skin-peeling

  • Cut through

    Each face aperture is cut completely through the rind for full interior glow

Learn the carving basics

Before you start cutting

How do I keep the cut edges from drying out and cracking?

Apply petroleum jelly or a thin coat of white craft glue to every cut edge right after carving. Reapply each day if the pumpkin is outdoors. Keeping it in a cool spot overnight also slows drying significantly.

Can I use a kitchen knife instead of a pumpkin saw?

A pumpkin saw gives you much better control on the curved surface and is less likely to slip. If you only have a kitchen knife, choose one with a thin, pointed blade and work slowly. Adults should handle all cutting regardless of the tool used.

What if one of my openings ends up lopsided?

Slight asymmetry often adds charm to a handmade carving. If the imbalance bothers you, you can carefully widen the smaller side of a matching opening by a few millimetres to even things up, as long as the surrounding bridges stay at least 8 mm wide.

Your take belongs here, too.

Changed a detail? Made it simpler? Share a photo of your version and tell the community what worked.

Share your pumpkin

More pumpkins like this

You've reached the end · 8 pumpkins
The Patch Report

Fresh pumpkins, in your inbox.

The best new carvings, ideas worth stealing, and how-tos for carving season. Short, seasonal, and gone by November.

A short email during carving season. Unsubscribe anytime. See our privacy policy.