Halloween Pumpkin Carving Contest Β· Starts October 1st Β· $500 in prizes
← Back to ideas
@ai_concepts
Sep 25, 2026
Scary Easy Pumpkin Carving With a Glowing Horror FaceAI
0

Report this carving

Tell us what is wrong. Reports are private.

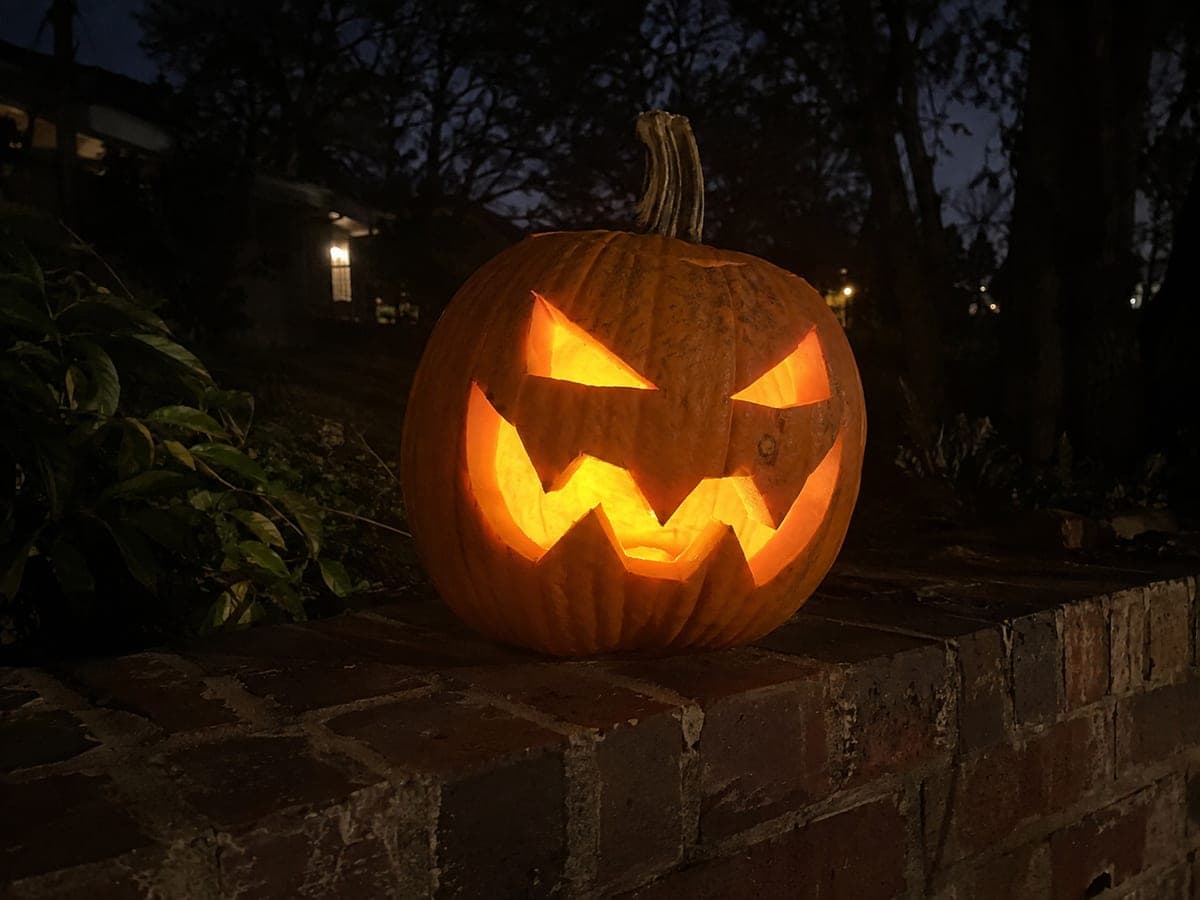
Scary Easy Pumpkin Carving With a Glowing Horror Face

Cut-through openings shaped into a frightening expression make this easy scary pumpkin carving idea the go-to choice for a quick but effective Halloween display. Trace the motif onto the surface with a stylus before cutting so the placement of the menacing features reads correctly. Cut the mouth opening first since it is typically the largest shape, then work up to the eyes and any accent details, leaving solid rind bridges throughout. A battery lantern inside projects a steady, unsettling glow all evening.

No ratings yet Β· Sign in to rate

Comments (0)

  • No comments yet β€” be the first.

Save without an account. Sign in to like or comment.

Our tips for carving a similar design

A few carefully shaped cut-through openings do all the work here: the horror effect comes from the placement and silhouette of the features, not from complexity. Transferring the motif before cutting ensures the menacing proportions land correctly. A battery lantern inside keeps the face glowing without any fire risk near front-door decorations.

From pumpkin to porch

  1. Hollow the pumpkin

    Cut the lid from the base so the lantern sits flat inside. Scoop out seeds and pulp until the inner wall is about an inch thick. Clearing the interior fully prevents seeds from casting odd shadows that interrupt the clean horror expression.

  2. Transfer the design

    Tape the scary face template to the front of the pumpkin and press a stylus firmly along every outline to leave a dotted impression. Remove the paper and connect the dots with a washable marker. Step back to confirm the expression reads as frightening before you pick up a saw.

  3. Cut the mouth first

    The mouth is typically the largest opening on a scary face, so cut it while the wall is at full strength. Follow the outline steadily with a small serrated saw, keeping the blade perpendicular to the surface. Support the offcut piece from inside as it releases so it does not drop and crack the nearby rind.

  4. Cut the eyes and any accent holes

    Move up to the eye openings, keeping at least 8 mm of solid rind between every pair of adjacent openings. For any small accent shapes like brow slits or pupil holes, use a fine-tooth detail saw and work slowly. Pop each offcut free from inside with a fingertip.

  5. Clean the edges

    Run a thin paring knife around the inside of each opening to remove ragged rind flaps. Smooth, defined edges make the horror expression read more sharply from across the street after dark. Remove all debris from the cavity before placing the lantern.

  6. Light and position

    Insert the battery lantern, replace the lid, and position the pumpkin at doorstep height. A dark background emphasizes the cold glow. Turn the lantern off when not in use to conserve battery life and slow the pumpkin's drying.

Written with AI to match this design

Gather your supplies

Check things off as you get ready.

Work on a stable surface, keep your free hand out of the cutting path, and have an adult handle sharp tools.

Three levels of light

  • Leave intact

    All rind surrounding the horror features stays solid and dark, framing the glow

  • Peel & shade

    None, only full cutouts are used

  • Cut through

    Every aperture of the scary face is cut completely through the rind for full interior glow

Learn the carving basics

Before you start cutting

How do I make a simple face look genuinely scary rather than just funny?

Narrow, angled eye openings read as menacing where wide round ones read as silly. A downward-pointing V angle on the inner corners of the eyes is the single fastest way to shift a face from funny to frightening. A jagged or asymmetric mouth also adds unease that a neat, symmetrical one does not.

Can I add dripping paint to suggest blood without cutting extra shapes?

Yes. Once the carving is complete, thin some red acrylic paint with a little water and let it drip from the top edge of the mouth opening down the orange rind. Allow each drip to run naturally and dry before adding more. This is a no-cut embellishment that dramatically increases the horror effect.

How do I stop the cut edges from turning brown and detracting from the scary look?

Apply petroleum jelly to every cut edge right after carving to slow oxidation and drying. If brown edges appear after a day or two, scrape them lightly with the edge of a spoon to reveal fresh orange rind underneath. Keeping the pumpkin in a cool spot when not on display significantly slows this process.

Your take belongs here, too.

Changed a detail? Made it simpler? Share a photo of your version and tell the community what worked.

Share your pumpkin

More pumpkins like this

You've reached the end Β· 8 pumpkins
The Patch Report

Fresh pumpkins, in your inbox.

The best new carvings, ideas worth stealing, and how-tos for carving season. Short, seasonal, and gone by November.

A short email during carving season. Unsubscribe anytime. See our privacy policy.