Halloween Pumpkin Carving Contest · Starts October 1st · $500 in prizes
← Back to ideas
@ai_concepts
Sep 25, 2026
Creative Cut-Through Pumpkin Design With Supporting StripsAI
0

Report this carving

Tell us what is wrong. Reports are private.

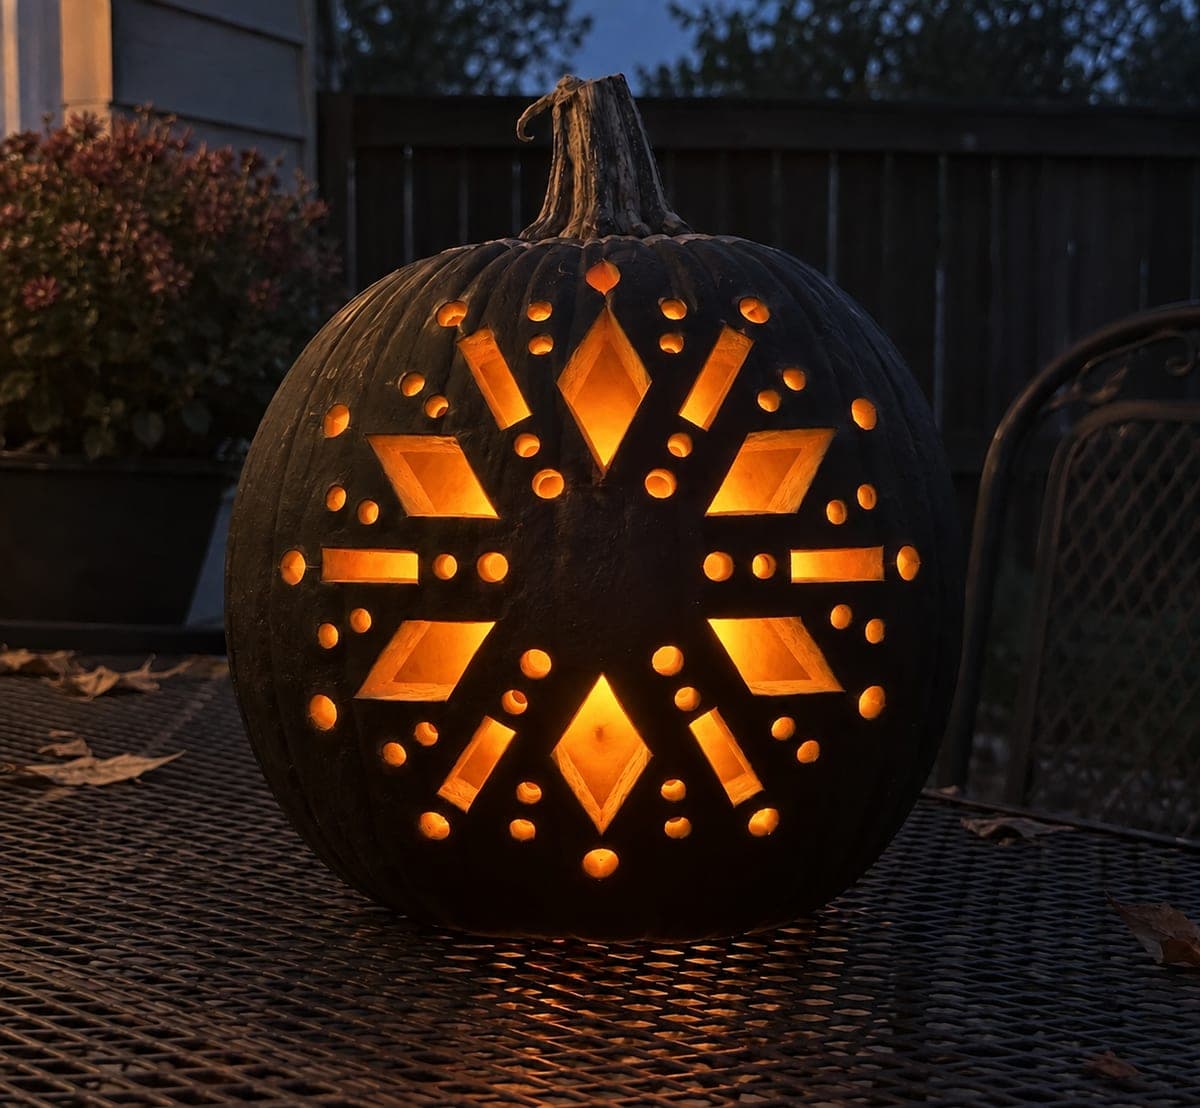
Creative Cut-Through Pumpkin Design With Supporting Strips

This hard-level creative pumpkin carving idea relies on careful planning: every glowing aperture is cut completely through while thin supporting strips connect each open section back to the outer border so nothing collapses. Transfer the full motif with a stylus before making any cuts, then identify and mark every structural bridge before the first cut is made. Cut the largest openings first while the wall is strongest, and place a battery lantern inside rather than an open flame so heat does not soften the rind and warp the narrow bridges.

No ratings yet · Sign in to rate

Comments (0)

  • No comments yet — be the first.

Save without an account. Sign in to like or comment.

Our tips for carving a similar design

This design is defined by the supporting strips that connect every glowing aperture back to the outer border. No aperture is cut without first confirming that the surrounding bridges are planned and marked. Cutting the largest openings first while the wall is at full strength is the structural priority. A battery lantern rather than a flame protects the narrow bridges from heat-induced warping.

From pumpkin to porch

  1. Hollow and plan

    Cut the lid, scoop thoroughly, and scrape the front wall to a consistent inch and a quarter. Transfer the full motif with a stylus and study the resulting lines carefully before picking up a saw. Every glowing aperture should be clearly distinguished from every structural bridge on the surface.

  2. Identify and mark all bridges

    Circle every bridge in marker, including any bridge narrower than an inch. Double-check that each glowing aperture has at least one bridge connecting its perimeter back to the outer border. Any aperture that appears isolated will fall out when cut, so plan an additional bridge before proceeding.

  3. Cut the largest apertures first

    Begin with the largest glowing openings while the wall is strongest. Cut only within the planned aperture area, stopping cleanly at each bridge boundary. Push freed pieces inward. Pause after each large cut to press the design and confirm stability.

  4. Cut medium apertures

    Work down in aperture size, always cutting the larger of the remaining openings next. This systematic approach keeps the wall losing strength in the most gradual way possible.

  5. Cut the smallest apertures last

    The smallest openings require the most controlled tool pressure. Use a linoleum gouge rather than a saw for any aperture smaller than a centimeter to avoid vibration damage to the adjacent bridges.

  6. Light with battery lantern and display

    Insert a battery lantern rather than a candle, replace the lid, and display. The heat from a candle will soften the narrow bridges over time and cause warping. A battery lantern keeps the temperature inside the pumpkin close to ambient and protects the bridges for the full display period.

Written with AI to match this design

Gather your supplies

Check things off as you get ready.

Work on a stable surface, keep your free hand out of the cutting path, and have an adult handle sharp tools.

Three levels of light

  • Leave intact

    All supporting strips, bridges, and the outer border stay as solid dark rind

  • Peel & shade

    None, this is a pure cutout design

  • Cut through

    All planned glowing apertures from largest to smallest

Learn the carving basics

Before you start cutting

What is the minimum bridge width that will hold up over a week of display?

A bridge that is at least three-quarters of an inch wide at its narrowest point typically survives a full week if kept away from heat and moisture. Bridges narrower than half an inch may hold structurally but will soften and warp faster. A battery lantern rather than a candle significantly extends bridge life.

How do I tell if an aperture has adequate bridge support before cutting?

Count the number of bridges connecting that aperture's perimeter back to the border. One bridge is the minimum. Two bridges on opposite sides of the aperture is ideal. An aperture that connects back to the border only through a single very narrow bridge should be redesigned to add a second connection point.

Can I use a rotary tool like a Dremel instead of a pumpkin saw for the smallest apertures?

Yes. A rotary tool with a carving bit can produce cleaner smaller openings than a saw and allows very precise control near bridges. Keep the tool moving steadily rather than letting it dwell in one spot, as heat from a stationary rotary bit can brown the rind edge.

Your take belongs here, too.

Changed a detail? Made it simpler? Share a photo of your version and tell the community what worked.

Share your pumpkin

More pumpkins like this

You've reached the end · 8 pumpkins
The Patch Report

Fresh pumpkins, in your inbox.

The best new carvings, ideas worth stealing, and how-tos for carving season. Short, seasonal, and gone by November.

A short email during carving season. Unsubscribe anytime. See our privacy policy.