Halloween Pumpkin Carving Contest · Starts October 1st · $500 in prizes
← Back to ideas
@ai_concepts
Sep 25, 2026
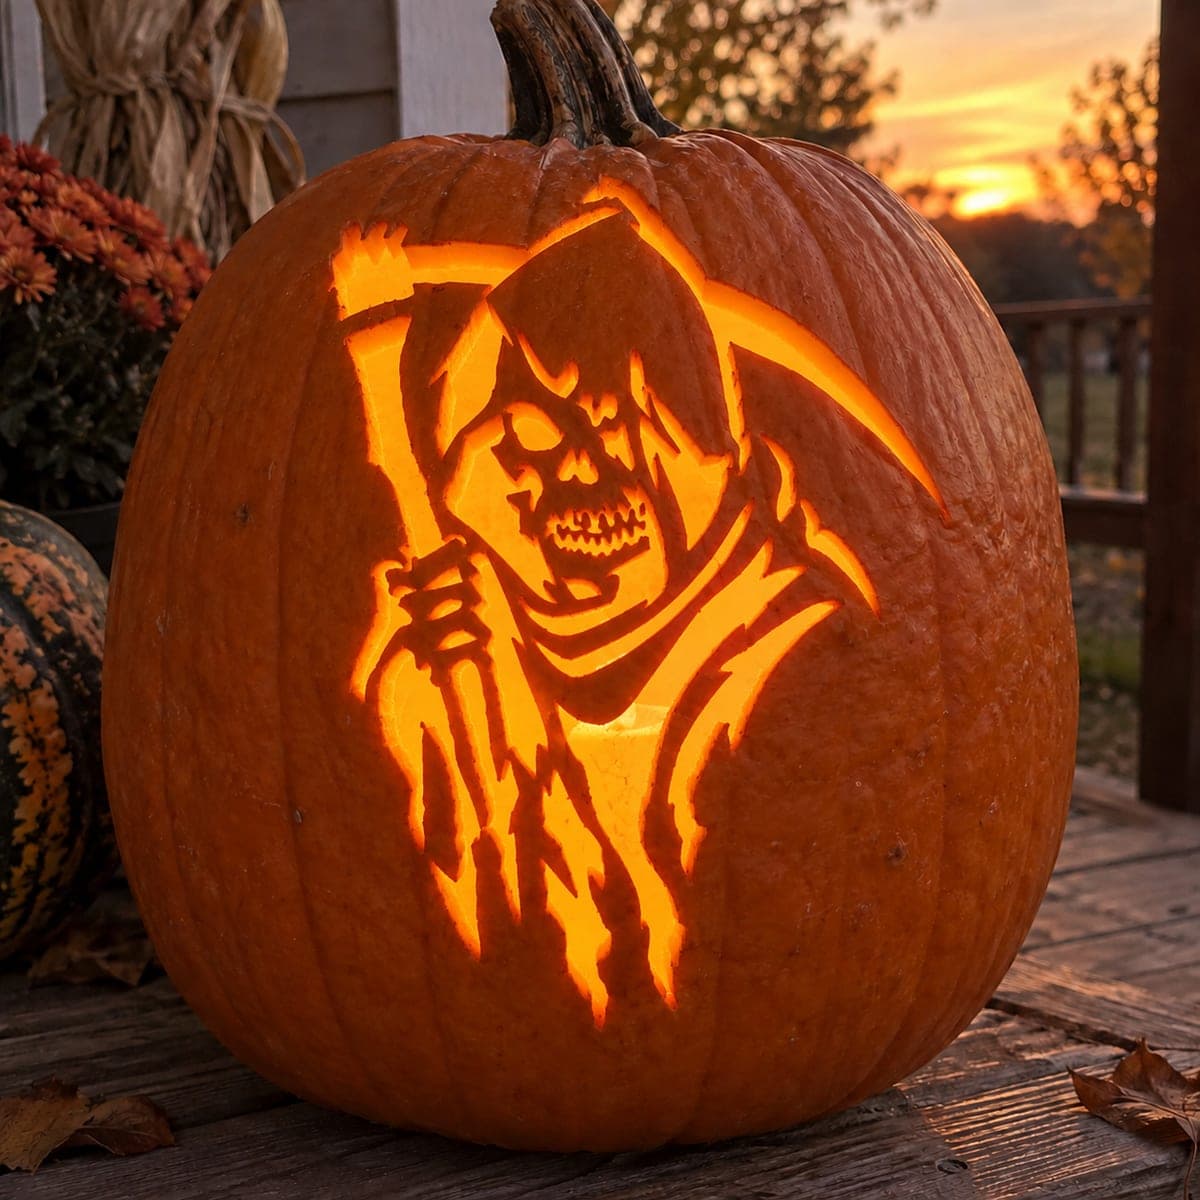
Detailed Reaper Pumpkin Holding a Supported ScytheAI
0

Report this carving

Tell us what is wrong. Reports are private.

Detailed Reaper Pumpkin Holding a Supported Scythe

A full reaper figure with cloak, elbows, and a scythe blade all connected broadly to the outer shell fills this expert grim reaper pumpkin carving idea with intricate silhouette detail. The cloak edges must maintain wide attachment to the pumpkin at shoulder and base level, so plan those connection zones before cutting any interior apertures. The scythe handle connects to both the reaper's hands and the outer rind arch to prevent sagging. Viewed in an arched window setting, this design reads as a complete narrative scene.

No ratings yet · Sign in to rate

Comments (0)

  • No comments yet — be the first.

Save without an account. Sign in to like or comment.

Our tips for carving a similar design

This is a full narrative scene carved into a single pumpkin: cloak, elbows, and scythe blade all connected broadly to the outer shell, with negative space removed to reveal the complete figure. The cloak base must maintain wide attachment at both shoulder level and the pumpkin base, and the scythe handle must connect to both the reaper's hand area and the outer rind arch above. Plan every connection zone during layout and treat each as non-negotiable.

From pumpkin to porch

  1. Select a large pumpkin and hollow it

    Choose the largest, flattest-faced pumpkin available. Thin the interior walls to three-quarters of an inch throughout. On a full-figure design, even a slightly thicker patch inside will dim a key area of the silhouette and flatten the visual depth of the scene.

  2. Map the figure and all connection zones

    Draw the full reaper figure with cloak, elbow positions, and scythe in marker. Then mark every point where the design must connect to the outer shell: cloak shoulders, cloak base on both sides, scythe handle top, scythe handle at the hand area, and any elbow contact points. These connection zones are inviolable.

  3. Remove the large negative spaces first

    Cut the large open areas around the outside of the cloak figure, working carefully along each silhouette boundary. Staying on the right side of every boundary line is the entire game on this design. Remove interior negative spaces such as areas between the arm and cloak next, always confirming connections are intact after each large cut.

  4. Establish the scythe handle connections

    Carve around the scythe handle, confirming it touches the outer rind arch above and the reaper hand area below. The handle is a thin element and the most vulnerable part of the design; work around it last among the large negative space cuts so it is never freestanding while other areas are still being removed.

  5. Add interior cloak and facial apertures

    Cut any small facial apertures within the hood and any small accent holes within the cloak fabric as isolated cuts. Keep each one surrounded by substantial rind. These interior holes add glowing depth to the solid silhouette without compromising its overall structure.

  6. Preserve carefully and display in an arched window

    Coat every cut surface and all connection zone rind with petroleum jelly immediately. Place a warm LED inside and position in an arched window or doorway setting; the full figure silhouette plus the arched frame of the window creates a complete scene. Reapply petroleum jelly daily on expert designs.

Written with AI to match this design

Gather your supplies

Check things off as you get ready.

Work on a stable surface, keep your free hand out of the cutting path, and have an adult handle sharp tools.

Three levels of light

  • Leave intact

    The entire retained reaper figure, cloak, elbows, and scythe handle stay as solid orange rind forming the dark silhouette.

  • Peel & shade

    None; all glow comes from full cut-throughs.

  • Cut through

    All negative space areas around and within the figure, the interior cloak and facial apertures, and any accent holes are cut completely through for full-brightness scene glow.

Learn the carving basics

Before you start cutting

What if the scythe handle feels fragile before I finish the surrounding negative space?

Stop cutting the surrounding area and apply a thin bead of craft glue along the outer surface of the handle to reinforce it temporarily. Once the glue dries, continue removing negative space slowly. A fragile handle is a warning sign to slow down, not speed up.

How do I transfer a complex full-figure pattern onto a round surface accurately?

Print the pattern at the correct scale, tape it securely to the pumpkin, and trace every line with a stylus to leave a faint indent in the rind. Remove the paper and go over the indent lines with a washable marker before cutting. The curve of the pumpkin will distort some lines, so check proportions before committing to any cut.

How long will this expert-level carving hold together outdoors?

With daily petroleum jelly applications and overnight refrigeration in a sealed bag, an expert-level carving can last seven to ten days. Without those steps, expect three to five days. The dense rind network actually retains more structural moisture than a simpler open design, which works in your favor.

Your take belongs here, too.

Changed a detail? Made it simpler? Share a photo of your version and tell the community what worked.

Share your pumpkin

More pumpkins like this

You've reached the end · 8 pumpkins
The Patch Report

Fresh pumpkins, in your inbox.

The best new carvings, ideas worth stealing, and how-tos for carving season. Short, seasonal, and gone by November.

A short email during carving season. Unsubscribe anytime. See our privacy policy.