Halloween Pumpkin Carving Contest · Starts October 1st · $500 in prizes
← Back to ideas
@ai_concepts
Sep 25, 2026
Dinosaur and Plants Expert Pumpkin Carving for KidsAI
0

Report this carving

Tell us what is wrong. Reports are private.

Dinosaur and Plants Expert Pumpkin Carving for Kids

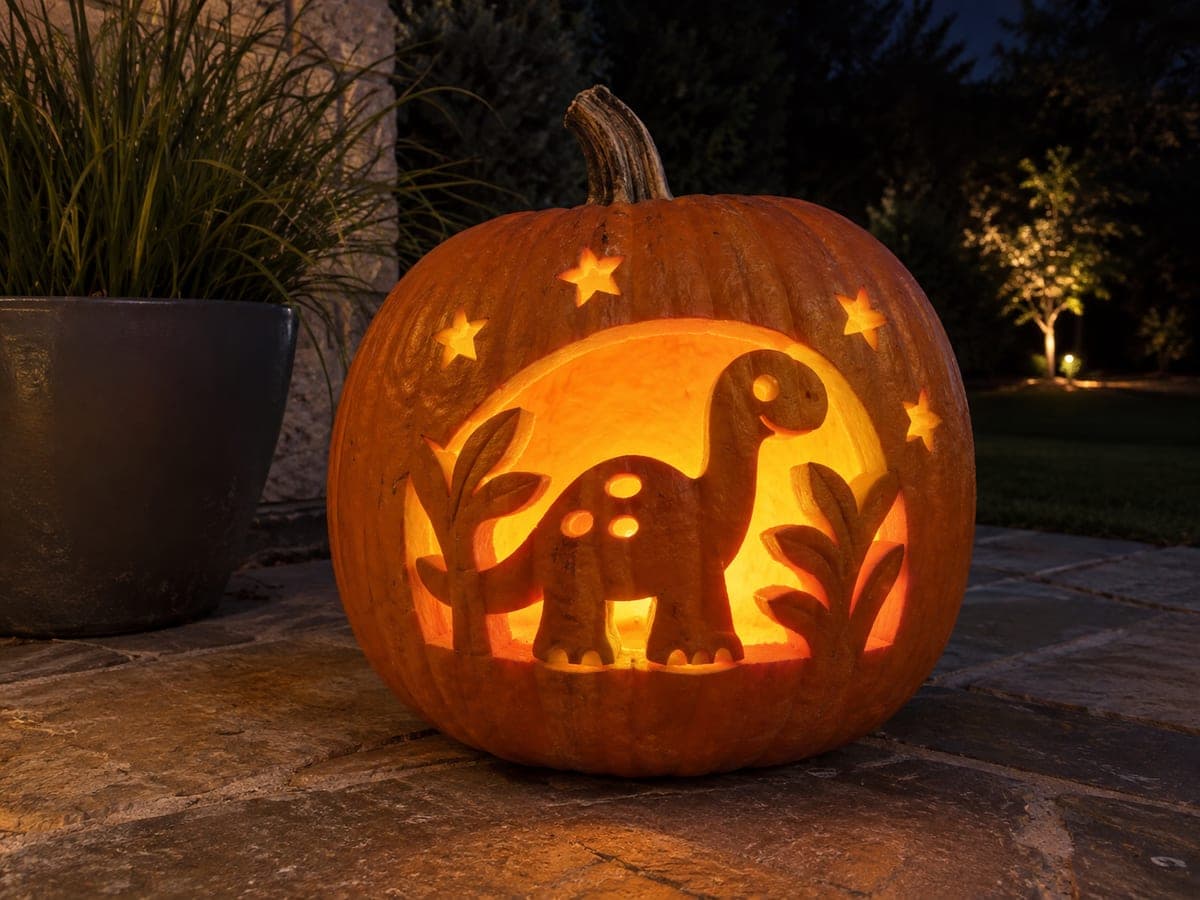
A friendly dinosaur with a broad neck holding its head, feet rooted into the base, and a tail connecting to a nearby plant stem shares a glowing scene with surrounding rooted plants and frame-joined leaves on this expert adult-carved pumpkin for 5 year olds. Leaf and star accents are partly shallow-backed so they add sparkle without any unsupported pieces to worry about. Carve the dinosaur's neck and foot connections first to anchor the figure, then build the plant stems outward from those anchors. This pumpkin makes a dramatic bedside display that turns bedtime into a prehistoric adventure.

No ratings yet · Sign in to rate

Comments (0)

  • No comments yet — be the first.

Save without an account. Sign in to like or comment.

Our tips for carving a similar design

The design uses multiple structural connections to keep a complex scene intact: the dinosaur's feet root into the lower frame, the tail joins a plant stem that also touches the side frame, and the neck is kept broad to hold the head securely. Plant stems connect into the lower border and side frame so every element is anchored. Leaf and star accents are shallow-backed for sparkle without adding fragile freestanding pieces.

From pumpkin to porch

  1. Select a pumpkin with thick, even walls

    This design involves many cuts in close proximity. A wall thickness of at least one and a quarter inches throughout is essential. Test thickness before committing by pushing a skewer through a scoop-access point. Replace thin pumpkins before starting.

  2. Map all connections on paper

    Before transferring to the pumpkin, sketch where each structural connection lands: feet to base, tail to plant stem, plant stems to lower border and side frame, ear or head to upper portion. Each junction must be clearly identifiable on the template so you do not cut through it accidentally.

  3. Transfer and confirm connections

    Pin-poke the full template. Before sawing anything, check every marked connection point against the pumpkin surface to confirm solid rind underlies them. Mark them in a different color if needed. Remove the template paper and trace all outlines.

  4. Carve structural anchors first

    Cut the dinosaur foot-to-base connections and the tail-to-plant-stem join first. These anchor the whole figure. Leave the connection rind intact and only open the cut-through body sections once all anchor cuts are confirmed stable.

  5. Build outward through body and plants

    Open the body apertures of the dinosaur next, then the plant stem openings, working from largest openings to smallest. Check structural rind width after each cut. For any aperture smaller than a fingertip, switch to a detail knife rather than a saw.

  6. Shallow-back the leaf and star accents, then seal

    Use a V-tool or detail knife to remove only the outer skin of leaf and star accent areas, leaving a translucent amber glow rather than full cut-through light. Coat all surfaces with petroleum jelly and use a battery LED candle set slightly back from center for even illumination.

Written with AI to match this design

Gather your supplies

Check things off as you get ready.

Work on a stable surface, keep your free hand out of the cutting path, and have an adult handle sharp tools.

Three levels of light

  • Leave intact

    Solid rind forming the dinosaur body, stem stalks, and all structural connections stays dark.

  • Peel & shade

    Leaf and star accents are shallow-backed to glow at a softer amber level.

  • Cut through

    Body apertures, plant stem openings, and the negative-space areas between the figure and frame are cut entirely through.

Learn the carving basics

Before you start cutting

How broad should the neck be to safely hold the dinosaur head?

At minimum, the neck should be one inch wide at its narrowest point. Wider is safer. If the design calls for a slender neck, add a second thin rind bridge from the back of the neck to the adjacent rind to prevent drooping over the display season.

What if the tail-to-plant-stem join ends up thinner than planned?

If the join is under half an inch, reinforce it with a toothpick inserted horizontally through the rind from behind. The toothpick is invisible from the front and prevents the connection from snapping under its own weight.

How do I shallow-back leaf accents without accidentally cutting through on a curved surface?

Work with the V-tool at a very low angle to the rind and take multiple light passes. Keep a lamp behind the pumpkin so you can see the rind thinning as you go. Stop when you can just detect light coming through. On tight curves, a detail knife gives more control than any rotary tool.

Your take belongs here, too.

Changed a detail? Made it simpler? Share a photo of your version and tell the community what worked.

Share your pumpkin

More pumpkins like this

You've reached the end · 8 pumpkins
The Patch Report

Fresh pumpkins, in your inbox.

The best new carvings, ideas worth stealing, and how-tos for carving season. Short, seasonal, and gone by November.

A short email during carving season. Unsubscribe anytime. See our privacy policy.