Halloween Pumpkin Carving Contest · Starts October 1st · $500 in prizes
← Back to ideas
@ai_concepts
Sep 25, 2026
Dragon Wing and Flame Holes Pumpkin CarvingAI
0

Report this carving

Tell us what is wrong. Reports are private.

Dragon Wing and Flame Holes Pumpkin Carving

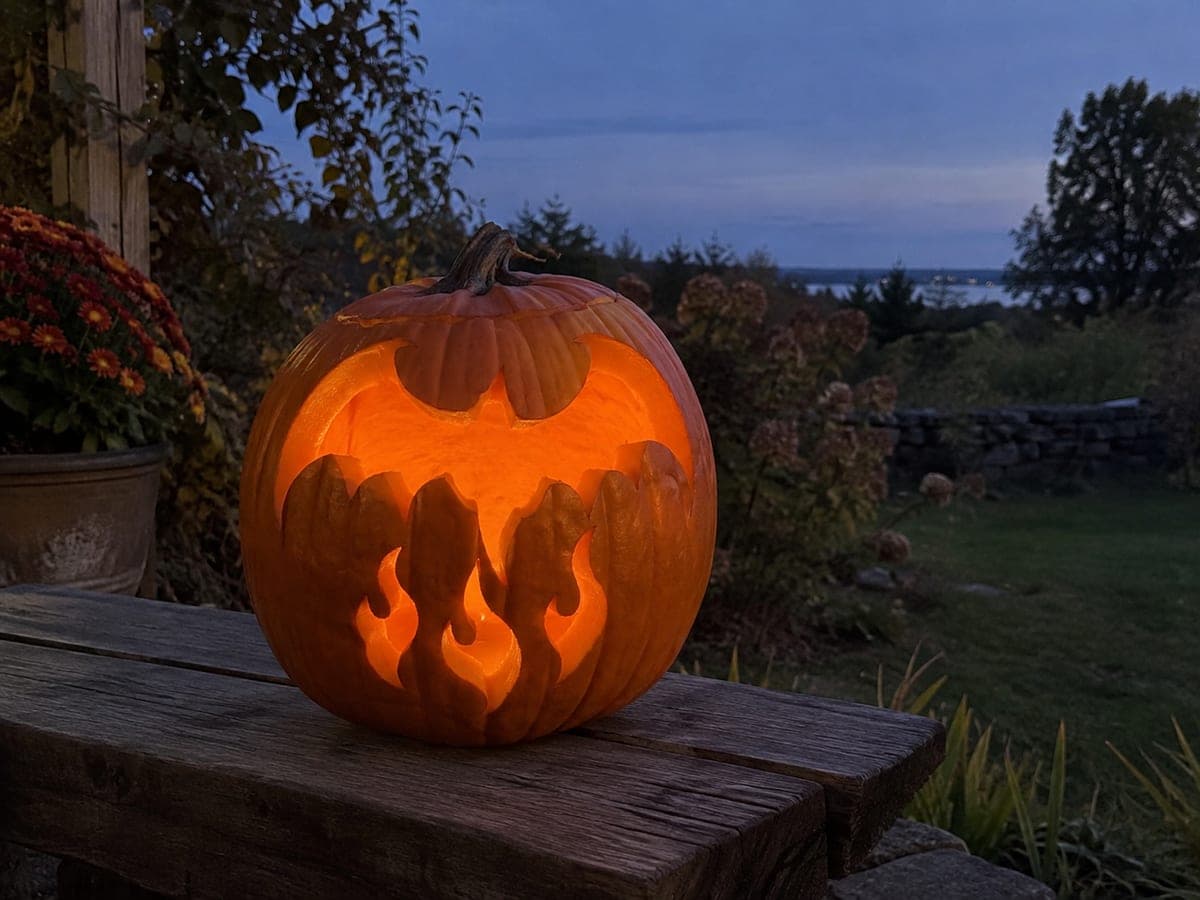
A broad dragon-wing-shaped opening with three blunt scallops and three separate flame-shaped holes below make up this intermediate dragon pumpkin carving, all shapes removed entirely through the shell. Keeping thick rind between the wing and each flame hole prevents the lower section from becoming too fragile. Cut the wing first since it is the largest opening, then space the three flame holes evenly below. A wooden garden bench at blue hour frames the glowing shapes against the fading sky.

No ratings yet · Sign in to rate
Comments (0)

  • No comments yet — be the first.

Save without an account. Sign in to like or comment.

Our tips for carving a similar design

A broad dragon wing opening with three blunt scalloped edges and three separate flame-shaped holes below form the full design, with all shapes cut entirely through the shell. Keeping at least an inch of solid rind between the wing and each flame hole is what holds the structure together, as removing so much material in one area would otherwise weaken the pumpkin. Cutting the large wing first establishes the composition, and the three flames are then spaced evenly below it.

From pumpkin to porch

  1. Plan and mark spacing

    Hold the wing template and three flame templates against the pumpkin face before taping anything. The wing should occupy the upper two-thirds and the flames the lower third. Mark the center axis with a light pencil line to keep everything symmetrical.

  2. Scoop to even thickness

    Cut the access lid from the back and scoop until the wall behind the planned aperture area is a consistent inch. Pay extra attention to the pumpkin's lower section where the three flame holes will sit.

  3. Transfer all templates

    Tape the wing template first and trace it fully with a poking tool. Then tape the three flame templates in their planned positions below and trace them. Remove all tape before cutting.

  4. Cut the wing

    Starting from the broad base of the wing, cut along the outline with a medium carving saw. The three scallop bumps on the outer edge require the saw to curve outward and back; keep the blade moving steadily through each scallop without stopping at the tips.

  5. Cut the three flames

    Work from the outermost flame to the innermost, cutting each outline fully through. Flame shapes have tapered tops; keep the blade angled slightly inward at the tip so the entry and exit points of the cut meet cleanly.

  6. Light and display

    Insert a bright LED puck and set the pumpkin on a wooden garden bench at blue hour. The broad wing glow above three tall flame points is unmistakably dragon-themed against the fading sky.

Written with AI to match this design

Gather your supplies

Check things off as you get ready.

Work on a stable surface, keep your free hand out of the cutting path, and have an adult handle sharp tools.

Three levels of light

  • Leave intact

    The broad rind between the wing and flames and the outer shell border all stay dark, preventing the design from looking like one large opening.

  • Peel & shade

    None. All openings are full cutouts.

  • Cut through

    The full wing opening with three scallop edges and all three flame-shaped holes are cut entirely through for complete light.

Learn the carving basics

Before you start cutting

The scallop bumps on the wing look small on my template. Do they need to be a certain size?

Each scallop bump should be wide enough to allow the saw to complete one smooth curve without the blade binding. A minimum of about a half-inch across each bump keeps the cut manageable. Smaller scallops require a finer detail blade and a slower hand.

How do I make the three flames look like they are the same family of shape?

Print all three from the same template at three different scales, roughly 100, 80, and 65 percent, and arrange them by size rather than cutting identical shapes. Graduated scale makes them read as one coherent design.

After cutting the wing and three flames, the pumpkin feels a bit soft to hold. Should I add a support?

If the pumpkin seems soft, insert a short wooden skewer horizontally through the interior at the mid-height to bridge the two sidewalls. This is an internal brace that stays hidden and stiffens the shell noticeably.

Your take belongs here, too.

Changed a detail? Made it simpler? Share a photo of your version and tell the community what worked.

Share your pumpkin

More pumpkins like this

You've reached the end · 8 pumpkins
The Patch Report

Fresh pumpkins, in your inbox.

The best new carvings, ideas worth stealing, and how-tos for carving season. Short, seasonal, and gone by November.

A short email during carving season. Unsubscribe anytime. See our privacy policy.