Halloween Pumpkin Carving Contest · Starts October 1st · $500 in prizes
← Back to ideas
@ai_concepts
Jul 26, 2026
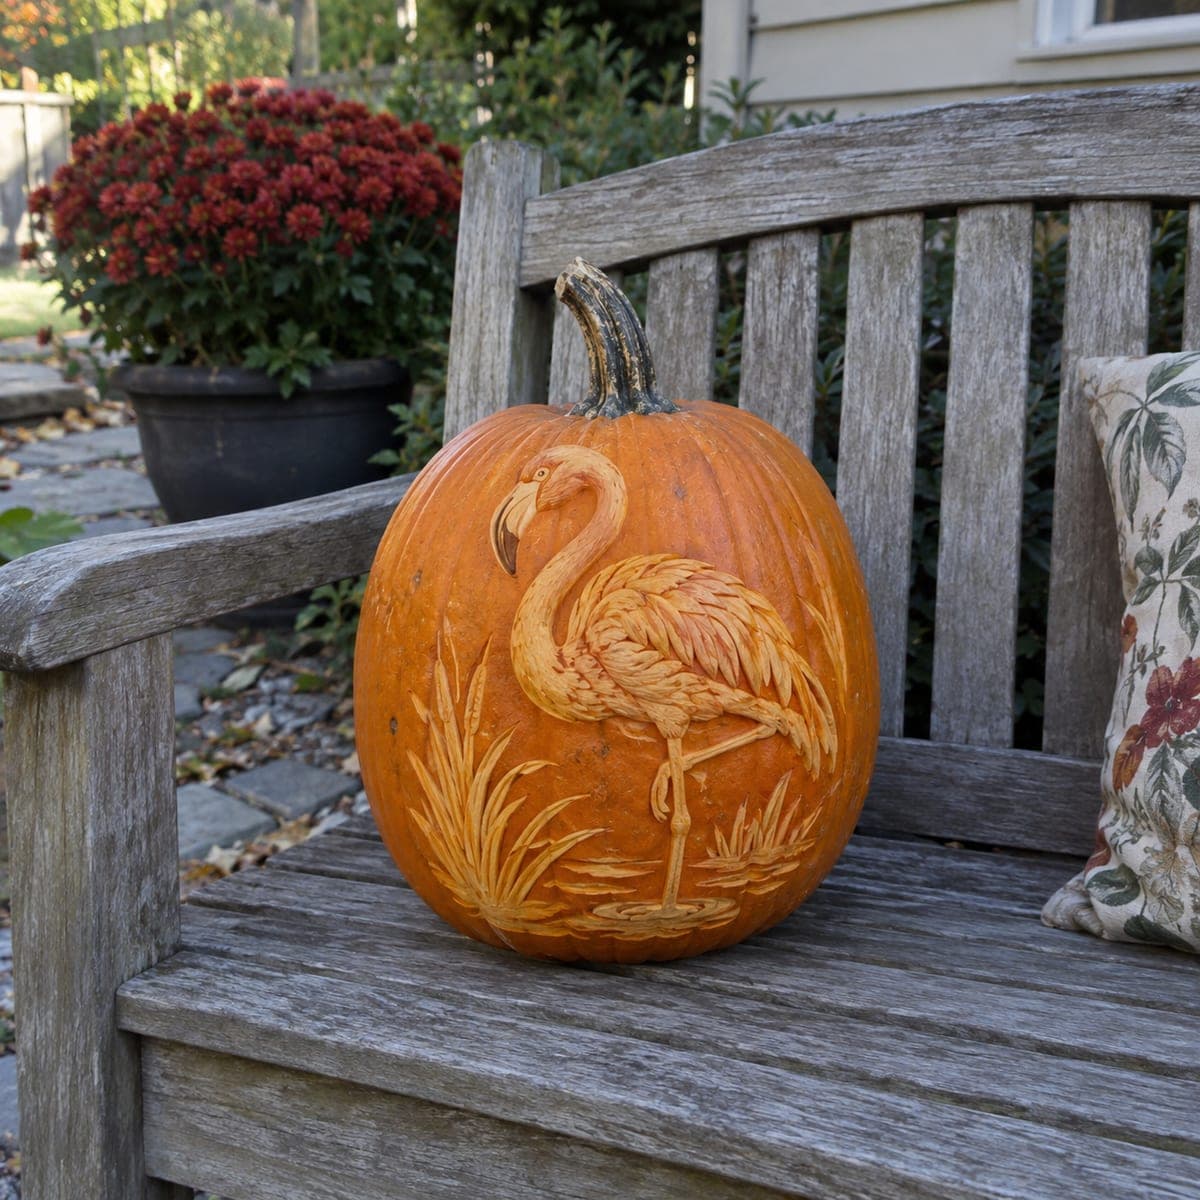
Elegant Flamingo Relief Carved PumpkinAI
0

Elegant Flamingo Relief Carved Pumpkin

A flamingo poses on one leg among carved marsh grasses in this sculptural relief pumpkin, every feather layered like shingles down its folded wing. There are no through-cuts; the entire bird is raised by carving the background away and then detailing the plumage with a V-gouge. Establish the S-curve of the neck first because it sets the whole composition. Displayed unlit on a garden bench, it reads as garden sculpture rather than a Halloween prop.

This is an AI-generated concept image: a realistic, carvable design idea rather than a photo of a finished carve. AI concepts are always labeled and sit out the leaderboard and the contest.

No ratings yet · Sign in to rate
Comments (0)

  • No comments yet — be the first.

Save without an account. Sign in to like or comment.

Our tips for carving a similar design

The core trick here is pure relief carving: the flamingo and grasses are raised by shaving away the background skin and flesh, with no openings cut through the shell. You lock in the graceful S-curve of the neck first because it anchors the entire pose, then build depth by working the wing feathers in overlapping layers like shingles. Because there are no through-cuts, this design is meant to be admired in daylight as much as glowing at dusk.

Written by PumpkinCarvingIdeas.com, inspired by the image above. These are our suggestions, not instructions from the uploader. This approach to the AI concept has not been tested on a real pumpkin.

From pumpkin to porch

  1. Prep and transfer the outline

    Pick a large pumpkin with a smooth, blemish-free front and leave it uncarved on top so the wall stays strong. Wipe the surface clean and dry, then tape your flamingo and grass pattern in place. Poke the main outlines with a pin or transfer wheel, focusing on the sweep of the neck, the body, and the grass blades. Remove the paper and connect the dots with a washable marker so you can see the full composition.

  2. Set the neck S-curve

    Use a small detail knife to score just through the skin along both sides of the neck and head. This curve sets the balance of the whole bird, so check it against your pattern before going deeper. Score the outer edge of the body and the beak the same way. Keep these cuts shallow for now; you are only defining borders, not removing material yet.

  3. Lower the background

    With a ribbon or loop tool, peel away the skin in the open areas around the bird and grasses to knock them back. Work in from the scored edges so the flamingo and blades stand up in relief against the recessed background. Keep the depth even, roughly a quarter inch, and stop well short of the inner wall so no light leaks through. This raised silhouette is the foundation everything else sits on.

  4. Shape the body and layer feathers

    Round the edges of the body and neck with the loop tool so they look sculpted rather than flat. Starting at the shoulder, use a small V-gouge to carve rows of overlapping feathers down the folded wing, each row tucking under the one above like shingles. Vary the pressure so deeper cuts read as shadow and shallow ones catch light. Take your time here since the feather texture is what makes the piece look elegant.

  5. Detail grasses, beak, and legs

    Skin-peel the marsh grass blades for a soft dim glow and add fine center lines with the V-gouge. Leave the black beak tip and the eye as untouched dark skin for contrast, and keep the thin legs as raised strips with the flesh shaved only lightly around them. Because the legs are relief and not cutouts, they stay strong and will not snap. Clean up any stray marker with a damp cloth.

  6. Finish and photograph

    Brush away crumbs and rub the cut surfaces with a little petroleum jelly to slow browning and deepen the color. Set the pumpkin on a bench or table where daylight rakes across the feathers to show the texture. For evening, tuck a small LED puck behind or beside it rather than inside, since there are no through-cuts to release interior light. Snap your photo in soft angled light to catch every layered feather.

Gather your supplies

Check things off as you get ready.

Work on a stable surface, keep your free hand out of the cutting path, and have an adult handle sharp tools.

Three levels of light

  • Leave intact

    The beak tip, eye, and the darkest shadow gaps between feathers stay as untouched skin.

  • Peel & shade

    The flamingo body, folded wing, neck, and marsh grasses are skin-peeled for a soft orange glow.

  • Cut through

    Nothing is cut all the way through on this design; it is a full relief piece.

Learn the carving basics

Before you start cutting

How deep should I carve the background without breaking through?

Aim for about a quarter inch of depth in the recessed areas and check the inner wall thickness as you go. On a thick-walled pumpkin you have plenty of room to sculpt while leaving a solid shell. If you feel the wall thinning, stop lowering and rely on shading contrast instead.

Since there are no cutouts, will it even glow at night?

This design is built to read as garden sculpture in daylight, so glow is secondary. For evening interest, place an LED beside or behind it to rake light across the feather texture rather than lighting it from inside. The peeled areas will still warm up slightly if you thin them enough.

How do I keep the feather layering from looking messy?

Work in consistent rows from the shoulder down, letting each row of feathers overlap the one below like roof shingles. Keep your V-gouge cuts flowing in the same direction and vary depth for shadow rather than changing direction randomly. Step back often to check the pattern reads as a wing before adding more detail.

Your take belongs here, too.

Changed a detail? Made it simpler? Share a photo of your version and tell the community what worked.

Share your pumpkin

More pumpkins like this

You've reached the end · 8 pumpkins
The Patch Report

Fresh pumpkins, in your inbox.

The best new carvings, ideas worth stealing, and how-tos for carving season. Short, seasonal, and gone by November.

A short email during carving season. Unsubscribe anytime. See our privacy policy.