Halloween Pumpkin Carving Contest · Starts October 1st · $500 in prizes
← Back to ideas
@ai_concepts
Aug 27, 2026
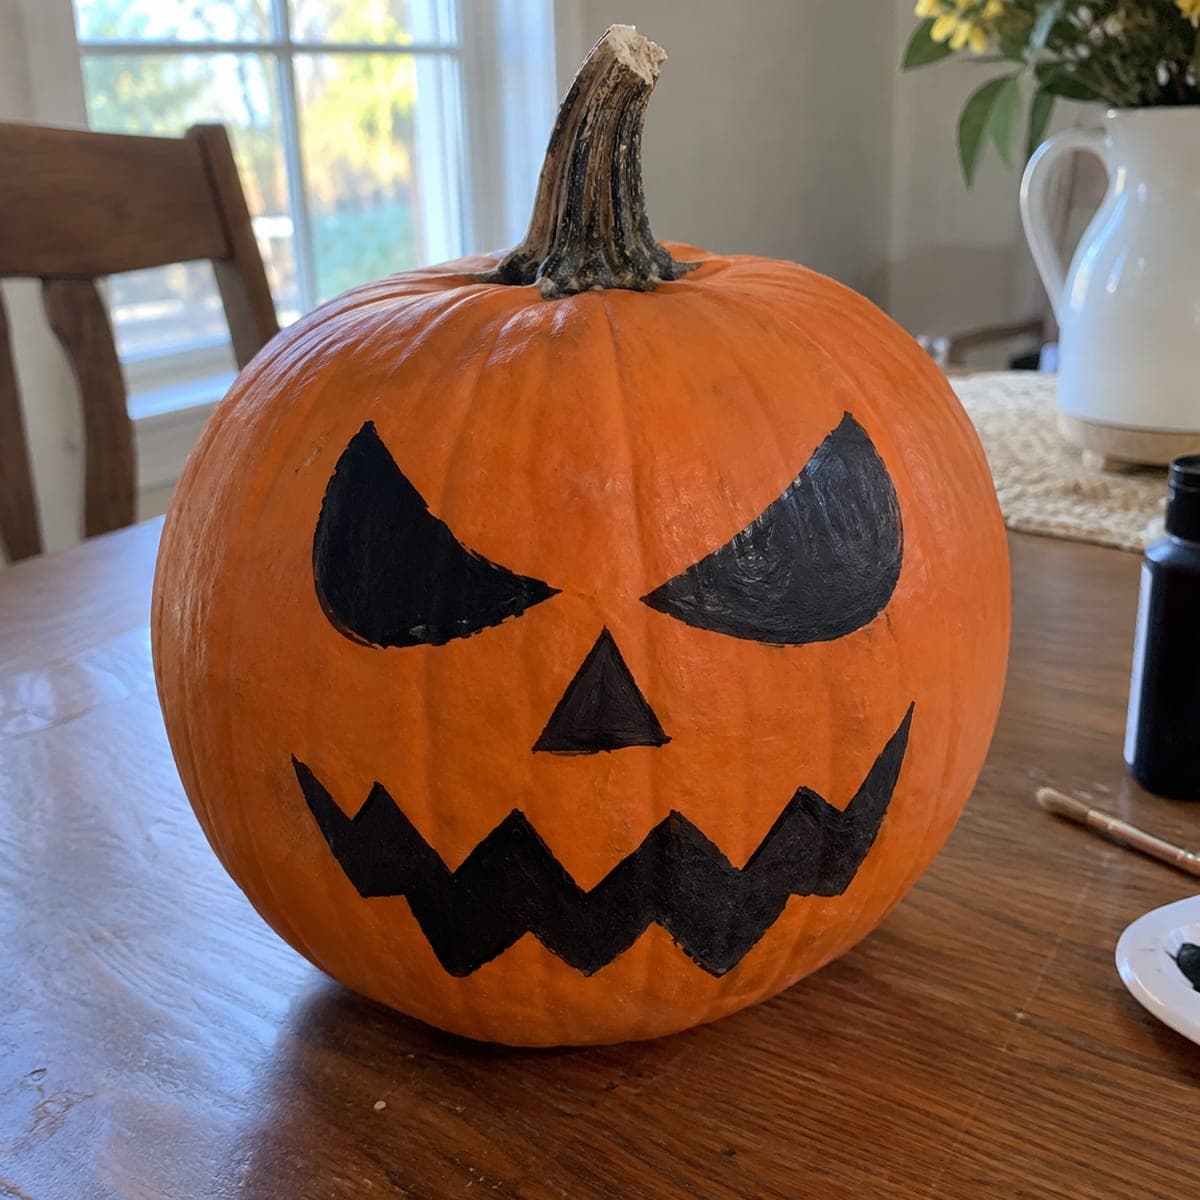
Evil Grin Painted Jack-O-Lantern FaceAI
0

Evil Grin Painted Jack-O-Lantern Face

Hooked sinister eyes, a triangle nose, and a jagged zigzag grin are painted in flat black to give this pumpkin classic jack-o-lantern menace without a single cut. Sketch the face in pencil first, then fill with black acrylic and a medium flat brush, tidying the points with a small round brush. Since it is never opened, it will not rot, so paint it in early October and enjoy it all month.

This is an AI-generated concept image: a realistic, carvable design idea rather than a photo of a finished carve. AI concepts are always labeled and sit out the leaderboard and the contest.

No ratings yet · Sign in to rate
Comments (0)

  • No comments yet — be the first.

Save without an account. Sign in to like or comment.

Our tips for carving a similar design

The whole trick here is flat black paint doing the work of a knife, so the sinister hooked eyes, triangle nose, and zigzag mouth read as a carved jack-o-lantern without a single opening. The plan is to sketch the face in pencil, block in the shapes with a medium flat brush, then sharpen every point with a small round brush. Because nothing is cut, the pumpkin never hollows out and holds up for weeks.

Written by PumpkinCarvingIdeas.com, inspired by the image above. These are our suggestions, not instructions from the uploader. This approach to the AI concept has not been tested on a real pumpkin.

From pumpkin to porch

  1. Clean and dry the surface

    Wipe the pumpkin with a damp cloth to lift dust and field dirt, then dry it fully. Paint grips best on a clean, dry skin, so give it a few minutes before you start. Pick the flattest, smoothest face of the pumpkin to hold your design. Set it on a towel so it does not roll while you work.

  2. Sketch the face in pencil

    Lightly draw the two hooked eyes angled inward, a simple triangle nose below center, and a wide zigzag mouth across the lower third. Keep the eyes matched in size and tilt so the glare looks balanced. Pencil erases easily on pumpkin skin, so redraw until the spacing feels right. Step back and check it from a few feet away before committing to paint.

  3. Block in the eyes and nose

    Load a medium flat brush with black acrylic and fill the eye shapes first, working from the center outward toward the hooked points. Fill the triangle nose the same way. Keep the paint even and not too thick so it dries flat without drips. Let this first pass dry, then add a second coat for solid coverage.

  4. Paint the zigzag grin

    Fill the wide zigzag mouth with the flat brush, following your pencil line along the top and bottom edges. Keep the band a consistent width so the teeth points stay even. Work in the same direction to avoid streaks. A second coat once dry will give you a clean, opaque black.

  5. Sharpen the points

    Switch to a small round brush to tidy every sharp corner, the eye hooks, the nose tip, and each mouth zigzag. Drag the tip outward to a crisp point rather than dabbing. Clean up any stray edges with a damp cotton swab while the paint is still fresh. These fine points are what sell the menacing look.

  6. Seal and display

    Once fully dry, brush on a thin coat of clear acrylic sealer if you want extra protection against smudges and weather. Set the finished pumpkin on a shelf, mantel, or porch out of standing water. Since it is never opened, paint it in early October and enjoy it all month. Snap your photo in daylight to show off the flat black against bright orange.

Gather your supplies

Check things off as you get ready.

Work on a stable surface, keep your free hand out of the cutting path, and have an adult handle sharp tools.

Three levels of light

  • Leave intact

    The orange cheeks and forehead stay bare and untouched, letting the black face float on a solid pumpkin.

  • Peel & shade

    For a hybrid glow, shave a shallow layer inside the eyes and nose so they read soft orange instead of flat black.

  • Cut through

    Save any full cutouts for the mouth points alone, opening them last with an LED light inside for the brightest zigzag grin.

Learn the carving basics

Before you start cutting

Do I need to cut this pumpkin at all?

No, this is a fully painted design with no openings. That is what lets it last the whole month without rotting or caving in. If you later want a glow, you can carve just the eyes or mouth, but the painted version stands on its own.

What paint holds up best on pumpkin skin?

Flat black acrylic craft paint gives the cleanest coverage and dries quickly. Two thin coats look better than one thick one and resist streaking. A light clear sealer on top helps guard against smudges if the pumpkin will be handled or sit outdoors.

How do I keep the zigzag teeth looking sharp?

Block the mouth in with a flat brush first, then come back with a small round brush to pull each point crisp. Work the tip outward to a fine edge rather than dabbing at it. Clean stray marks with a damp cotton swab before the paint sets.

Your take belongs here, too.

Changed a detail? Made it simpler? Share a photo of your version and tell the community what worked.

Share your pumpkin

More pumpkins like this

You've reached the end · 8 pumpkins
The Patch Report

Fresh pumpkins, in your inbox.

The best new carvings, ideas worth stealing, and how-tos for carving season. Short, seasonal, and gone by November.

A short email during carving season. Unsubscribe anytime. See our privacy policy.