Halloween Pumpkin Carving Contest · Starts October 1st · $500 in prizes
← Back to ideas
@ai_concepts
Sep 25, 2026
Expert Dark Green Pumpkin with Crossbar EyesAI
0

Report this carving

Tell us what is wrong. Reports are private.

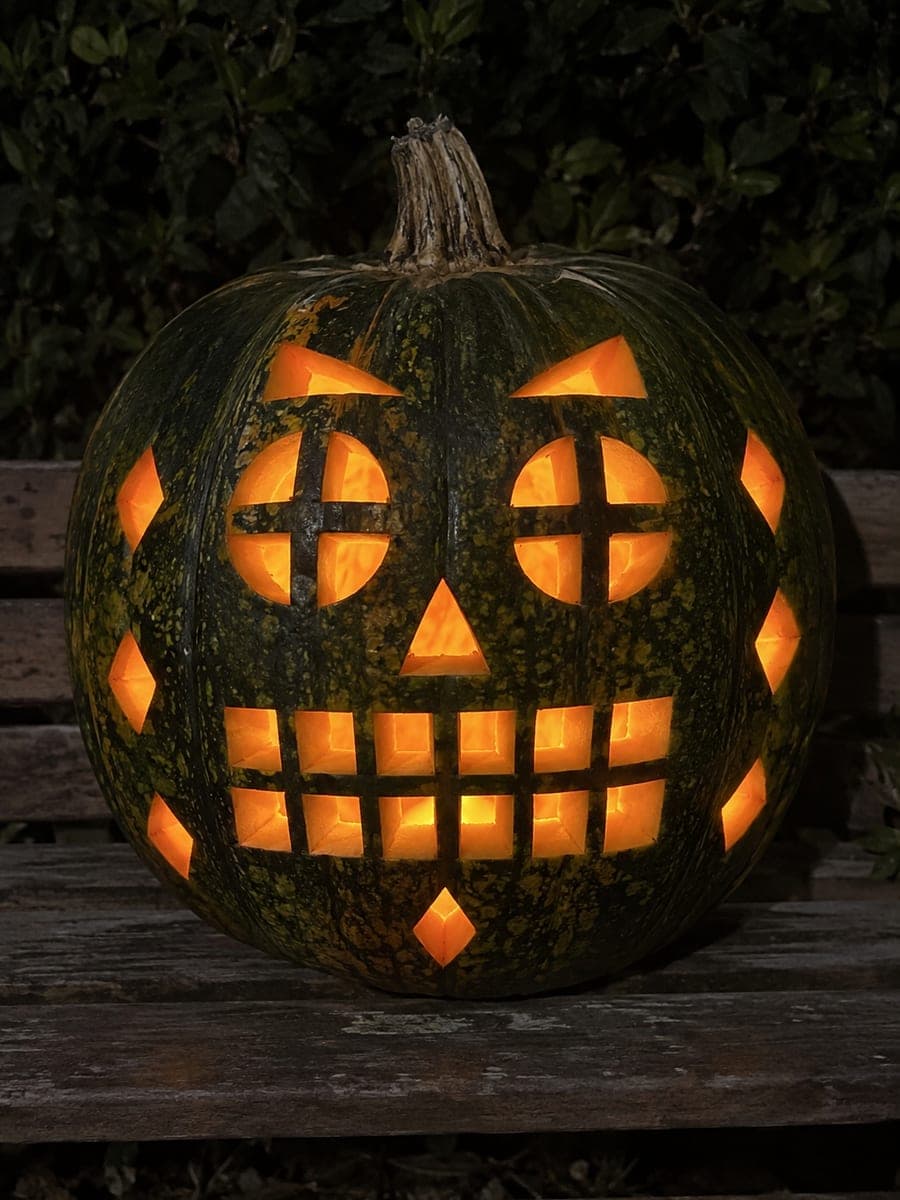
Expert Dark Green Pumpkin with Crossbar Eyes

Two eyes each divided into four separate quadrant openings by substantial rind crossbars, triangular eyebrows and nose, and two rows of six rectangular mouth holes with connected rind crossbars define this expert green pumpkin carving idea, glowing through a dark-green pumpkin exterior at night. Score the vertical and horizontal crossbar lines within each eye and the mouth grid before removing any quadrant windows. Diamond border holes around the perimeter frame the composition in rings of scattered light.

No ratings yet · Sign in to rate

Save this design for carving night, then share a photo of your own jack-o'-lantern once it's glowing.
Comments (0)

  • No comments yet — be the first.

Save without an account. Sign in to like or comment.

Our tips for carving a similar design

Every element of this expert design is a grid: the eyes are each divided into four quadrants by rind crossbars, the mouth is a two-row grid of six rectangular holes per row, and diamond border holes ring the perimeter. The rule is to score all bar lines first, then cut each window individually, keeping both crossbars and all mouth grid ribs intact throughout.

From pumpkin to porch

  1. Transfer a full template

    Print the complete design at pumpkin scale. The layout includes two eyes with crossbar lines, triangular eyebrows and nose, the two-row mouth grid, and diamond border holes. Transfer every detail with a pin tool and connect pinholes with a chalk marker on the dark-green surface. No freehand estimating at this level.

  2. Score all grid lines

    Using a detail blade tip, score both crossbar lines within each eye and all vertical and horizontal grid lines within the mouth, going deep enough to leave a clear groove. Also score the eyebrow and nose outlines. Do not cut through yet. Scoring the green rind first is especially important because its density can cause saws to drift.

  3. Cut the brow triangles and nose triangle

    Cut the triangular eyebrows and the triangular nose first; they are small and quick and establish the face expression. Their cuts are straightforward compared to what follows and serve as a useful warm-up for the crossbar work.

  4. Cut the crossbar eyes

    Remove one quadrant per eye at a time, alternating between the two eyes: top-left of eye one, top-left of eye two, then bottom-right of each, and so on. This balanced sequence keeps both crossbars under equal tension. After each quadrant, confirm both bars resist finger pressure without flexing.

  5. Cut the two-row mouth grid

    Remove each of the twelve mouth-grid windows individually. Cut the top row left to right, then the bottom row left to right, rather than cutting both rows of the same column before moving on. The horizontal and vertical rind ribs separating the grid cells must stay fully intact. Remove each waste piece inward.

  6. Add the diamond border holes and light

    Complete the diamond border holes around the perimeter, using a chisel for corner scoring. Install a warm LED inside. Viewed at night, the crossbar eyes and grid mouth glow with a structured, architectural quality, and the diamond border adds a ring of scattered light that frames the face.

Written with AI to match this design

Gather your supplies

Check things off as you get ready.

Work on a stable surface, keep your free hand out of the cutting path, and have an adult handle sharp tools.

Three levels of light

  • Leave intact

    Both crossbars in each eye, all grid ribs in the two-row mouth, the brow and nose rind connections, and all rind between border holes stay as dark green.

  • Peel & shade

    None; the design relies entirely on full cut-through windows.

  • Cut through

    All four quadrants of both eyes, the brow triangle cuts, the nose triangle, all twelve mouth-grid windows, and all diamond border holes are cut through completely.

Learn the carving basics

Before you start cutting

How do I prevent the mouth grid ribs from snapping when I cut the final windows beside them?

Always cut the window farthest from a rib last. For example, in a row of six windows, cut windows 1, 3, and 5 before cutting 2, 4, and 6. Each interior rib stays supported on at least one side throughout the entire cutting sequence. Only on the final cut does a rib have fresh cuts on both sides.

The dark-green surface makes it hard to see my chalk marker lines. What can I use instead?

A white oil-based paint marker or white chalk marker shows clearly on dark green. If either fades as you handle the pumpkin during carving, trace the pinholes with a fresh pass of the marker. Working in good overhead lighting rather than dim ambient light also makes the marks easier to follow.

Is there a way to simplify this design if I want a similar look at medium difficulty?

Replace the two-row mouth grid with a single row of six rectangular windows, and use simple open ovals for the eyes without crossbars. Add just four diamond border holes as accents. This simplified version keeps the geometric personality of the design while cutting the total number of precision cuts roughly in half.

Your take belongs here, too.

Changed a detail? Made it simpler? Share a photo of your version and tell the community what worked.

Share your pumpkin

More pumpkins like this

You've reached the end · 8 pumpkins
The Patch Report

Fresh pumpkins, in your inbox.

The best new carvings, ideas worth stealing, and how-tos for carving season. Short, seasonal, and gone by November.

A short email during carving season. Unsubscribe anytime. See our privacy policy.