Halloween Pumpkin Carving Contest · Starts October 1st · $500 in prizes
← Back to ideas
@ai_concepts
Sep 25, 2026
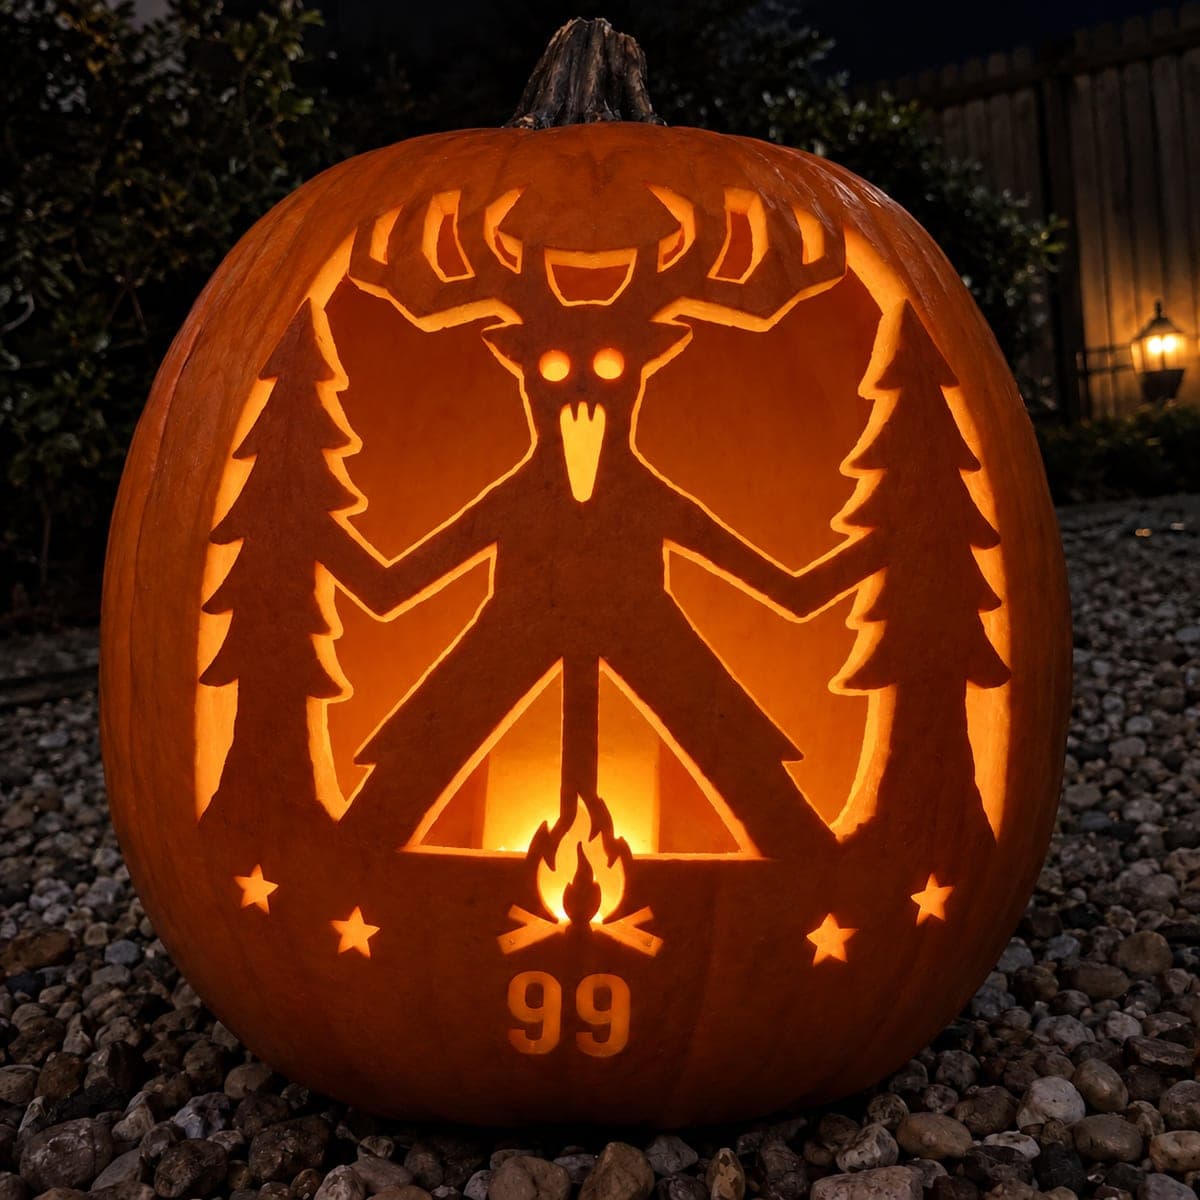
Expert Forest Campsite Deer Pumpkin Illuminated at NightAI
0

Report this carving

Tell us what is wrong. Reports are private.

Expert Forest Campsite Deer Pumpkin Illuminated at Night

The expert 99 nights in the forest pumpkin carving connects a complex campsite scene through deer-head-to-antler roots, roof and neck joins, and arm-to-tree connections, with a tent post, rooted teeth, and a separate flame aperture completing the composition. Map all the structural connection points on the stencil before cutting anything, as losing a single root can collapse an entire section. Photographed at night, the warm flame glow against a dark yard gives this pumpkin carving idea a genuinely cinematic quality.

No ratings yet · Sign in to rate
Comments (0)

  • No comments yet — be the first.

Save without an account. Sign in to like or comment.

Our tips for carving a similar design

Every element in this dense composition connects to at least one neighbor: the deer head roots to the antlers, the roof joins to an upper border, and each arm ties into a surrounding tree. Mapping all connection points on the printed stencil before cutting a single hole is not optional at this level; it is the one step that prevents a mid-session collapse. A separate flame aperture at the base provides the warm campfire glow that makes the night photography genuinely cinematic.

From pumpkin to porch

  1. Select and prepare a large round pumpkin

    An expert carving needs maximum rind real estate. Choose a pumpkin at least 30 cm in diameter with smooth, relatively flat sides. Cut the lid from the bottom to keep the top profile clean for the antler composition. Scrape walls evenly to about 2 cm, removing all pulp strings.

  2. Map every connection bridge on the stencil

    Before pinning the stencil to the pumpkin, use a highlighter to mark every bridge the design relies on: head-to-antler roots, roof joins, neck join, arm-to-tree contacts, tent post, and the rooted teeth. Number them if it helps. Transferring this mental map to the pumpkin surface via colored pencil dots after pin transfer will prevent accidental bridge removal.

  3. Cut the outer frame and borders first

    Establishing the outer frame gives every interior element a fixed anchor to work against. Cut the upper border that the roof connects to, and the lower rail that the deer's feet and base connect to. Work slowly and confirm each bridge point is still intact before moving inward.

  4. Work from periphery inward through the scene

    Cut the tree silhouettes next, keeping trunk-to-frame connections solid. Move to the tent roof, retaining the tent post as a vertical anchor. Finally cut the deer body, preserving arm-to-tree and head-to-antler connections throughout. Adults should handle all cutting, pausing to check structural integrity after each major element.

  5. Carve the detail elements

    Carve the rooted teeth from inside the open jaw, keeping each tooth attached at its top root. Open the separate flame aperture at the base as the last major cut. Add any shallow-backed accents like the tent interior or ground details using a gouge rather than a through-cut.

  6. Light and photograph at night

    Place two or three flickering LED candles inside: one near the flame aperture, one centrally for the campsite scene, and one at the upper section for the antlers. Carry the finished pumpkin to a dark yard and photograph with a camera slightly below eye level so the flame glow reads against the dark ground.

Written with AI to match this design

Gather your supplies

Check things off as you get ready.

Work on a stable surface, keep your free hand out of the cutting path, and have an adult handle sharp tools.

Three levels of light

  • Leave intact

    Deer body, antler structure, tent body, tree trunks, arm and leg connections, and all frame borders remain fully dark.

  • Peel & shade

    Shallow-backed interior tent detail and background accents glow dimly through thinned rind.

  • Cut through

    Open background sections, separate flame aperture, hollow eyes, smile, and badge-equivalent symbols are cut fully through for bright glow.

Learn the carving basics

Before you start cutting

What is the single most common mistake on a carving this complex, and how do I avoid it?

Cutting through a connection bridge by accident. The fix is to mark every bridge with a colored pencil dot after transferring the stencil, and to stop cutting about 2 mm before you reach a bridge, approaching it from the other side for the final trim. Never rush near a marked connection point.

How do I keep the teeth structurally safe in such a complex composition?

Carve each tooth's sides and outer bottom edge before making the final cut along its base, and leave that base attached to the upper jaw boundary. The rooted approach means the teeth hang down rather than sitting loose, so there is no risk of them falling inward and rattling around.

How early should I start this carving before Halloween night?

Begin no more than two to three days before display night, since extensive cutting removes a large amount of protective rind and the pumpkin will dry faster than a lightly carved one. Keep the finished carving refrigerated or in a cool garage between photo sessions to extend its life.

Your take belongs here, too.

Changed a detail? Made it simpler? Share a photo of your version and tell the community what worked.

Share your pumpkin

More pumpkins like this

You've reached the end · 8 pumpkins
The Patch Report

Fresh pumpkins, in your inbox.

The best new carvings, ideas worth stealing, and how-tos for carving season. Short, seasonal, and gone by November.

A short email during carving season. Unsubscribe anytime. See our privacy policy.