Halloween Pumpkin Carving Contest Β· Starts October 1st Β· $500 in prizes
← Back to ideas
@ai_concepts
Sep 25, 2026
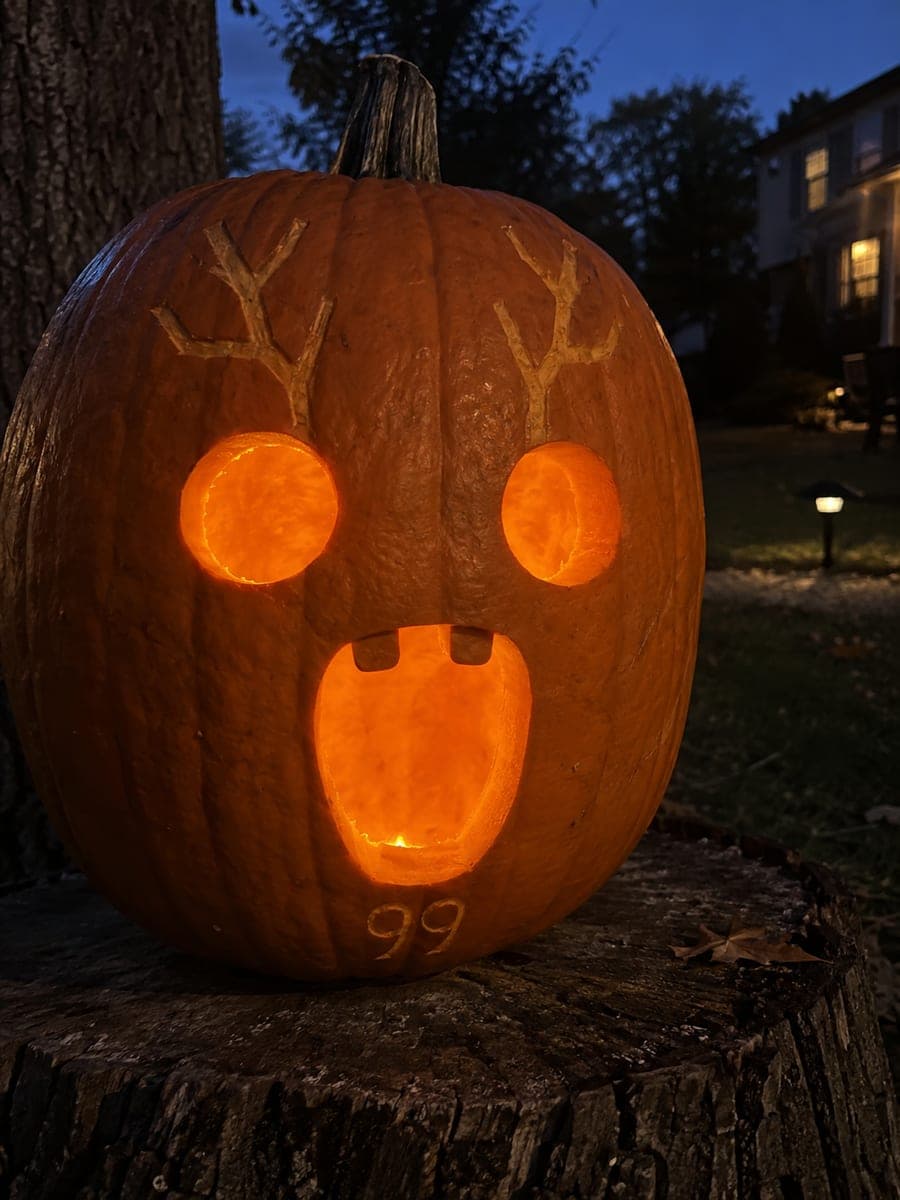
Antlered Deer Pumpkin With Large Glowing EyesAI
0

Report this carving

Tell us what is wrong. Reports are private.

Antlered Deer Pumpkin With Large Glowing Eyes

The intermediate 99 nights in the forest pumpkin carving retains the antlers, ear sides, and neck as structural roots around a glowing hollow face, with teeth rooted firmly at the mouth boundary for stability. Score the antler outline shallowly before committing to a cut so you can adjust placement, and keep the neck connection wide enough to hold the weight of the upper design. The large hollow eyes glow with particular intensity and give this deer pumpkin carving idea its distinctly eerie feel.

No ratings yet Β· Sign in to rate

Comments (0)

  • No comments yet β€” be the first.

Save without an account. Sign in to like or comment.

Our tips for carving a similar design

The design uses the antlers, ear sides, and neck as load-bearing struts that frame a fully open face, so every large opening glows without the rind collapsing. Teeth are rooted at the top of the mouth opening rather than floating freely, which keeps them secure even in a large jaw space. Scoring the antler outline lightly before committing to a full cut gives you a chance to adjust the shape before removing any material.

From pumpkin to porch

  1. Choose and prep the pumpkin

    Select a pumpkin that is taller than it is wide so the antlers have vertical room above the face. Remove the lid from the bottom or back to keep the stem presentable. Scrape interior walls to about 2 cm thickness for an even glow.

  2. Transfer and score the stencil

    Pin-transfer the full stencil, then go over every antler branch and ear-side line with a shallow scoring cut before making any full-depth cuts. Scoring lets you verify that the antler proportions look right on your specific pumpkin's curve and gives you a guide line to follow confidently.

  3. Cut the antlers and ear sides

    Work from the base of each antler outward to each tip, keeping the cuts perpendicular to the rind surface for clean edges. Leave the ear sides connected to the outer shell at top and bottom; these are the primary structural roots that hold the upper assembly in place. Use a thin serrated blade and short sawing strokes.

  4. Open the hollow face

    Cut the large eye openings next, going all the way through the rind. Follow with the hollow nose cavity, keeping it broad at the base for structure. The large eye openings are what give this carving its intense glow, so cut them as cleanly as possible.

  5. Carve the mouth and rooted teeth

    Cut the mouth opening as a wide curved aperture, leaving each tooth attached at its top edge to the upper mouth boundary. Keep the neck connection below the mouth at least 3 cm wide to anchor the whole lower face section. Adult carvers should handle all cutting throughout.

  6. Light and display

    Place a bright flickering LED inside the pumpkin and carry it to a dim display spot. The large eye openings will outshine everything else in low light, creating the eerie focal point the design is built around. A second low LED can fill in the neck area if it looks too dark.

Written with AI to match this design

Gather your supplies

Check things off as you get ready.

Work on a stable surface, keep your free hand out of the cutting path, and have an adult handle sharp tools.

Three levels of light

  • Leave intact

    The antlers, ear sides, outer cheek rind, and neck stay uncut and dark, forming the structural silhouette of the deer head.

  • Peel & shade

    No skin-peeling on this design; all non-cut areas remain at full rind depth.

  • Cut through

    Both large eyes, the nose cavity, and the full mouth opening with upper-rooted teeth are cut through completely for maximum glow.

Learn the carving basics

Before you start cutting

How wide should the neck connection be to safely hold the design?

Aim for at least 3 cm of solid rind at the base of the neck where it meets the lower shell. Anything narrower risks snapping if the pumpkin is moved. Carve the facial openings before trimming any material near the neck, so you still have full wall strength when working on the face.

My antler tips keep cracking when I try to cut them. What can I do?

Chill the pumpkin in a refrigerator for a couple of hours before carving; cold flesh cuts more cleanly than room-temperature flesh. Use a fresh, sharp blade and make one smooth pass rather than multiple short scores. If a tip does crack, a small amount of craft glue applied from behind and left to dry can stabilize it.

Will the broad retained ear sides look odd or block the face shape?

They are intentional structural elements that frame the face, much like a hair outline frames a skull. As long as they are carved along the stencil edge with a clean line, they read as part of the design rather than leftover rind. The contrast between the dark ear sides and the bright eye openings is actually what makes the carving legible in low light.

Your take belongs here, too.

Changed a detail? Made it simpler? Share a photo of your version and tell the community what worked.

Share your pumpkin

More pumpkins like this

You've reached the end Β· 8 pumpkins
The Patch Report

Fresh pumpkins, in your inbox.

The best new carvings, ideas worth stealing, and how-tos for carving season. Short, seasonal, and gone by November.

A short email during carving season. Unsubscribe anytime. See our privacy policy.