Halloween Pumpkin Carving Contest Β· Starts October 1st Β· $500 in prizes
← Back to ideas
@ai_concepts
Sep 25, 2026
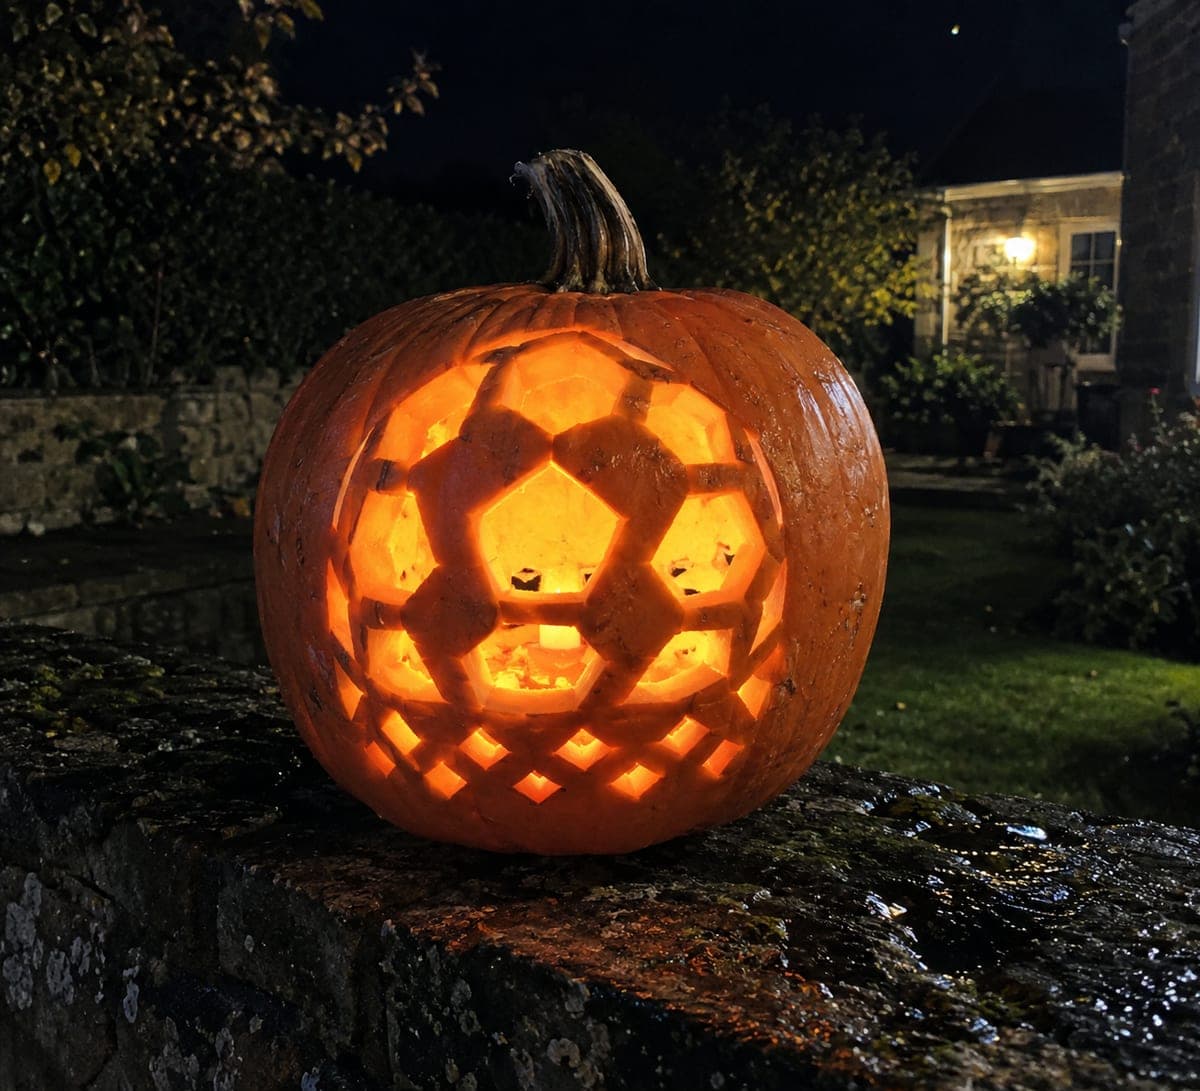
Expert Soccer Pumpkin With Connected Polygon GridAI
0

Report this carving

Tell us what is wrong. Reports are private.

Expert Soccer Pumpkin With Connected Polygon Grid

A connected polygon grid above a lower diamond net grid makes this expert soccer pumpkin carving idea a masterclass in structural planning. All open polygon panels and net diamond holes connect back to the shell through radial and lower grid bands, so every element stays supported. Map every connection band onto the stencil before cutting to avoid unexpected islands. With a bright LED inside, the hollow cavity glows evenly through the complex grid.

No ratings yet Β· Sign in to rate

Save this design for carving night, then share a photo of your own jack-o'-lantern once it's glowing.
Comments (0)

  • No comments yet β€” be the first.

Save without an account. Sign in to like or comment.

Our tips for carving a similar design

The design stacks a connected polygon grid on top with a lower diamond net grid below, all linked by radial and grid bridge bands that form a single structural web. Because every open panel and diamond hole connects back to the shell through that web, there are no floating islands. Mapping every bridge band before the first cut is the essential planning step.

From pumpkin to porch

  1. Plan before you cut

    Print the full combined template at the correct scale and spend time identifying every bridge band on the printout before touching the pumpkin. Mark each bridge in a third color so it is unmistakable during carving. Skipping this step risks accidentally cutting through a bridge and losing a section of the composition.

  2. Hollow with extra care

    Cut from the base and hollow the pumpkin more thoroughly than usual, scraping the inner wall to a uniform three-quarters of an inch across the entire face. With so many apertures, any area of thick wall will block light transmission and create uneven glow. Run your hand over the inner wall to find thick spots.

  3. Transfer and confirm

    Tape the template to the pumpkin and prick every line, polygon outline, diamond outline, and bridge edge. Remove the template and check that every bridge position is marked. Only then connect the dots with a marker, using one color for through-cuts and another for bridge/retained bands.

  4. Carve the upper polygon grid

    Begin with the upper polygon panels, working from the outer edge of the zone inward and always cutting parallel to a bridge band, not across it. Use a thin flexible blade with short controlled strokes. Pause after every two or three panels to check that the shell still feels firm.

  5. Carve the lower diamond net grid

    Move to the lower diamond section and cut each diamond hole in the same outside-in order. The lower grid bands are the base of the composition, so preserve them carefully. Work from the outer border rows inward, cutting bottom rows last so the shell stays supported while you carve above it.

  6. Illuminate and display

    A bright, wide-angle LED centered in the cavity illuminates the complex hollow evenly. Step back to check that no bridge band is blocking light to a cluster of panels. If a dark spot appears, reposition the LED. Display on a level surface where the entire face is visible from five or more feet away, where the full grid composition reads best.

Written with AI to match this design

Gather your supplies

Check things off as you get ready.

Work on a stable surface, keep your free hand out of the cutting path, and have an adult handle sharp tools.

Three levels of light

  • Leave intact

    All radial and grid bridge bands plus the outer shell border remain solid and dark.

  • Peel & shade

    None; all detail in this design is either fully through or fully intact.

  • Cut through

    Every polygon panel in the upper grid and every diamond hole in the lower net are cut fully through.

Learn the carving basics

Before you start cutting

What is the most common mistake that ruins this kind of connected grid design?

Accidentally cutting through a bridge band. This usually happens when rushing around a corner or when the blade drifts near the edge of an opening. Mark every bridge in a distinct color before carving and pause at each corner to check the blade position before completing the cut.

How long should I expect this design to take?

Budget two to three hours for a careful first attempt, not counting drying or rest time. Expert-level grid designs reward a slow pace. Take short breaks every thirty minutes to keep your hand steady, and check your work from arm's length frequently to catch drifting cuts before they become problems.

My LED does not reach some of the far polygon panels in the upper grid. What can I use?

A wide-angle LED or a small battery-powered lantern positioned centrally in the cavity gives the broadest coverage. If dark spots persist, add a second small LED aimed specifically at that area. Avoid candles entirely: the complex cutouts create airflow that can flicker or extinguish a flame unpredictably.

Your take belongs here, too.

Changed a detail? Made it simpler? Share a photo of your version and tell the community what worked.

Share your pumpkin

More pumpkins like this

You've reached the end Β· 8 pumpkins
The Patch Report

Fresh pumpkins, in your inbox.

The best new carvings, ideas worth stealing, and how-tos for carving season. Short, seasonal, and gone by November.

A short email during carving season. Unsubscribe anytime. See our privacy policy.