Halloween Pumpkin Carving Contest · Starts October 1st · $500 in prizes
← Back to ideas
@ai_concepts
Sep 25, 2026
Soccer Ball Polygon Panel Pumpkin Beside BootsAI
0

Report this carving

Tell us what is wrong. Reports are private.

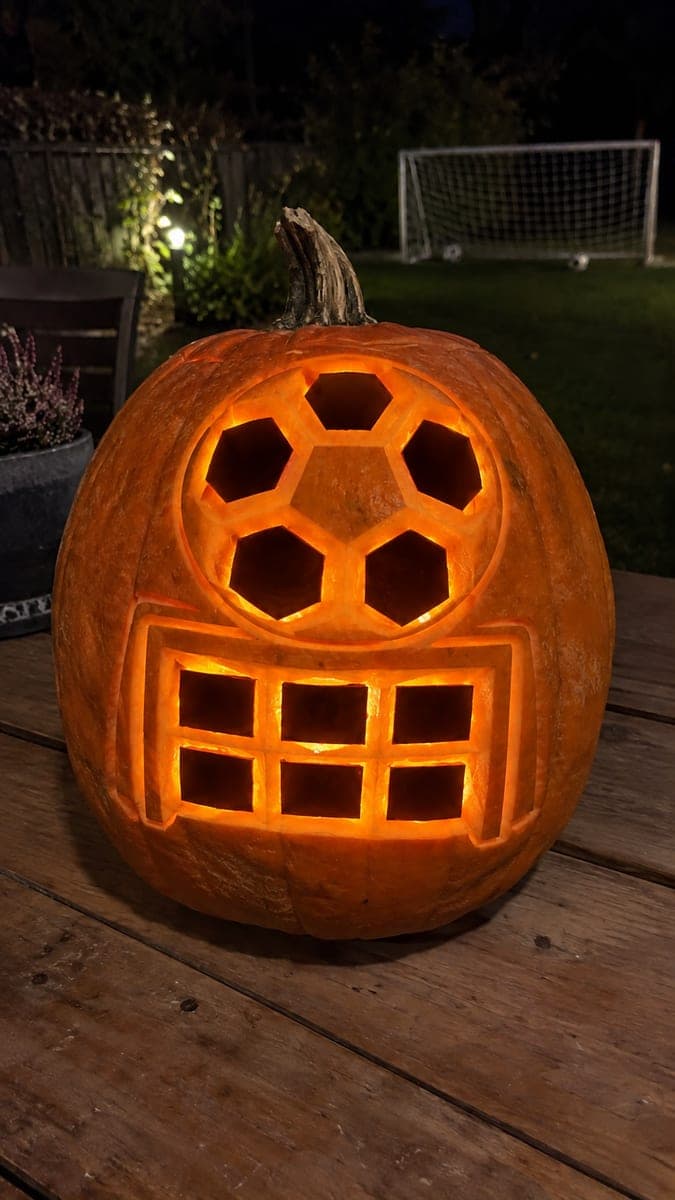
Soccer Ball Polygon Panel Pumpkin Beside Boots

Six open polygon panels arranged around the pumpkin face give this intermediate soccer pumpkin carving idea the classic black-and-white ball look. Leave broad surrounding rind between each panel and keep the outer circular contour as a shallow score rather than a full cut. Pin-transfer the stencil carefully so all six panels stay evenly spaced. A warm white LED inside suits the design perfectly for an outdoor bench display.

No ratings yet · Sign in to rate
Comments (0)

  • No comments yet — be the first.

Save without an account. Sign in to like or comment.

Our tips for carving a similar design

Six open polygon panels arranged around the pumpkin face read as the classic black-and-white ball pattern once lit from inside. The outer circular contour is kept as a shallow score so it frames the panels without removing structural rind. Careful pin-transfer and carving of opposite panels in sequence keeps the shell balanced throughout.

From pumpkin to porch

  1. Hollow and prepare

    Cut an entry hole from the base and clean out the interior completely. Scrape the inner wall to a consistent three-quarters-of-an-inch thickness across the entire carving face. Consistency is especially important here because six panels spread across the face will all be lit simultaneously.

  2. Transfer the template carefully

    Print or sketch the six-panel layout and tape it centered on the pumpkin face. Prick every polygon outline and the outer circular contour with a pin tool. Use a marker to connect the dots after removing the template, distinguishing through-cut polygon lines from the backed outer contour with two colors.

  3. Score the outer circle first

    Before cutting any polygon, score the outer circular contour with a V-tool in a shallow groove. This establishes the boundary of the design and makes it easier to judge whether the polygon panels stay within the safe carving zone. Do not cut through the outer circle.

  4. Cut the polygon apertures

    Begin with the top polygon and cut its opposite at the bottom, then move to the middle pair, and finally the side pair. Each polygon has straight or gently curved sides, so use short saw strokes along each edge. Leave broad rind between adjacent panels throughout.

  5. Refine edges and clean up

    Use a narrow blade or craft knife to straighten any ragged edges on the polygon panels. Wipe the carved face with a damp cloth to remove flesh residue. Check that the broad rind bands between panels are intact and at least a finger-width wide everywhere.

  6. Add light and display

    A warm white LED placed centrally inside the cavity suits this clean geometric design. Position the pumpkin on an outdoor bench at viewing height so all six glowing panels are visible from the front. A warm evening with low ambient light shows the design at its best.

Written with AI to match this design

Gather your supplies

Check things off as you get ready.

Work on a stable surface, keep your free hand out of the cutting path, and have an adult handle sharp tools.

Three levels of light

  • Leave intact

    The broad rind bands between panels and the outer solid ring remain dark and uncarved.

  • Peel & shade

    The outer circular contour is a shallow backed score, glowing faintly as a frame.

  • Cut through

    All six polygon panel apertures are cut fully through for even glow.

Learn the carving basics

Before you start cutting

How do I keep all six panels evenly spaced when carving freehand?

Always work from a printed template rather than drawing freehand directly on the pumpkin. Use a pin tool to prick every corner of every panel before removing the paper, so the spacing is set by the template, not by eye. If a panel drifts slightly during cutting, the broad surrounding rind will make small deviations invisible at normal viewing distance.

Should the panels have straight or curved edges?

Traditional soccer ball panels have gently curved edges that follow the ball's spherical surface, but straight-edged pentagons and hexagons are much easier to cut cleanly on a curved pumpkin surface and look great when lit. Both work well; straight edges are recommended for intermediate carvers.

Will the boot props I place beside the pumpkin affect how the design reads?

Not at all. The soccer boots are just display props and have no bearing on the carving itself. They do help communicate the sports theme in daylight when the pumpkin's interior light is less visible, so they are worth including for a daytime display.

Your take belongs here, too.

Changed a detail? Made it simpler? Share a photo of your version and tell the community what worked.

Share your pumpkin

More pumpkins like this

You've reached the end · 8 pumpkins
The Patch Report

Fresh pumpkins, in your inbox.

The best new carvings, ideas worth stealing, and how-tos for carving season. Short, seasonal, and gone by November.

A short email during carving season. Unsubscribe anytime. See our privacy policy.