Halloween Pumpkin Carving Contest · Starts October 1st · $500 in prizes
← Back to ideas
@ai_concepts
Sep 11, 2026
Fishbone Skeleton Etched Halloween PumpkinAI
0

Fishbone Skeleton Etched Halloween Pumpkin

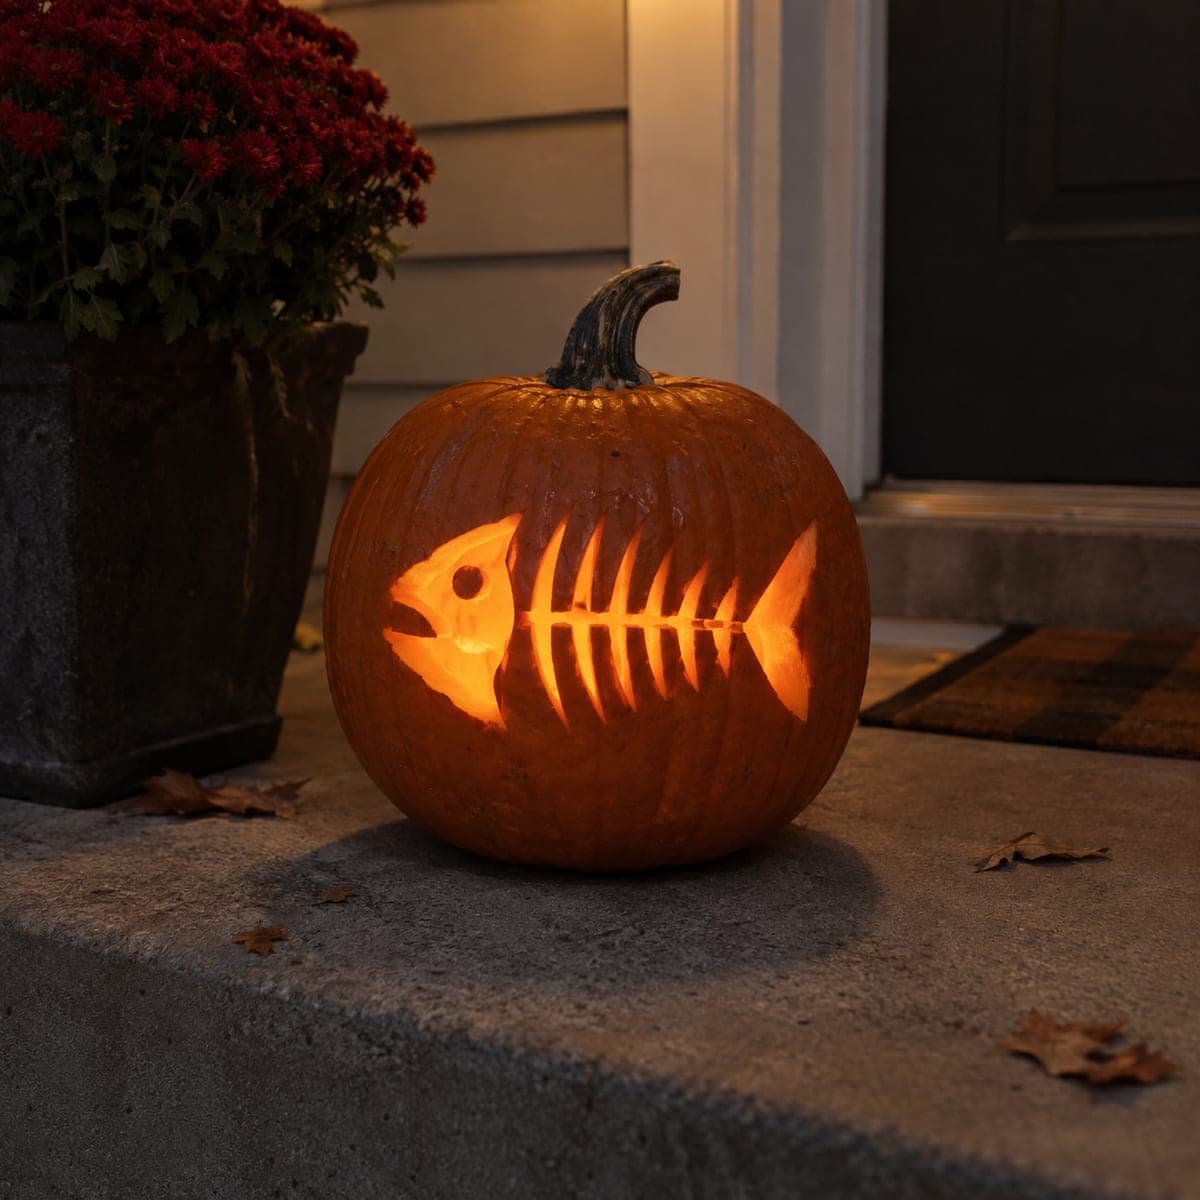
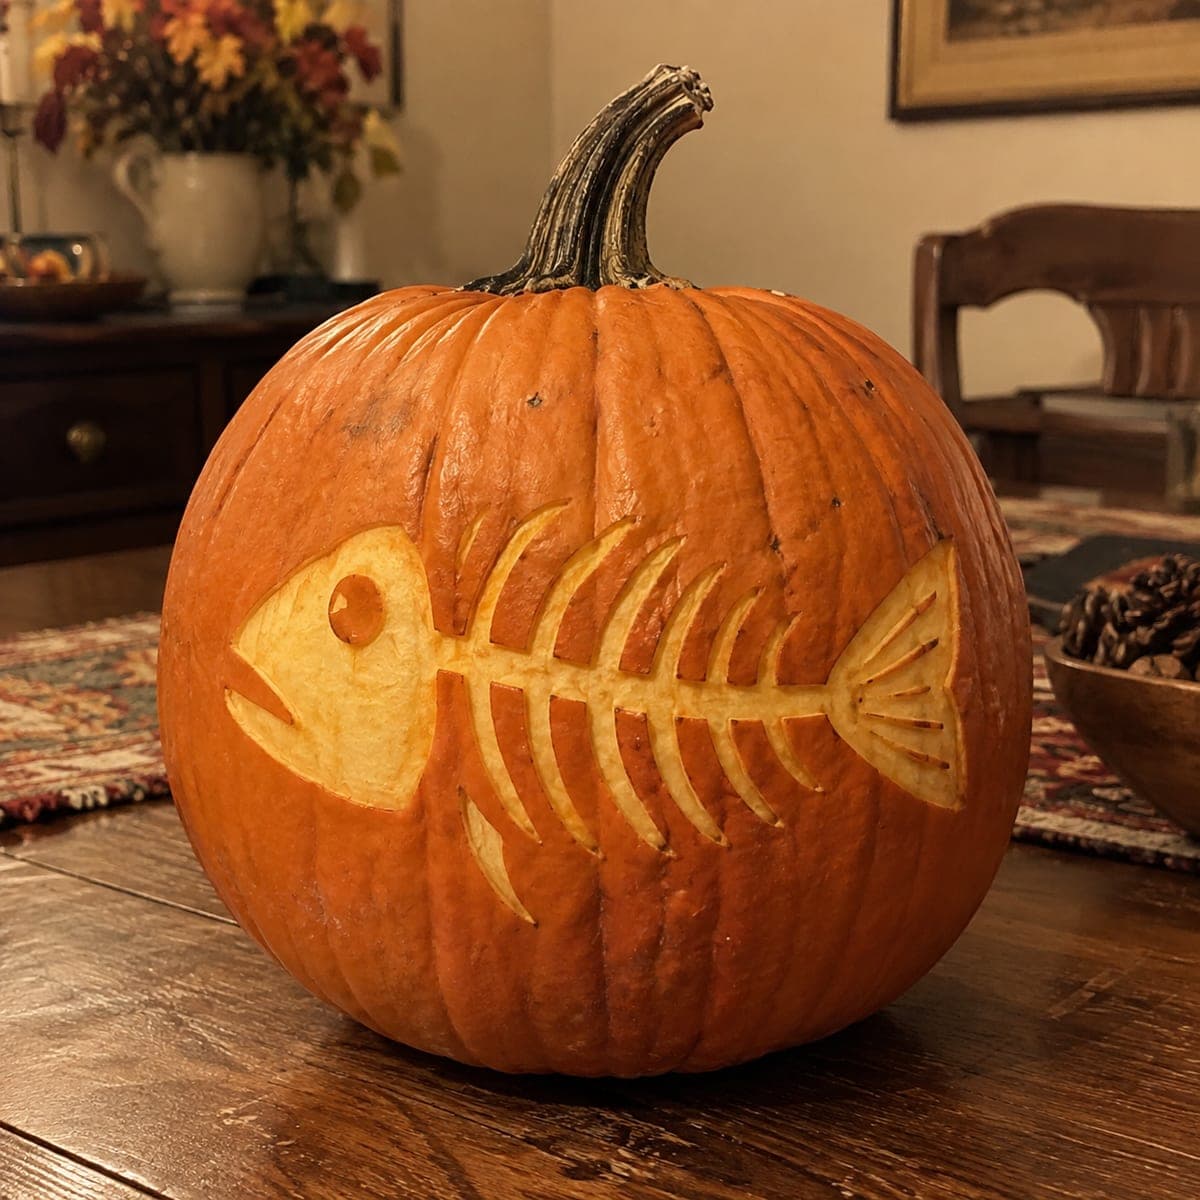
A cartoon fish skeleton stretches across this pumpkin, from grumpy open-mouthed skull to fanned tail, with each rib peeled as a clean curved stroke. The design is all shallow etching, which makes it a satisfying step up from basic cutouts without needing saw skills. Carve the spine as one long line first, then hang matching rib pairs off it so the spacing stays even. A quirky pick for cat households or anyone who likes their Halloween a little deadpan.

This is an AI-generated concept image: a realistic, carvable design idea rather than a photo of a finished carve. AI concepts are always labeled and sit out the leaderboard and the contest.

No ratings yet · Sign in to rate
Comments (0)

  • No comments yet — be the first.

Save without an account. Sign in to like or comment.

Our tips for carving a similar design

The core trick here is shallow etching, not cutting all the way through. You peel away only the pumpkin skin so the bones glow a soft orange while the surrounding body stays dark. Plan it as one long spine line with matching rib pairs branching off, which keeps the whole fish balanced and easy to space.

Written by PumpkinCarvingIdeas.com, inspired by the image above. These are our suggestions, not instructions from the uploader. This approach to the AI concept has not been tested on a real pumpkin.

From pumpkin to porch

  1. Pick a smooth side and open the pumpkin

    Since this is a concept image, you are building your own version of the look. Choose the flattest, cleanest face of a real pumpkin for the fish. Cut a lid from the top or a hatch from the back with a serrated carving saw, an adult handling the blade. Scoop the inside until the front wall is about one inch thick so etching goes smoothly.

  2. Transfer the fish skeleton

    Print or draw the design with a grumpy open-mouthed skull on the left, a long spine, evenly spaced ribs, and a fanned tail on the right. Tape the pattern flat and poke closely spaced dots along every line with a pushpin or poking tool. Peel the paper and connect the dots lightly with a marker so you can see the full layout. Double check that the rib pairs line up before you cut.

  3. Etch the spine and ribs

    Work the long spine line first as a single shallow channel, then hang the matching rib pairs off it one at a time. Use a lino or ribbon gouge to scrape away just the top skin, exposing the pale flesh underneath for a dim glow. Keep the depth even and shallow, only a couple millimeters, so no line accidentally cuts through. Carving the spine first gives you a guide that keeps rib spacing consistent.

  4. Peel the skull and tail fan

    Widen the skull area into a clean peeled shape and lightly scrape the open-mouth curve and the fanned tail strokes. Leave thin skin bridges between the tail rays so the fan reads as separate lines instead of one big patch. Round the edges of each peeled area slightly so they catch light softly rather than looking ragged.

  5. Add the eye and clean up

    For a bright accent, cut the small round eye all the way through so it becomes the single point of full light. Save this cut for last so the surrounding etching stays firm while you work. Go back over every etched line and shave any stray skin so the pale flesh is even. Blot the flesh dry with a paper towel.

  6. Light it and photograph

    Set a battery LED tea light or a small puck light inside, never a candle, since the thin etched walls can scorch. Turn off the room lights and check that the ribs glow evenly, touching up any dull spots by scraping a hair deeper. The eye should pop as the brightest dot. Shoot your photo in near darkness so the warm orange bones stand out against the dark body.

Gather your supplies

Check things off as you get ready.

Work on a stable surface, keep your free hand out of the cutting path, and have an adult handle sharp tools.

Three levels of light

  • Leave intact

    The whole pumpkin body around the fish stays untouched and dark, letting the skeleton read as a silhouette.

  • Peel & shade

    The spine, ribs, skull, and tail fan are skin-peeled so the bones glow a soft dim orange.

  • Cut through

    Only the small round eye is cut through for a single bright point of light.

Learn the carving basics

Before you start cutting

How do I keep all the ribs evenly spaced?

Carve the long spine as one continuous line before touching any ribs. Then add the rib pairs one at a time, mirroring each new bone against the one across from it. Marking the spine into equal segments with a marker first makes the spacing almost automatic.

My etched lines look faint when lit. What went wrong?

Faint lines usually mean the skin was not fully removed, so light cannot pass through the remaining green layer. Go back and scrape until you reach the pale, slightly wet flesh underneath. Keep the depth even and shallow so the glow is consistent across the whole fish.

Can I skip the cut-through eye and etch it instead?

Yes, etching the eye keeps the design all one glow level and is a bit safer for younger helpers. A cut-through eye simply gives you one bright accent that draws the viewer's focus. Either choice works, so pick the contrast you prefer.

Your take belongs here, too.

Changed a detail? Made it simpler? Share a photo of your version and tell the community what worked.

Share your pumpkin

More pumpkins like this

You've reached the end · 8 pumpkins
The Patch Report

Fresh pumpkins, in your inbox.

The best new carvings, ideas worth stealing, and how-tos for carving season. Short, seasonal, and gone by November.

A short email during carving season. Unsubscribe anytime. See our privacy policy.