Halloween Pumpkin Carving Contest · Starts October 1st · $500 in prizes
← Back to ideas
@ai_concepts
Sep 25, 2026
Floral Mandala Pumpkin With Four Radial Support SpokesAI
0

Report this carving

Tell us what is wrong. Reports are private.

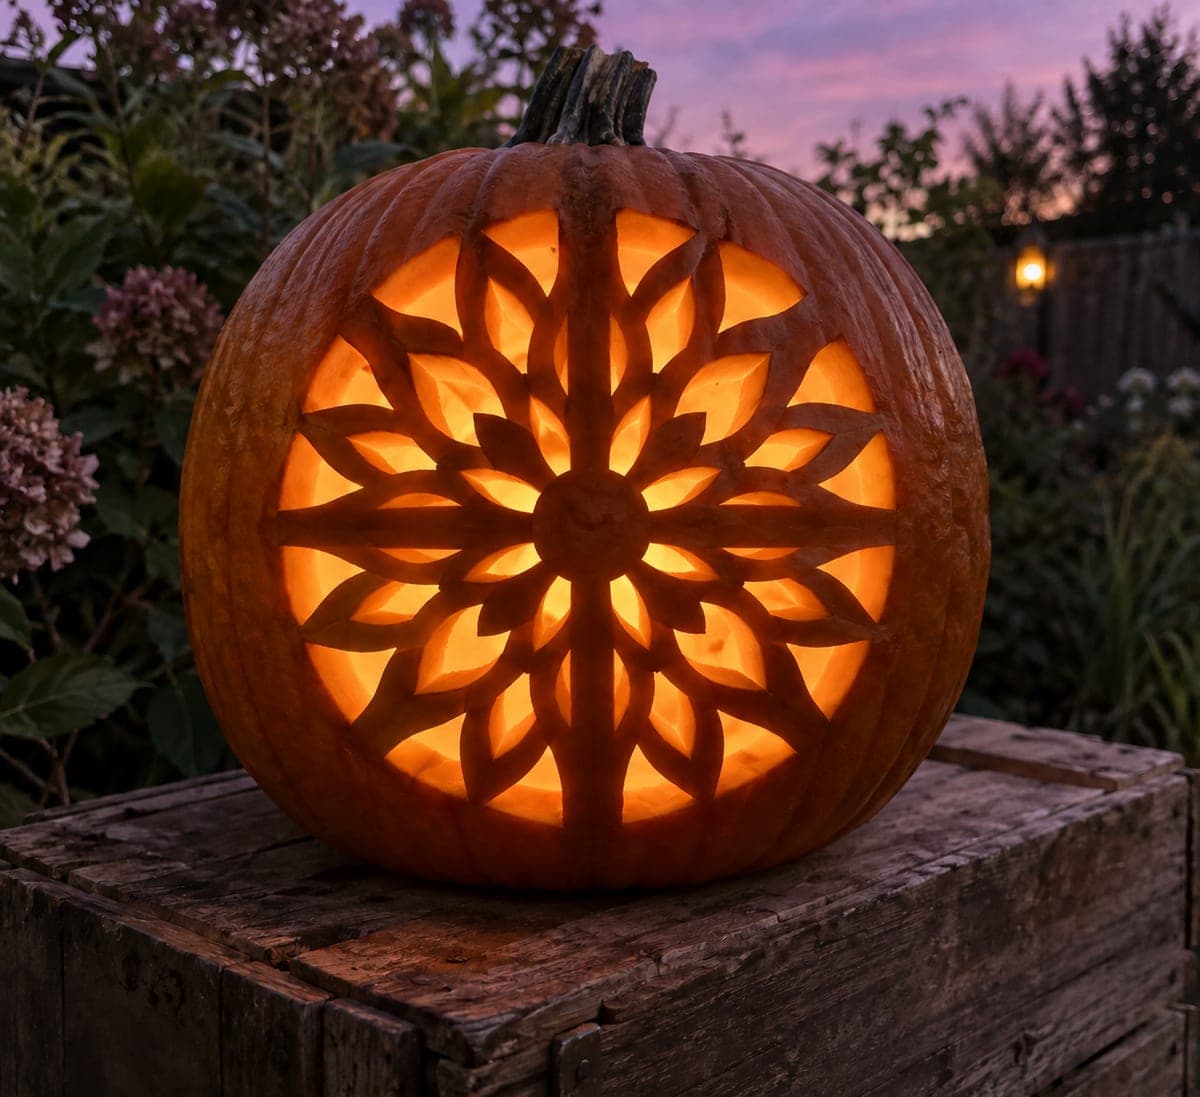
Floral Mandala Pumpkin With Four Radial Support Spokes

A detailed floral mandala with four broad uninterrupted dark rind spokes at the cardinal positions connecting a central disc to the outer wall gives this hard advanced pumpkin carving idea both beauty and structural integrity. Draw the four spokes at 12, 3, 6, and 9 o'clock before cutting any petal holes, and verify each spoke is at least 12mm wide and continuous with no light gaps across its length. Merge the spokes naturally into existing dark shapes where possible, then cut the individual petal openings and inner flower details.

No ratings yet · Sign in to rate
Comments (0)

  • No comments yet — be the first.

Save without an account. Sign in to like or comment.

Our tips for carving a similar design

Four broad uninterrupted dark rind spokes at the 12, 3, 6, and 9 o'clock positions are the engineering foundation of this mandala, connecting the central solid disc to the outer wall throughout the cutting process. Every petal hole is cut within the wedge-shaped zones between those spokes, so no section ever becomes structurally isolated. Drawing and verifying all four spoke positions before cutting a single petal hole is the non-negotiable first step.

From pumpkin to porch

  1. Choose a round symmetrical pumpkin

    A globe-shaped pumpkin with a flat face gives the radial mandala its most symmetrical presentation. Scoop to about three-quarters of an inch of wall thickness throughout. Mark the center point of the face with a small dot as the reference for all radial measurements.

  2. Draw the four spokes before anything else

    From the center mark, draw four straight lines outward at 12, 3, 6, and 9 o'clock, extending all the way to the outer pumpkin wall. Make each spoke at least 12 mm wide by drawing parallel edges on both sides of each center line. These four corridors of rind must not be cut at any point during the carving process.

  3. Draw the central disc and petal holes

    Draw the central disc as a solid circle about 40-50 mm in diameter around the center point, confirming it connects to all four spokes. Then sketch the petal openings in the four wedge zones, keeping all inner petals attached to the disc and outer petals attached to the wall via the spoke framework.

  4. Cut outer petals first, working inward

    Working in one wedge zone at a time, cut the petal holes closest to the outer wall before moving inward. This preserves the most rind while you still have a firm grip on the pumpkin. Complete one full wedge before rotating to the next.

  5. Cut inner petal details and light

    Move inward toward the central disc, cutting the smaller inner petal holes with a fine detail blade. Verify each inner petal hole remains connected to the disc through solid rind. Insert a bright LED lantern centered inside the pumpkin for even illumination across all four zones.

Written with AI to match this design

Gather your supplies

Check things off as you get ready.

Work on a stable surface, keep your free hand out of the cutting path, and have an adult handle sharp tools.

Three levels of light

  • Leave intact

    All four radial spokes, the central solid disc, and dark rind shapes between petals stay intact.

  • Peel & shade

    None for this design.

  • Cut through

    All individual petal openings in the four wedge zones are cut through completely for full glowing light.

Learn the carving basics

Before you start cutting

How do I make all four spokes exactly equal width?

Use a ruler to draw parallel lines 12 mm apart on both sides of each center axis line. Check the spoke width at three points along its length, since the curved pumpkin surface can cause the drawn lines to drift slightly. Wider is always safer than narrower when structural integrity is the goal.

Can I simplify the petal count to make this less demanding?

Yes. Using 6-8 large simple petals per wedge zone instead of many small detailed ones makes the cuts faster and more forgiving without losing the mandala character. Keep the four spokes and central disc structure unchanged and simply use fewer, bigger petal openings.

What if I accidentally nick a spoke?

Stop and assess the cut depth. A shallow surface scratch can be packed with petroleum jelly to slow drying. If the spoke is cut more than halfway through, leave an adjacent strip of uncut rind immediately next to it as a secondary support bridge, and avoid putting any further pressure on that spoke.

Your take belongs here, too.

Changed a detail? Made it simpler? Share a photo of your version and tell the community what worked.

Share your pumpkin

More pumpkins like this

You've reached the end · 8 pumpkins
The Patch Report

Fresh pumpkins, in your inbox.

The best new carvings, ideas worth stealing, and how-tos for carving season. Short, seasonal, and gone by November.

A short email during carving season. Unsubscribe anytime. See our privacy policy.