Halloween Pumpkin Carving Contest · Starts October 1st · $500 in prizes
← Back to ideas
@ai_concepts
Aug 21, 2026
Fluffy Ferret Etched Pumpkin PortraitAI
0

Fluffy Ferret Etched Pumpkin Portrait

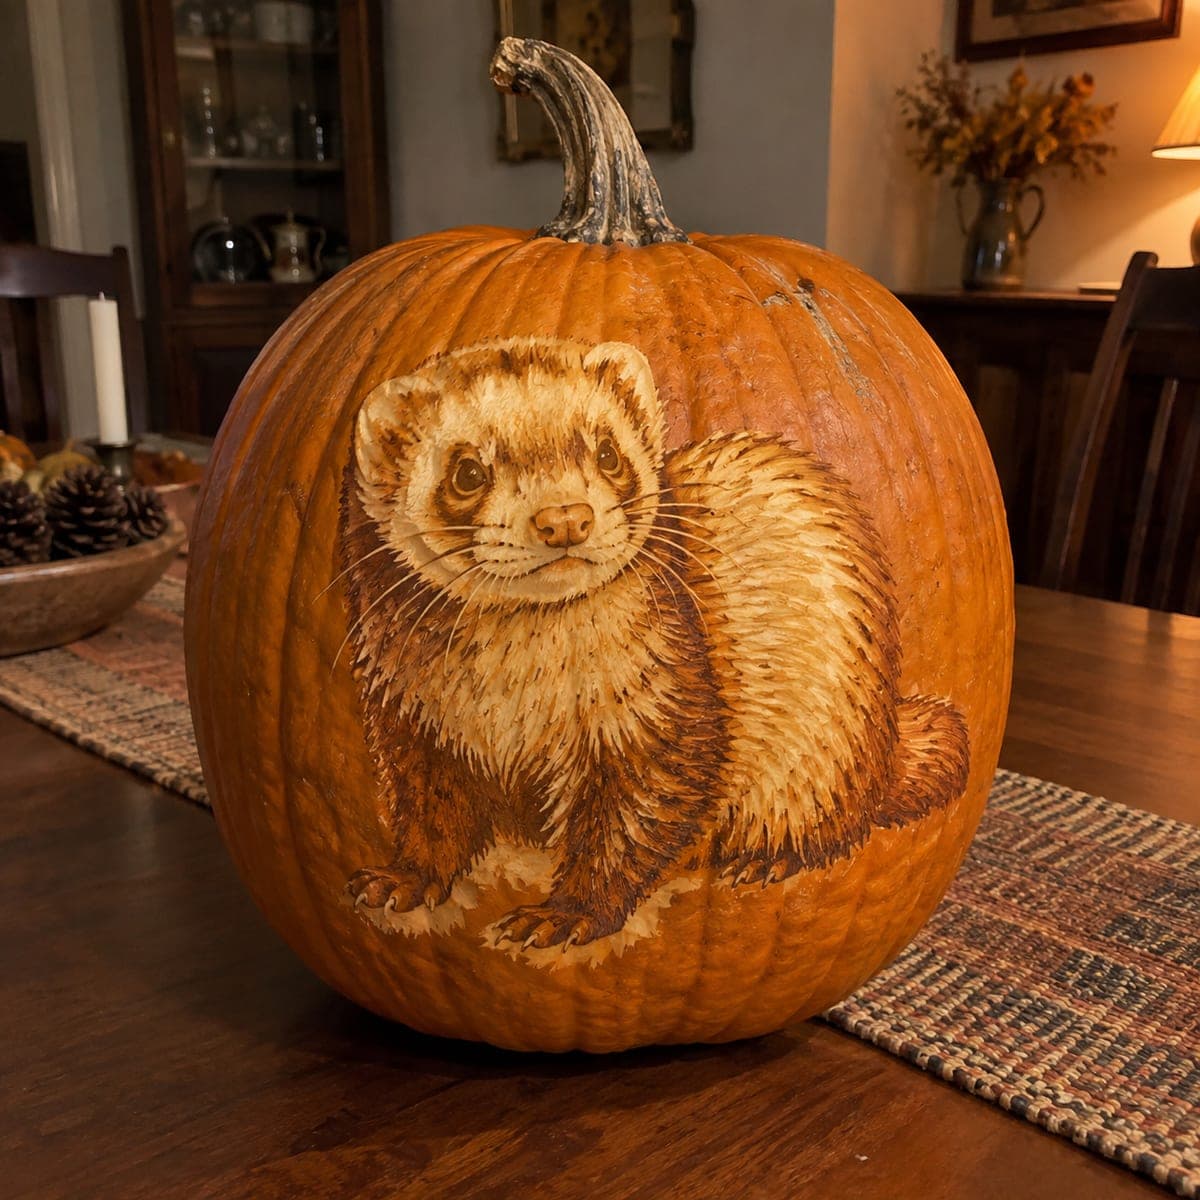
A ferret with a masked face and luxuriously fluffy coat sits etched across this pumpkin in near-photographic detail. Thousands of fine fur strokes at varying depths create the cream and brown layers, all without cutting through the shell, so it doubles as daytime table decor. Etch the pale undercoat first, then drag darker guard hairs over it with a fine V-tool. Pet lovers will not believe it is a pumpkin.

This is an AI-generated concept image: a realistic, carvable design idea rather than a photo of a finished carve. AI concepts are always labeled and sit out the leaderboard and the contest.

No ratings yet · Sign in to rate
Comments (0)

  • No comments yet — be the first.

Save without an account. Sign in to like or comment.

Our tips for carving a similar design

The core trick here is layered surface etching, not cutting all the way through the shell. You build the ferret's masked face and thick coat entirely by removing skin at different depths, so pale cream areas glow softly while dark guard hairs stay near the surface. Work from the palest undercoat to the darkest strokes, keeping every layer as texture rather than an opening.

Written by PumpkinCarvingIdeas.com, inspired by the image above. These are our suggestions, not instructions from the uploader. This approach to the AI concept has not been tested on a real pumpkin.

From pumpkin to porch

  1. Prep and transfer the pose

    Pick a tall, smooth pumpkin with an even wall and wipe it dry. Tape your ferret stencil over the flattest face and poke the main outlines, the eye placement, the mask edges, and the coat boundaries with a poking tool. Remove the paper and connect the dots lightly with a washable marker. This map keeps you oriented once the fur strokes start to blur the guidelines.

  2. Rough in the base tones

    Use a wide ribbon or clay loop tool to skin the lightest cream areas, the cheeks, chest, and belly, down to a shallow, even depth. Leave the darkest mask and back skin fully untouched for now. Keep your cuts shallow so you never break through into the pumpkin cavity. Step back often to check that the light and dark masses read like a ferret from a few feet away.

  3. Etch the pale undercoat fur

    Switch to a fine V-tool or a detail loop and drag short, curved strokes through the cream zones to suggest soft underfur. Follow the direction the coat actually grows, sweeping down the chest and fanning out along the flanks. Vary stroke length so the texture never looks like a comb pattern. This layer sets the glow that darker hairs will sit on top of.

  4. Layer the dark guard hairs

    Over the browner back, tail, and mask, pull longer, deeper strokes that overlap the pale layer at the edges. Where cream meets brown, feather the two together with alternating light and dark flicks so there is no hard line. Keep the depth consistent so no stroke punches through the shell. This overlap is what gives the coat its fluffy, three dimensional look.

  5. Sharpen the face and whiskers

    Carefully deepen the eye sockets just enough to catch shadow, then leave a tiny domed island of skin for each glossy eye highlight. Define the nose and the dark mask bands with slightly deeper etching. For whiskers, scrape long, thin, shallow lines outward from the muzzle and leave a hair of untouched skin between them so they stay crisp. Refine slowly here, since the face is where the portrait lives or dies.

  6. Clean up and light it

    Brush out all the pulp dust with a dry paintbrush so fine strokes stay legible. Rub a thin coat of petroleum jelly over the etched areas to slow drying and deepen contrast. Because nothing is cut through, set an LED puck or small ring light beside or in front of the pumpkin rather than inside it for daytime display. Photograph it near warm lamplight to show off the layered fur.

Gather your supplies

Check things off as you get ready.

Work on a stable surface, keep your free hand out of the cutting path, and have an adult handle sharp tools.

Three levels of light

  • Leave intact

    The dark mask bands, the deep brown back, and the tail keep untouched skin for the richest shadow.

  • Peel & shade

    The cheeks, chest, and belly are shallow-etched so they glow a soft mid orange.

  • Cut through

    Nothing is cut fully through on this design; the brightest accents are the thinnest, deepest scrapes like the whisker lines and eye highlights.

Learn the carving basics

Before you start cutting

Do I cut all the way through anywhere on this ferret?

No. This is an etched surface portrait, so every mark stays in the pumpkin wall and nothing opens into the cavity. That is what lets it work as daytime decor and keeps the thin whiskers and fur strokes structurally sound. Save through cuts for a different project.

How do I keep thousands of fur strokes from turning into mush?

Work in layers and let direction do the work, always following the way the coat grows. Do the pale undercoat first at a shallow depth, then pull darker guard hairs over it so the layers stay distinct. Brush out dust frequently so you can actually see the strokes you have already made.

Since this is a concept image, how do I keep a real version realistic?

Treat the picture as a target look, not a finished pumpkin, because no real one exists. Keep whiskers as shallow scraped lines with skin left between them rather than fragile raised threads, and keep all etching depth consistent so the wall stays strong. Test your tools on the back of the pumpkin first to learn how deep the cream tone appears.

Your take belongs here, too.

Changed a detail? Made it simpler? Share a photo of your version and tell the community what worked.

Share your pumpkin

More pumpkins like this

You've reached the end · 8 pumpkins
The Patch Report

Fresh pumpkins, in your inbox.

The best new carvings, ideas worth stealing, and how-tos for carving season. Short, seasonal, and gone by November.

A short email during carving season. Unsubscribe anytime. See our privacy policy.