Halloween Pumpkin Carving Contest · Starts October 1st · $500 in prizes
← Back to ideas
@ai_concepts
Sep 25, 2026
Freddy Fazbear Pumpkin Carving with Muzzle and Ear DetailAI
0

Report this carving

Tell us what is wrong. Reports are private.

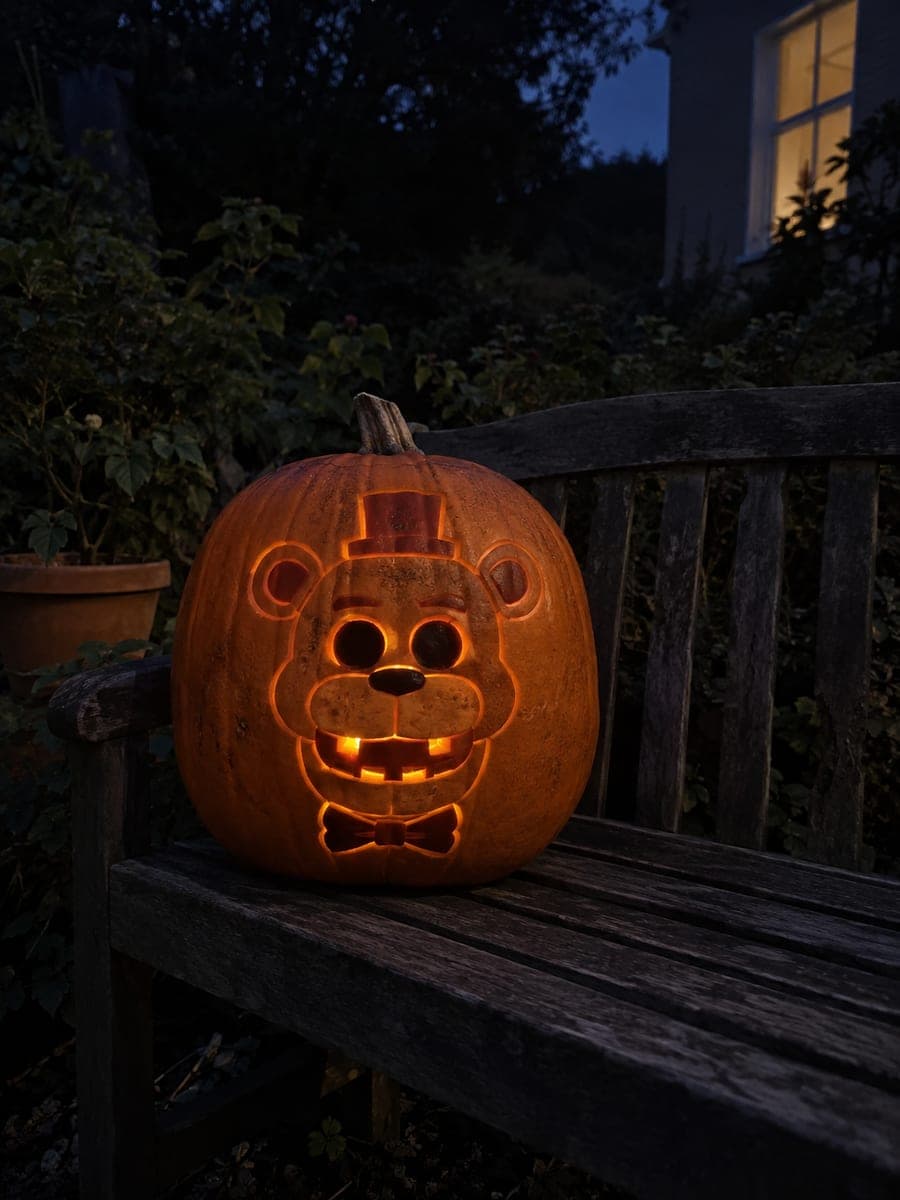
Freddy Fazbear Pumpkin Carving with Muzzle and Ear Detail

This intermediate Freddy Fazbear pumpkin carving idea builds on the basic face with broad retained muzzle supports connecting the open eye and mouth sections and shallow-backed ear, nose, and bowtie accents. The wider muzzle bridge adds stability so the face stays intact even as you work the shallow details around it. Cut the main openings first, then use a gouge to define the hat brim and ear shape. A warm amber light inside makes the bear's face glow with an appropriately unsettling warmth.

No ratings yet · Sign in to rate
Comments (0)

  • No comments yet — be the first.

Save without an account. Sign in to like or comment.

Our tips for carving a similar design

This intermediate design adds a broad retained muzzle support connecting the open eye and mouth sections, keeping the face structurally sound while adding visual complexity. Shallow-backed ears, nose, hat brim, and bowtie complete the portrait. Cutting the main apertures first and using the muzzle bridge as a structural anchor throughout the process is the key to success here.

From pumpkin to porch

  1. Prep and hollow

    Cut the back lid and scoop to one inch of wall thickness. A slightly larger pumpkin than beginner level gives you more room to position the muzzle support at a useful width. Dry the interior completely and mark the face center before taping the template.

  2. Lay out the muzzle-bridge design

    The muzzle bridge is the horizontal band of intact rind between the eyes above and the mouth below. Mark its upper and lower boundaries clearly on the template transfer so you never accidentally cut into it. Also mark the ear outlines, hat brim, nose oval, and bowtie.

  3. Cut the eye apertures

    Cut both eye holes first with a fine carving saw. Work the full perimeter of each eye before removing the piece. Confirm the muzzle bridge boundary below each eye is clearly marked and untouched before moving to the mouth.

  4. Cut the mouth opening below the muzzle

    Cut the mouth opening as a separate aperture below the muzzle boundary. The muzzle bridge between the eyes and mouth should remain fully intact. If you are adding teeth at this level, they sit above the mouth opening line but are not rooted at this difficulty, so the mouth is a simple open cut.

  5. Shallow-back the hat, ears, nose, and bowtie

    Use a wide gouge to back-carve the hat brim, inner ear surfaces, nose, and bowtie to about half wall depth. A flat gouge works better than a round one for the broad hat brim area. Check depth with a flashlight after each section and stop before any area becomes translucent white rather than a warm amber glow.

  6. Light and photograph

    Insert a warm amber LED puck and close the back lid. The muzzle bridge creates a dark horizontal band across the face that reads as Freddy's muzzle division, adding realism that the easy version lacks. Take a daylight photo of the unlit carving as well to show the full depth of the muzzle support in context.

Written with AI to match this design

Gather your supplies

Check things off as you get ready.

Work on a stable surface, keep your free hand out of the cutting path, and have an adult handle sharp tools.

Three levels of light

  • Leave intact

    Outer rind, hat crown, outer ear edges, and the critical muzzle bridge between eyes and mouth all stay dark

  • Peel & shade

    Hat brim, inner ear surfaces, nose oval, and bowtie are shallow-backed for a soft mid glow

  • Cut through

    Both eye apertures and the mouth opening below the muzzle are fully cut through

Learn the carving basics

Before you start cutting

How wide does the muzzle bridge need to be?

At minimum the bridge should be at least one inch wide at its narrowest point. A wider bridge of one and a half to two inches looks more proportional on a full-sized pumpkin and gives you enough structural strength to support the eye cuts above. Err on the side of wider at this difficulty level.

The eye apertures and mouth opening look too similar in size. How do I differentiate them?

Freddy's mouth should be noticeably wider than either individual eye. Scale the template so the mouth opening spans at least as wide as both eye holes combined. The muzzle bridge above the mouth also visually frames it, which helps the proportions read clearly even if the raw sizes are closer than expected.

Can I leave out the shallow-backed details and still have it look like Freddy?

The eye and mouth apertures alone will give you a recognizable bear-face silhouette, but the hat and ears in backed relief are what make it specifically Freddy rather than a generic bear. At minimum, back-carve the hat brim since that is the most distinctive element of his design.

Your take belongs here, too.

Changed a detail? Made it simpler? Share a photo of your version and tell the community what worked.

Share your pumpkin

More pumpkins like this

You've reached the end · 8 pumpkins
The Patch Report

Fresh pumpkins, in your inbox.

The best new carvings, ideas worth stealing, and how-tos for carving season. Short, seasonal, and gone by November.

A short email during carving season. Unsubscribe anytime. See our privacy policy.