Halloween Pumpkin Carving Contest · Starts October 1st · $500 in prizes
← Back to ideas
@ai_concepts
Sep 25, 2026
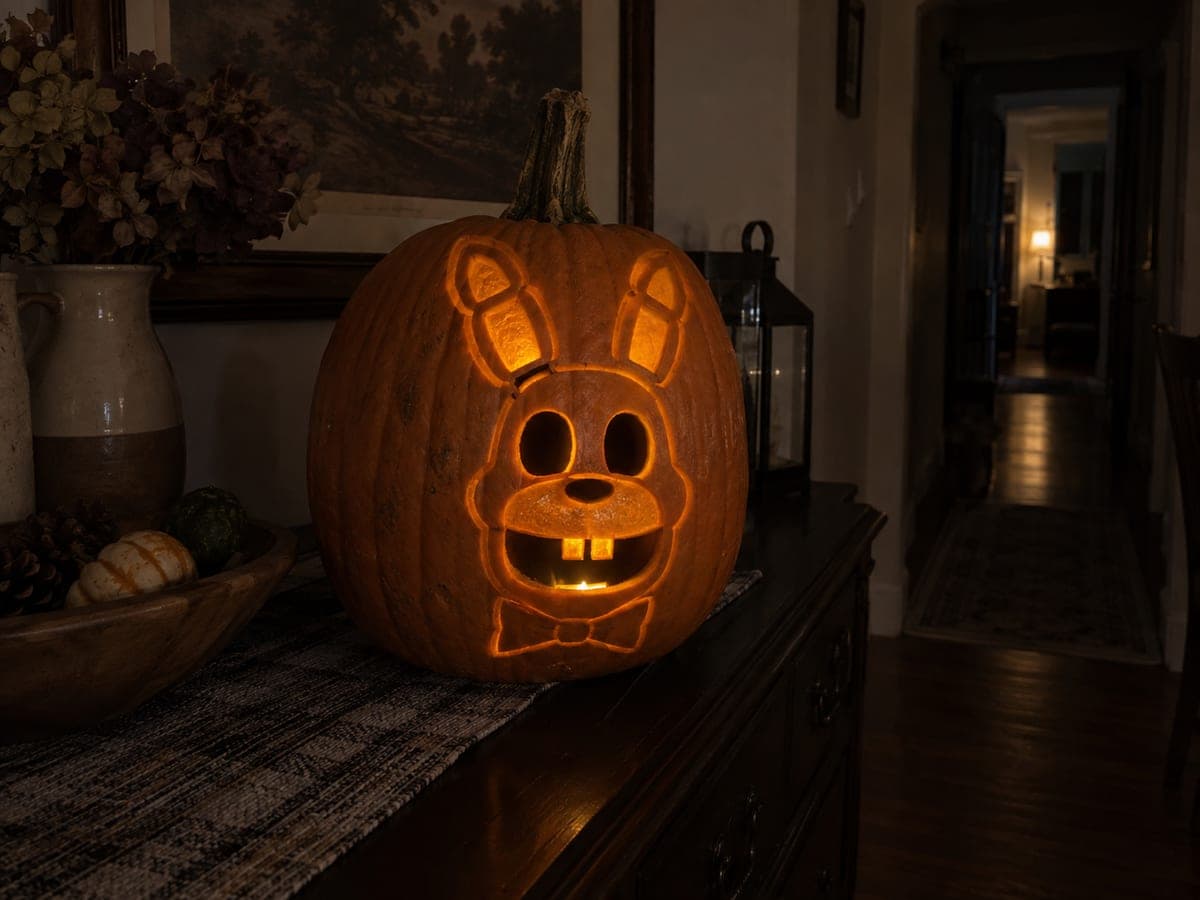
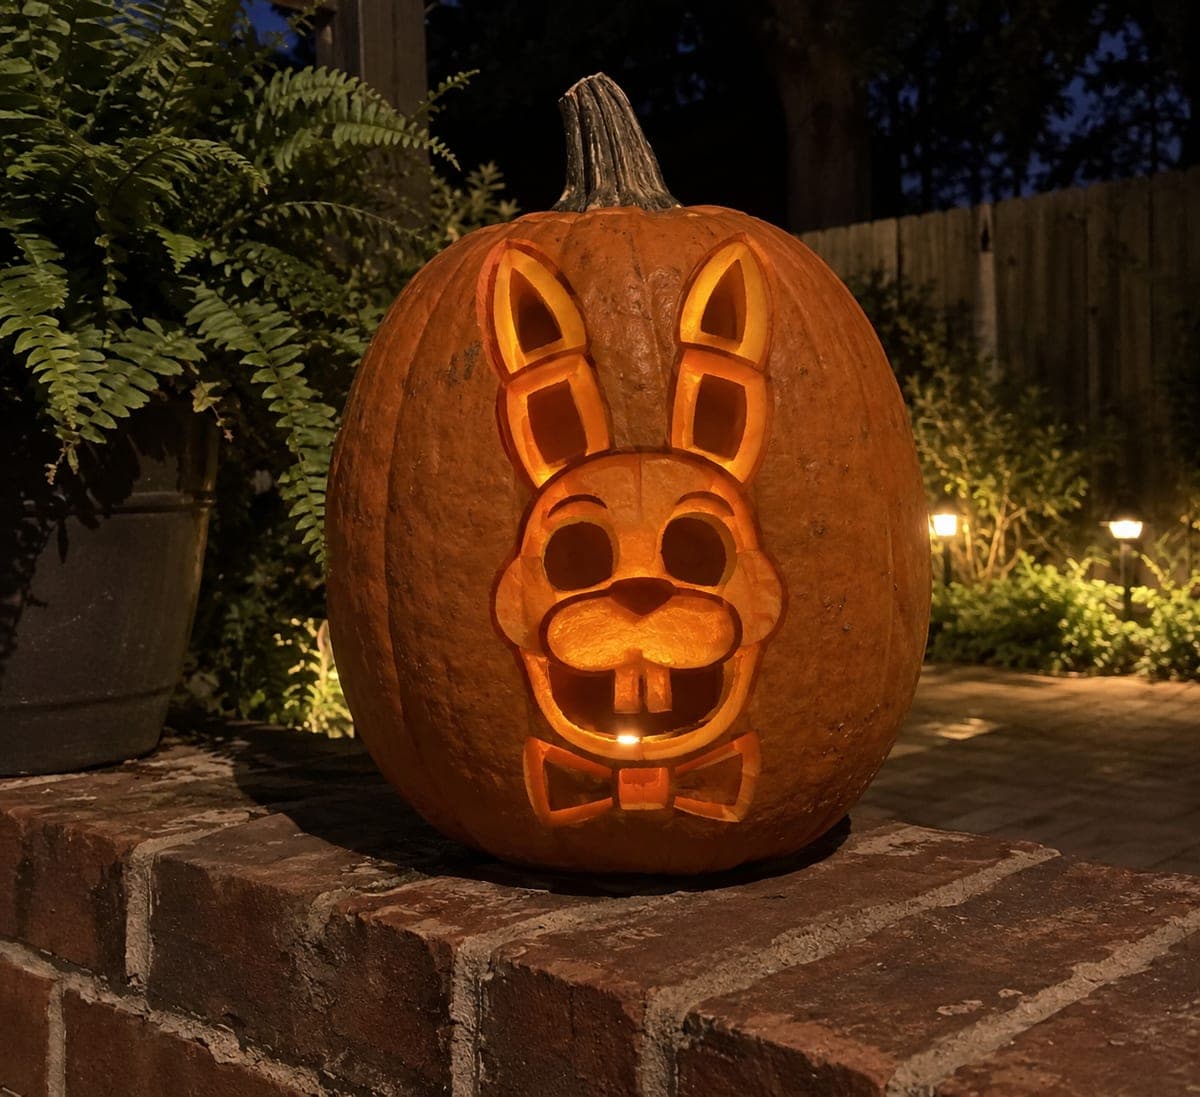
Bonnie FNAF Intermediate Pumpkin Carving with Fang GrinAI
0

Report this carving

Tell us what is wrong. Reports are private.

Bonnie FNAF Intermediate Pumpkin Carving with Fang Grin

This intermediate Five Nights at Freddy's pumpkin carving idea captures Bonnie with empty eyes and nose plus an open mouth featuring two upper teeth rooted to the lip. Ears, face contour, and bowtie are all shallow-backed for added character. Cut the large eye and mouth openings first so you can assess spacing before adding the rooted teeth. The rooted tooth blocks are the trickiest element, so score their bases lightly before committing to the full cut.

No ratings yet · Sign in to rate
Comments (0)

  • No comments yet — be the first.

Save without an account. Sign in to like or comment.

Our tips for carving a similar design

Bonnie's design centers on hollow eyes, a small nose aperture, and an open mouth featuring two upper teeth whose bases are still connected to the lip. Ears, face contour, and bowtie are shallow-backed for added dimension. Cutting the large openings first and scoring the tooth roots before committing to the mouth cut is the safest order of operations.

From pumpkin to porch

  1. Prepare the pumpkin

    Cut the lid from the back and scoop to about one inch of wall thickness. Thicker walls are helpful here because the rooted teeth need solid material around their bases. Dry the interior thoroughly. Select a pumpkin tall enough that the long ear panels have room above the face.

  2. Transfer the Bonnie template

    Scale the template so the eyes, nose, and mouth opening sit comfortably in the lower two-thirds of the face, leaving room for the ears above. Tape and trace all lines including the ear outlines, face contour, bowtie shape, and the individual tooth widths within the mouth. Mark tooth root lines clearly so you do not cut through them accidentally.

  3. Score the tooth roots before cutting

    Before opening the mouth area, use a detail knife to score a shallow groove along each tooth root line. This gives you a clear stop-line when you cut the mouth opening and reduces the chance of accidentally severing a root. Press lightly, just deep enough to mark the rind surface.

  4. Cut the main facial apertures

    Cut the two eye holes first, then the small nose aperture. For the mouth, cut along the outer perimeter first and then carefully around the tooth shapes, leaving each tooth base attached to the upper lip. Remove the mouth piece in sections rather than as one piece to protect the tooth roots. Confirm each tooth is firmly rooted by pressing gently.

  5. Shallow-back the ear, contour, and bowtie details

    Use a linoleum gouge to back-carve the ear panels, face-contour areas, and bowtie outline to about half wall depth. Work in one direction for consistency and check depth frequently with a flashlight. The ear panels glow well even at half depth, giving Bonnie his looming silhouette effect.

  6. Add light and display

    Insert a cool white LED puck inside for sharp shadow contrast on the rooted teeth. Close the back lid. Set the pumpkin where viewers approach from straight on so the asymmetric ear proportions read as intended. A dark background behind the pumpkin intensifies the glowing expression.

Written with AI to match this design

Gather your supplies

Check things off as you get ready.

Work on a stable surface, keep your free hand out of the cutting path, and have an adult handle sharp tools.

Three levels of light

  • Leave intact

    Outer rind, the face-contour border, and the tooth root attachments at the upper lip remain dark

  • Peel & shade

    Ear panels, face contour, and bowtie outline are shallow-backed for a soft mid glow

  • Cut through

    Eye holes, nose aperture, and open mouth (between and around the rooted teeth) are fully cut through

Learn the carving basics

Before you start cutting

How wide should I make the tooth roots to keep them from breaking?

Each tooth root should be at least a quarter inch wide at the lip line, even if the tooth tapers narrower above that. Thin roots are the most common breakage point. If a root does crack, you can reinforce it with a thin wooden toothpick pressed into the rind from behind and secured with a dab of craft glue.

The ears make the pumpkin top-heavy when it is displayed. Any tips?

The ear panels are back-carved rather than fully cut through, so the rind mass remains and balances the pumpkin better than you might expect. If stability is still a concern, place a folded damp towel under the front of the pumpkin to tilt it slightly back against a wall.

Should I use a purple or blue tinted LED to match Bonnie's color?

A colored LED is a fun touch but not necessary for the design to read well. Cool white light already gives Bonnie a cold, eerie glow. If you do use colored light, a dim purple works nicely and does not overwhelm the tooth shadow detail the way a bright blue might.

Your take belongs here, too.

Changed a detail? Made it simpler? Share a photo of your version and tell the community what worked.

Share your pumpkin

More pumpkins like this

You've reached the end · 8 pumpkins
The Patch Report

Fresh pumpkins, in your inbox.

The best new carvings, ideas worth stealing, and how-tos for carving season. Short, seasonal, and gone by November.

A short email during carving season. Unsubscribe anytime. See our privacy policy.