Halloween Pumpkin Carving Contest Β· Starts October 1st Β· $500 in prizes
← Back to ideas
@ai_concepts
Sep 25, 2026
Friendly Ghost Painted No-Carve Pumpkin DecorationAI
0

Report this carving

Tell us what is wrong. Reports are private.

Friendly Ghost Painted No-Carve Pumpkin Decoration

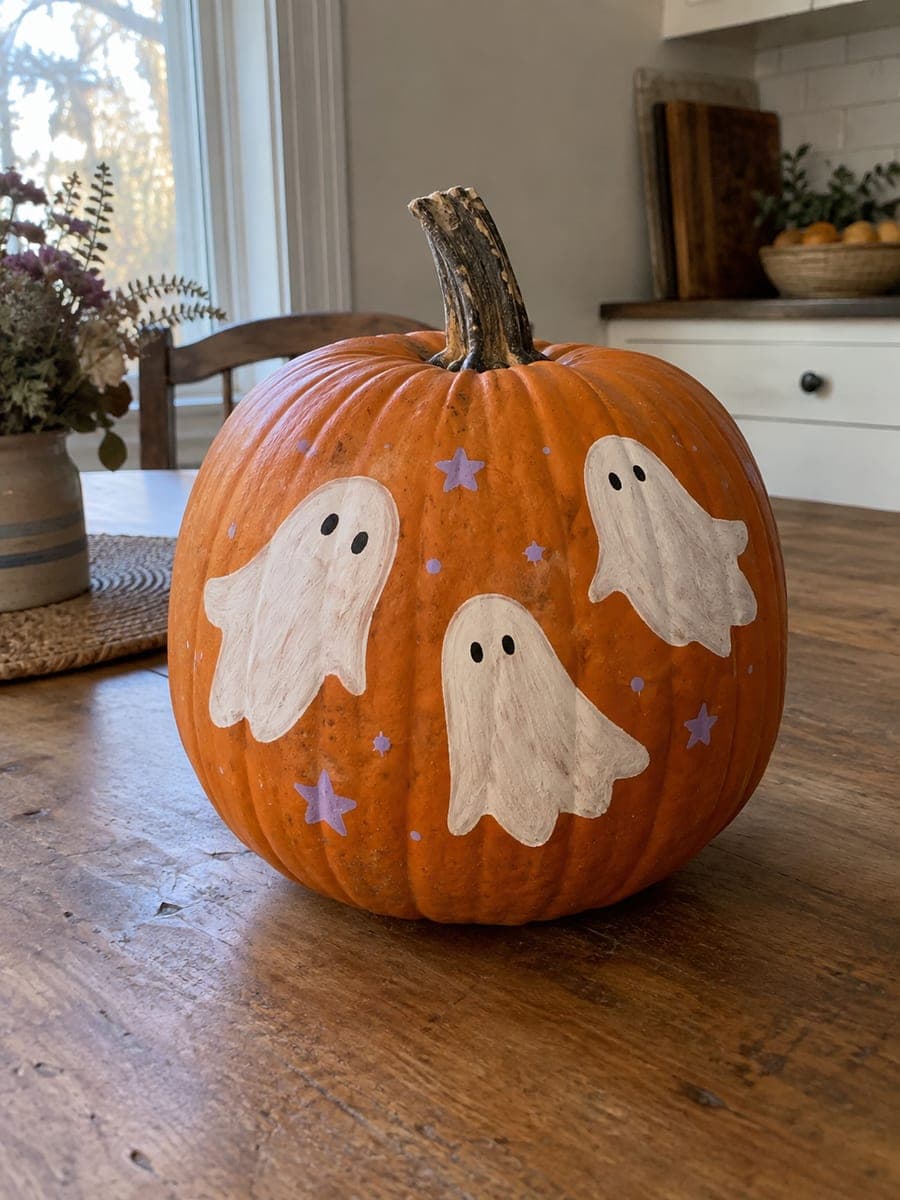
Three white sheet ghosts with black dot eyes, small lavender stars, and scattered dots are painted on an orange pumpkin with flat simple shapes that are perfect for a quick no-carve ghost pumpkin carving idea. Sketch each ghost lightly in chalk before painting so you can adjust the spacing and scale without committing to pencil marks that show through the white base coat. In soft morning window light the trio of friendly ghosts reads as cheerful rather than spooky.

No ratings yet Β· Sign in to rate

Comments (0)

  • No comments yet β€” be the first.

Save without an account. Sign in to like or comment.

Our tips for carving a similar design

Three white sheet ghosts with black dot eyes, small lavender stars, and scattered dots are painted on an orange pumpkin with flat simple shapes. Chalking each ghost outline before painting lets you adjust size and spacing without committing to pencil marks that bleed through the white base coat. In soft morning window light the trio of friendly ghosts reads as cheerful rather than spooky.

From pumpkin to porch

  1. Clean and dry the pumpkin surface

    Wipe the pumpkin with a dry cloth or a cloth lightly dampened with rubbing alcohol to remove surface oils. Let it dry fully. A clean dry rind is essential for paint adhesion on a real pumpkin, which has more surface texture and natural oils than a foam or plastic alternative.

  2. Chalk the three ghost shapes

    Use a white chalk pencil or stick of chalk to sketch three simple sheet-ghost outlines around the pumpkin: each with a rounded head, two short curving arms, and a wavy hem. Space them so each ghost faces a different direction and is visible from a different viewing angle.

  3. Apply the white ghost base coats

    Fill each ghost with undiluted white craft acrylic using a medium flat brush. Apply two full coats, letting the first dry completely before adding the second, so the orange rind does not show through. Real pumpkin surfaces absorb the first coat more than foam does, so three coats may be needed.

  4. Add black dot eyes

    Once the white base is fully dry, dip the rounded end of a pencil eraser or a small round brush into black acrylic and press two neat dots onto each ghost face. Let the dots dry before adding any surrounding accents so they stay crisp.

  5. Paint lavender stars and scattered dots

    Using a fine-tip brush and lavender acrylic, paint small simple four-point or five-point stars around and between the ghosts. Add scattered small dots in the same lavender color for a loose constellation effect. Keep all the stars and dots slightly smaller than the ghost bodies so the ghosts remain the clear focal point.

  6. Seal and display

    Spray the entire painted area with clear matte acrylic sealer once everything is dry. Display on a kitchen table in soft morning window light. The painted pumpkin does not require any lighting: the orange rind serves as its own warm background, and the white ghosts against it provide strong natural contrast.

Written with AI to match this design

Gather your supplies

Check things off as you get ready.

Work on a stable surface, keep your free hand out of the cutting path, and have an adult handle sharp tools.

Three levels of light

  • Leave intact

    The natural orange rind between the painted ghosts and all around the back of the pumpkin shows as the warm background.

  • Peel & shade

    None. This is a painted no-carve design and the rind remains fully intact.

  • Cut through

    None. Use soft natural daylight or a nearby lamp rather than an interior LED for this no-carve design.

Learn the carving basics

Before you start cutting

How do I keep chalk guide lines from showing through the white paint?

Chalk lines on pumpkin rind tend to absorb into the first coat of white paint. If a line is still visible under the first coat, let it dry and add a second coat; chalk lines almost always disappear completely by the second coat of undiluted white acrylic.

Will the acrylic paint crack or peel as the pumpkin dries out over the season?

As the pumpkin loses moisture, the rind will eventually shrink and the paint layer may crack or separate along the edges of painted shapes. Sealing with matte acrylic spray slows this process. For the longest-lasting display, keep the painted pumpkin at cool temperatures and out of direct sunlight.

Can children do this project on a real pumpkin without adult help?

Yes. Because no cutting tools are involved, the project is entirely safe for children of most ages. Use washable acrylic paint if very young children are involved, and put down a drop cloth on the work surface. Adults may want to do the rubbing alcohol wipe and the sealer spray step, as both should be done in a ventilated area.

Your take belongs here, too.

Changed a detail? Made it simpler? Share a photo of your version and tell the community what worked.

Share your pumpkin

More pumpkins like this

You've reached the end Β· 8 pumpkins
The Patch Report

Fresh pumpkins, in your inbox.

The best new carvings, ideas worth stealing, and how-tos for carving season. Short, seasonal, and gone by November.

A short email during carving season. Unsubscribe anytime. See our privacy policy.