Halloween Pumpkin Carving Contest · Starts October 1st · $500 in prizes
← Back to ideas
@ai_concepts
Aug 11, 2026
Glowing Cross No-Carve Faith Pumpkin DecorationAI
0

Glowing Cross No-Carve Faith Pumpkin Decoration

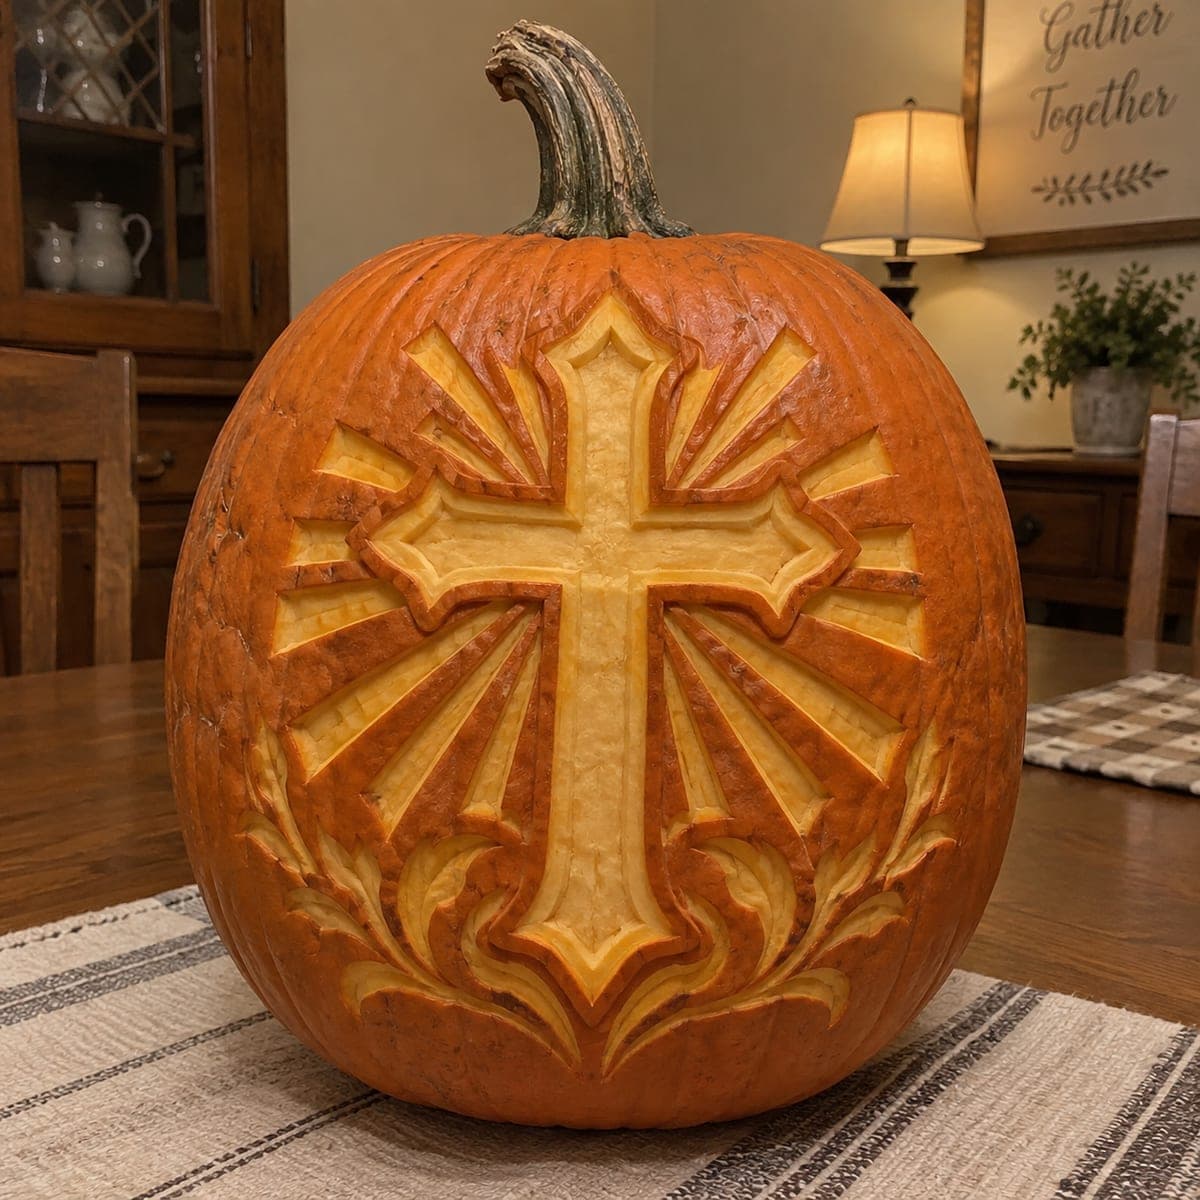
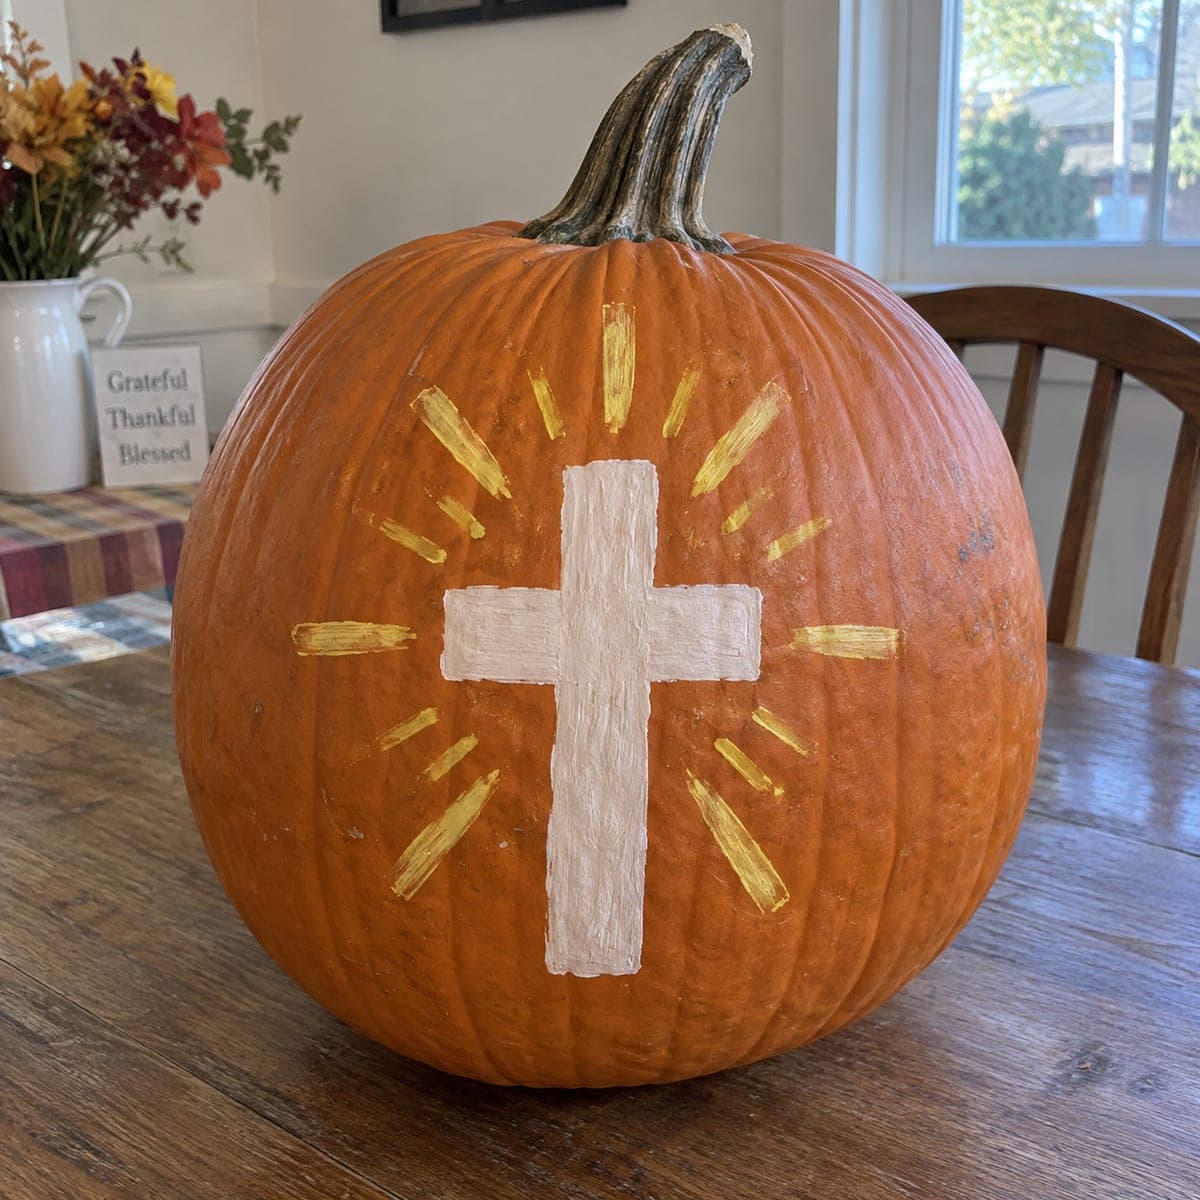
A white Latin cross with golden sunburst rays radiating outward is painted on this pumpkin, offering a faith-based alternative to the typical Halloween jack-o-lantern. The no-carve painted design uses thick white acrylic for the cross body and a fan brush to streak the golden rays in a starburst pattern. Because the pumpkin remains intact, it will keep its shape through November and beyond as a Thanksgiving table decoration. This design is popular among families who want seasonal decor that reflects their values rather than Halloween imagery.

This is an AI-generated concept image: a realistic, carvable design idea rather than a photo of a finished carve. AI concepts are always labeled and sit out the leaderboard and the contest.

No ratings yet · Sign in to rate

Comments (0)

  • No comments yet — be the first.

Save without an account. Sign in to like or comment.

Our tips for carving a similar design

The core trick here is a thick white Latin cross surrounded by short golden sunburst rays, all painted rather than cut so the pumpkin stays whole. Build the cross first as a clean, opaque shape, then add the rays radiating outward in a balanced starburst. Because nothing is hollowed out, this design keeps its form well past Halloween and works as a Thanksgiving centerpiece.

Written by PumpkinCarvingIdeas.com, inspired by the image above. These are our suggestions, not instructions from the uploader. This approach to the AI concept has not been tested on a real pumpkin.

From pumpkin to porch

  1. Clean and dry the pumpkin

    Wipe the whole pumpkin with a damp cloth and let it dry fully so paint grips the skin. Pick the smoothest, flattest face for your design and set the pumpkin on a towel to keep it steady. A dry surface prevents the acrylic from beading up or peeling later. Have the stem facing up as your top reference point.

  2. Sketch the layout lightly

    Use a washable marker or a pencil to draw a tall cross centered on the face, with the vertical bar longer than the horizontal one. Keep the arms a consistent width so the shape reads clearly from a few feet away. Add faint tick marks in a ring around the cross to plan where the rays will sit. Step back and check the spacing before you commit to paint.

  3. Paint the cross body

    Load a flat brush with thick white acrylic and fill the cross in smooth, even strokes following the long direction of each bar. Two thin coats look better than one heavy coat, so let the first dry before adding the second for full opacity. Keep the edges crisp by pulling the brush toward the outline rather than across it. Wipe any stray marks with a damp cotton swab while the paint is still workable.

  4. Streak the golden rays

    Switch to a fan brush and a warm yellow-gold paint to flick short rays outward around the cross. Vary the length slightly, alternating longer and shorter strokes, so the burst feels lively rather than mechanical. Work in a ring and keep even gaps so the pattern stays balanced on all sides. Let each ray taper naturally by lifting the brush as you finish the stroke.

  5. Seal and set out

    Once everything is fully dry, brush on a thin coat of clear matte acrylic sealer to protect the paint from moisture and handling. Place a battery LED tea light or a small string of fairy lights beside or behind the pumpkin for a soft evening glow, since no candle is needed on a no-carve design. Set it on a table with fall accents and snap your photo in warm, even light. Store it somewhere cool and dry to help it last into November.

Gather your supplies

Check things off as you get ready.

Work on a stable surface, keep your free hand out of the cutting path, and have an adult handle sharp tools.

Three levels of light

  • Leave intact

    The orange pumpkin skin stays untouched as the background around the cross and between the rays.

  • Peel & shade

    If you want a subtle glow, lightly shave the skin along the golden rays so they catch light while staying shallow.

  • Cut through

    For a lit version, the cross itself could be cut all the way through last so it becomes the brightest shape when an LED is placed inside.

Learn the carving basics

Before you start cutting

This is a no-carve design, so do I need to light it at all?

No inside light is required since nothing is hollowed out. If you want a glow, set a battery LED tea light or fairy lights beside or behind the pumpkin. Never place a candle against dry paint.

How do I keep the ray pattern balanced?

Plan the rays with light tick marks in a ring before you paint. Alternate longer and shorter strokes and keep the gaps roughly even on all sides. Step back every few rays to check the burst still looks centered on the cross.

Will the paint last through Thanksgiving?

An intact painted pumpkin can last many weeks if kept cool and dry. Use two thin coats of acrylic for full coverage, then seal it with a clear matte finish to guard against moisture. Wipe it gently if dust settles rather than scrubbing.

Your take belongs here, too.

Changed a detail? Made it simpler? Share a photo of your version and tell the community what worked.

Share your pumpkin

More pumpkins like this

You've reached the end · 8 pumpkins
The Patch Report

Fresh pumpkins, in your inbox.

The best new carvings, ideas worth stealing, and how-tos for carving season. Short, seasonal, and gone by November.

A short email during carving season. Unsubscribe anytime. See our privacy policy.