Halloween Pumpkin Carving Contest · Starts October 1st · $500 in prizes
← Back to ideas
@ai_concepts
Sep 25, 2026
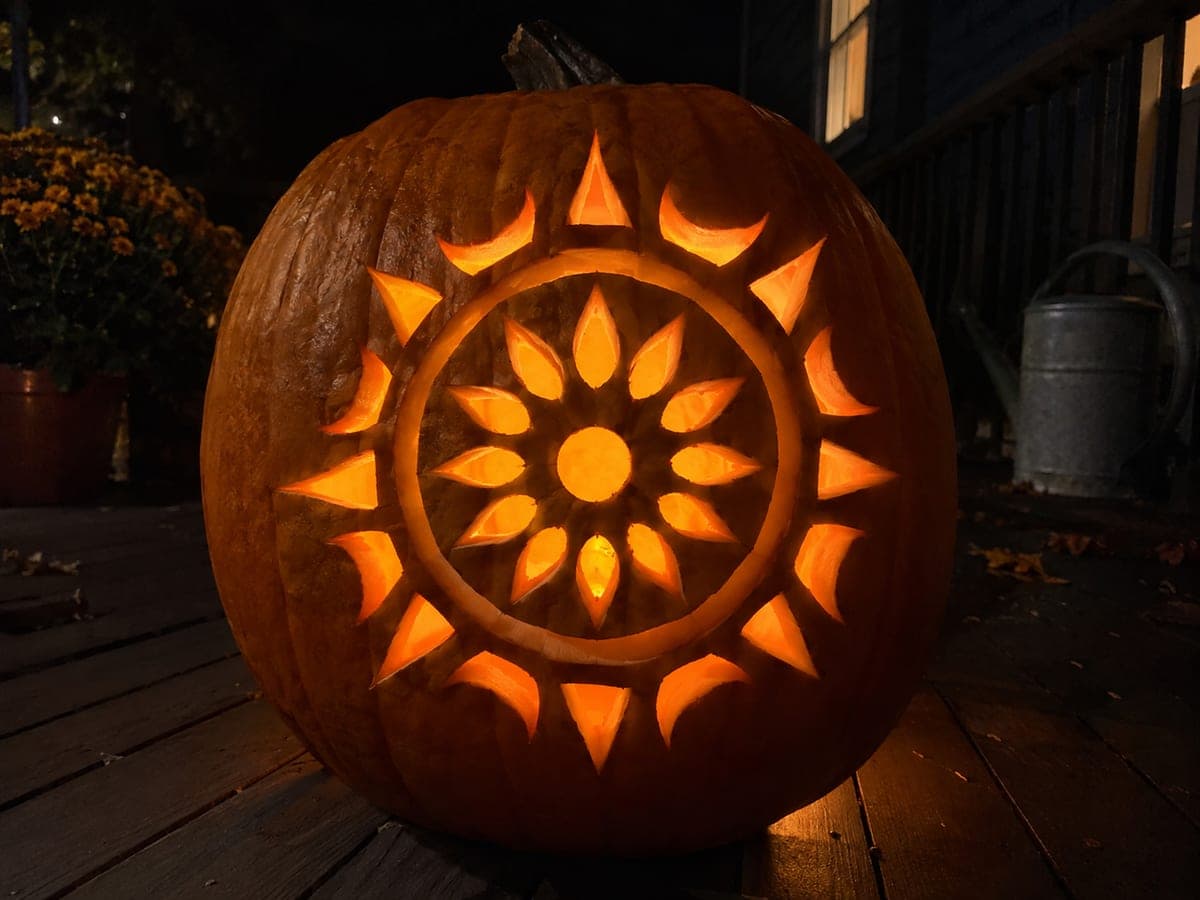
Glowing Sun Mandala Pumpkin With Alternating Rings and RaysAI
0

Report this carving

Tell us what is wrong. Reports are private.

Glowing Sun Mandala Pumpkin With Alternating Rings and Rays

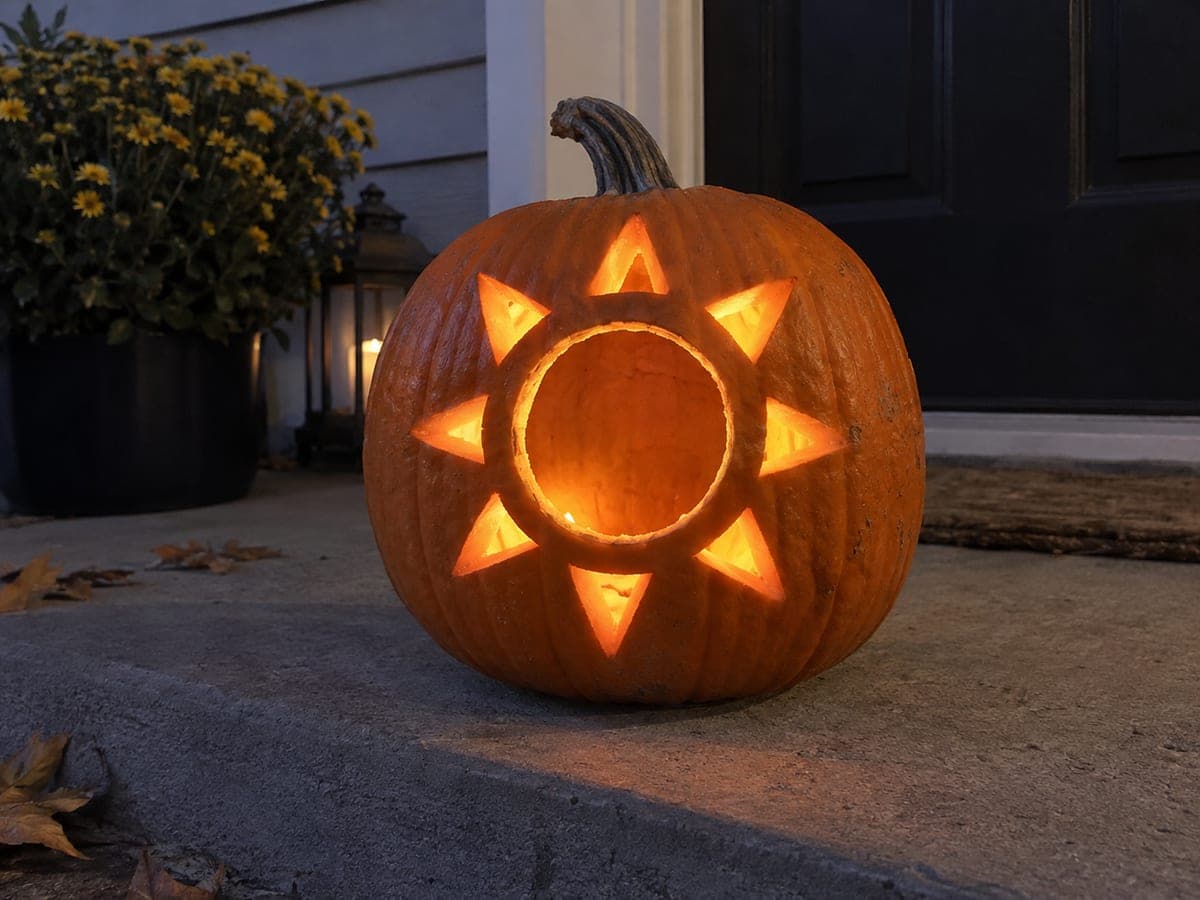
A sun mandala with connected rings, petal apertures, and alternating ray openings fills the face of this expert sun pumpkin carving, with a decorative ring executed as shallow back-carved relief to keep the inner motif connected. The combination of through-cut apertures and shallow-carved sections gives this design a three-dimensional quality when lit from inside. Begin with the central circle, then work outward through the petal and ray layers, completing the back-carved ring last with a detail gouge. Broad radial supports between each ray preserve the structural integrity of the outer shell.

No ratings yet · Sign in to rate
Comments (0)

  • No comments yet — be the first.

Save without an account. Sign in to like or comment.

Our tips for carving a similar design

This design layers two techniques on one pumpkin: standard through-cut apertures for the petals and rays, and shallow back-carved relief for the decorative ring between them. The back-carved ring keeps the inner motif structurally connected while producing a faint mid-glow halo between the brightly lit petals and rays. Working from the center circle outward through each layer means each completed layer supports the next.

From pumpkin to porch

  1. Prepare a large, firm pumpkin and plan the layers

    Select a large pumpkin with a smooth front face and scoop the interior to a consistent, firm inch-thick wall. Chill for an hour before carving. Identify the three concentric layers on the template: the center circle, the petal ring, and the alternating ray ring, plus the back-carved decorative ring between them.

  2. Transfer the full template and mark the back-carve zone

    Perforate the boundaries of all through-cut elements. Use a different marker color or a shallow scored line to indicate the back-carve ring so you do not accidentally cut through it during the main aperture phase. Confirm broad radial supports between each ray before cutting.

  3. Cut the center circle

    Begin with the central circle using a jab saw. This is the design anchor and the first light source point. Cut cleanly and check the inner wall is smooth. Place the LED tea light temporarily to verify the circle position looks centered from the front.

  4. Cut the petal apertures

    Work outward through the petal ring, cutting each petal aperture while leaving the broad radial supports between petals intact. Alternate between opposite sides of the ring as you cut to keep the shell balanced. Each petal should be cleanly separated from the center circle by a solid band.

  5. Cut the alternating ray apertures

    Move to the outer ring and cut each ray aperture, again alternating between opposite positions. Leave the broad radial supports intact between rays. The back-carve ring zone between the petal ring and the ray ring must stay completely uncut at this stage.

  6. Back-carve the decorative ring and display

    Use a detail gouge or linoleum cutter to carve the decorative ring as a shallow relief channel, removing the outer skin and part of the flesh but never cutting through the wall. Angle the tool at about 30 degrees and make smooth, even passes. Once complete, place the LED inside and display in a fully dark area to appreciate the layered glow.

Written with AI to match this design

Gather your supplies

Check things off as you get ready.

Work on a stable surface, keep your free hand out of the cutting path, and have an adult handle sharp tools.

Three levels of light

  • Leave intact

    The broad radial supports between petals and rays, and the outer pumpkin rim, remain dark and solid.

  • Peel & shade

    The shallow back-carved decorative ring glows with a soft, diffused mid-level light between the petal and ray layers.

  • Cut through

    The central circle, each petal aperture, and each alternating ray aperture are cut through for full bright backlit glow.

Learn the carving basics

Before you start cutting

How do I avoid accidentally cutting through the back-carve ring?

Mark the back-carve ring boundary with a clearly different color pencil or a light scored line with a craft knife before you start cutting through-holes. Keep your jab saw well away from this marked zone throughout the aperture cutting phase. Only switch to the gouge tool when all through-cuts are complete and the ring is clearly untouched.

What is the minimum width for the radial supports in this design?

The radial supports that run from the center outward through all three rings should be at least half an inch wide throughout their length. The back-carve ring sits on top of these supports, so if a support is too narrow, the carved ring channel will weaken it dangerously. Plan the template so supports are wider than the minimum wherever the back-carve ring crosses them.

Can I substitute a different tool for the linoleum gouge?

A sharp wood carving V-tool or a craft knife held at a low angle both work for the back-carve ring channel. The key quality in any substituted tool is a clean, controlled cut that removes a consistent amount of material in a single pass. Avoid using a standard pumpkin saw for back-carving, as it removes too much material unpredictably.

Your take belongs here, too.

Changed a detail? Made it simpler? Share a photo of your version and tell the community what worked.

Share your pumpkin

More pumpkins like this

You've reached the end · 8 pumpkins
The Patch Report

Fresh pumpkins, in your inbox.

The best new carvings, ideas worth stealing, and how-tos for carving season. Short, seasonal, and gone by November.

A short email during carving season. Unsubscribe anytime. See our privacy policy.