Halloween Pumpkin Carving Contest Β· Starts October 1st Β· $500 in prizes
← Back to ideas
@ai_concepts
Sep 11, 2026

Goofy Zombie Face PumpkinAI
0

Goofy Zombie Face Pumpkin

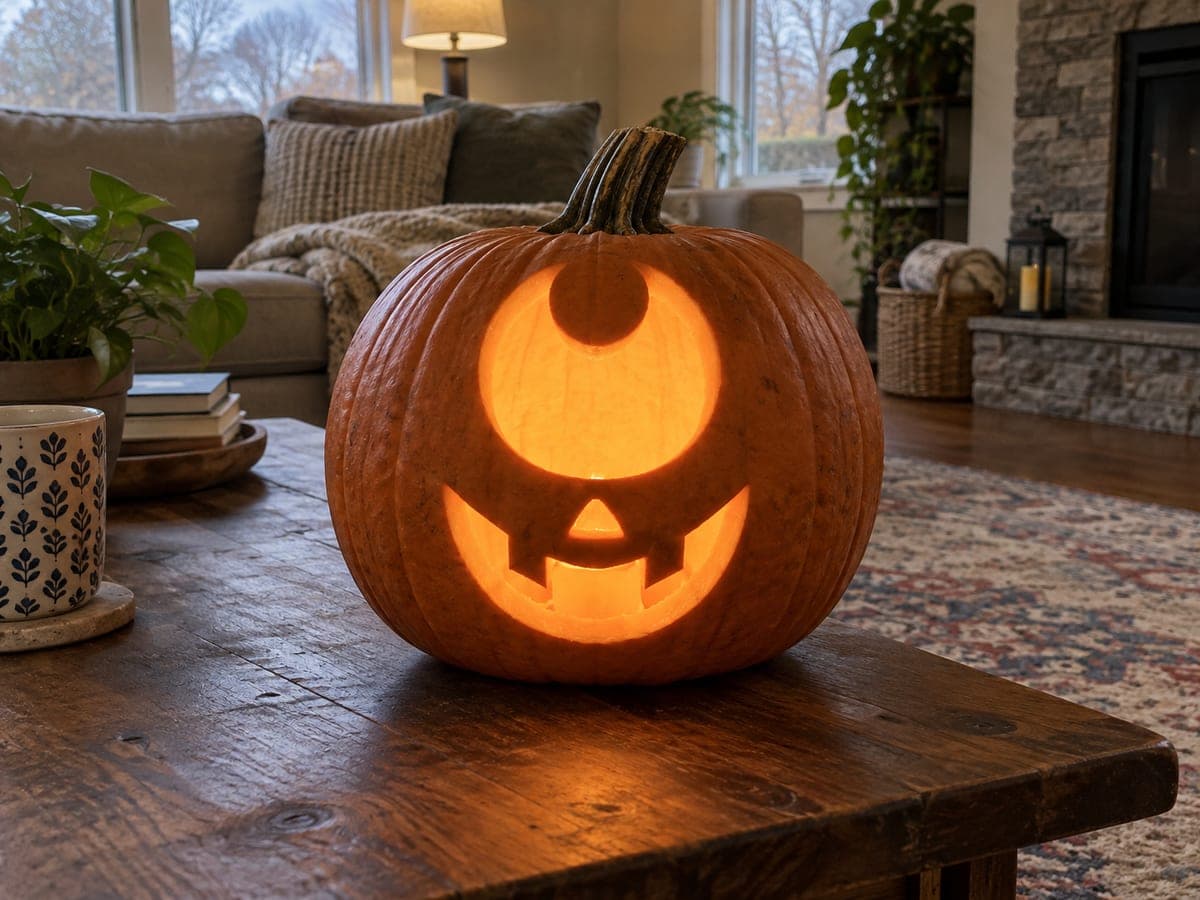
A zombie that shambled straight out of a cartoon: one droopy swirled eye, one wide crooked eye, a bent nose, and a lopsided stitched grin full of mismatched square teeth. Everything is a simple cutout, and the sloppier the lines the better the undead look, which makes it a forgiving first carve for kids. Silly instead of scary, so it fits porches that get tiny trick-or-treaters.

This is an AI-generated concept image: a realistic, carvable design idea rather than a photo of a finished carve. AI concepts are always labeled and sit out the leaderboard and the contest.

No ratings yet Β· Sign in to rate

Comments (0)

  • No comments yet β€” be the first.

Save without an account. Sign in to like or comment.

Our tips for carving a similar design

The whole charm here is imperfection, so lean into it. Every feature is a straight cutout with no shading, and a lopsided line only makes the zombie look more undead. Plan two very different eyes, a bent nose, and a wide grin broken into separate square teeth so light pours through in a fun, uneven pattern.

Written by PumpkinCarvingIdeas.com, inspired by the image above. These are our suggestions, not instructions from the uploader. This approach to the AI concept has not been tested on a real pumpkin.

From pumpkin to porch

  1. Pick a tall pumpkin and open the top

    Choose a rounder pumpkin with a smooth front face and a sturdy stem. An adult should cut a lid at an angle around the stem so it drops back in place later. Scoop out the seeds and pulp, then thin the front wall to about an inch so your tools push through easily. A thinner wall also lets more light glow out.

  2. Draw the goofy features

    With a washable marker, sketch one swirled droopy eye and one wide crooked eye at different heights. Add a small bent nose and a long lopsided mouth line below. Do not aim for symmetry, since the crooked look is the point. Mark each tooth as its own little square so gaps stay between them.

  3. Cut the small features first

    Start with the nose and the tighter curves of the swirled eye, working with a small serrated carving saw. Cutting the smallest shapes first keeps the pumpkin strong while you handle it. Saw with gentle back and forth strokes and let the tool do the work instead of forcing it. Push the pieces out from inside with your thumb.

  4. Open the two eyes

    Carve the wide crooked eye and finish the swirled eye, leaving the little curl of skin in the swirl attached at both ends so it holds. Keep your non-cutting hand clear of the blade path. If an edge tears a bit, that ragged look actually helps the zombie feel. Clear the cut pieces as you go so you can see the light coming through.

  5. Carve the stitched grin last

    The mouth is the biggest opening, so save it for the end when the pumpkin is at its strongest everywhere else. Cut each mismatched square tooth as a separate hole, leaving thin bridges of skin between them so the teeth read clearly. Vary the tooth heights and widths on purpose. Trim any stray flecks with a paring knife for clean glow lines.

  6. Light it and photograph

    Set a battery LED tea light or puck light inside, never an open flame. Pop the lid back on and turn off the room lights to check the glow, then trim any spots that stay too dark. Set it on a porch step with a few fallen leaves for a cozy fall scene. Shoot from slightly above at dusk so the warm light reads against the darker background.

Gather your supplies

Check things off as you get ready.

Work on a stable surface, keep your free hand out of the cutting path, and have an adult handle sharp tools.

Three levels of light

  • Leave intact

    The untouched outer skin of the face and the thin bridges between teeth stay dark and hold the shapes together.

  • Peel & shade

    You can shave a shallow halo around the swirled eye so a faint orange ring softens that side of the face.

  • Cut through

    The two eyes, the bent nose, and each square tooth cut all the way through for the brightest glow.

Learn the carving basics

Before you start cutting

How do I keep the swirl in the droopy eye from falling out?

Treat the curl as a strip of skin that stays connected at both ends rather than a free floating piece. Cut the open space around it but leave the curl itself anchored to the pumpkin wall. If it feels loose, widen the anchor points a little for extra support.

My teeth keep breaking into one big hole. What went wrong?

The bridges between teeth are probably too thin or you cut them too close together. Leave at least a finger width of skin between each square and cut each tooth as its own separate opening. Saving the mouth for last also keeps the pumpkin firm while you work.

Since this is a concept image, can a real pumpkin look like this?

Yes, every feature here is a simple through cut that works fine on a real pumpkin. Just keep the tooth bridges and the eye swirl solid so nothing sags. Thin the wall and use an LED light and the glow will match the concept closely.

Your take belongs here, too.

Changed a detail? Made it simpler? Share a photo of your version and tell the community what worked.

Share your pumpkin

More pumpkins like this

You've reached the end Β· 8 pumpkins
The Patch Report

Fresh pumpkins, in your inbox.

The best new carvings, ideas worth stealing, and how-tos for carving season. Short, seasonal, and gone by November.

A short email during carving season. Unsubscribe anytime. See our privacy policy.