Halloween Pumpkin Carving Contest · Starts October 1st · $500 in prizes
← Back to ideas
@ai_concepts
Jul 26, 2026
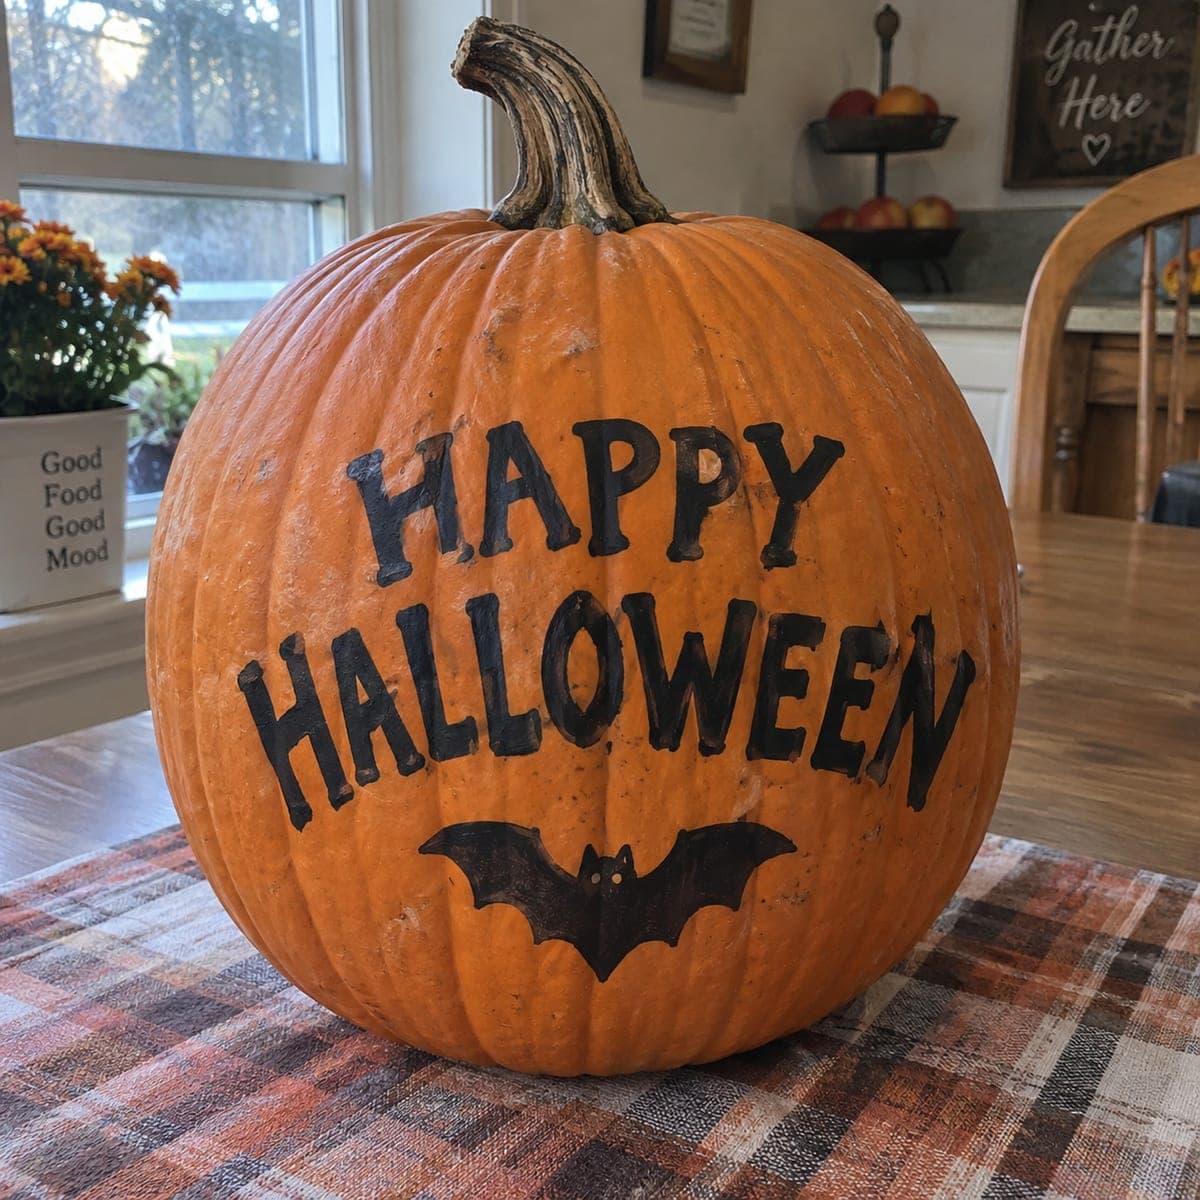
Hand Lettered Happy Halloween No-Carve PumpkinAI
0

Hand Lettered Happy Halloween No-Carve Pumpkin

Bold black hand lettering spells HAPPY HALLOWEEN across this tall pumpkin, with a friendly wide-winged bat swooping beneath the words. As a no-carve pumpkin it can sit out for weeks on a kitchen table or covered porch without softening. Sketch the two arched lines of text in pencil first, checking letter spacing before committing, then paint with a small flat brush and finish the bat in a single solid coat.

This is an AI-generated concept image: a realistic, carvable design idea rather than a photo of a finished carve. AI concepts are always labeled and sit out the leaderboard and the contest.

No ratings yet · Sign in to rate
Comments (0)

  • No comments yet — be the first.

Save without an account. Sign in to like or comment.

Our tips for carving a similar design

The core trick here is confident hand lettering: two gently arched lines that read HAPPY HALLOWEEN, anchored by a friendly wide-winged bat below. Because nothing is cut, the whole design lives on the surface in solid black paint, so the plan is all about clean layout and steady brush control. Sketch everything in pencil first, fix your spacing, then paint.

Written by PumpkinCarvingIdeas.com, inspired by the image above. These are our suggestions, not instructions from the uploader. This approach to the AI concept has not been tested on a real pumpkin.

From pumpkin to porch

  1. Pick and wipe down a tall pumpkin

    Choose a tall, smooth-shouldered pumpkin with a flat front panel so your two lines of text have room to arch. Wipe the surface with a damp cloth and let it dry fully, since paint grips poorly on dust or field dirt. A ribbed pumpkin still works, just keep your letters on the smoother sections between deep grooves. Set it on the table at the angle it will finally be displayed.

  2. Sketch the two arched lines in pencil

    Lightly pencil a curved guideline for HAPPY on top and a longer curve for HALLOWEEN below, both smiling upward at the ends. Rough in each letter as a hollow outline first so you can check spacing and center the whole block. Step back and read it from a few feet away, then erase and nudge any cramped letters. Pencil marks wipe off easily, so take your time before any paint touches the skin.

  3. Add the bat guideline underneath

    Below the words, pencil a simple symmetrical bat: a small rounded body, two scalloped wings sweeping out, and two tiny ears up top. Keep the wings wide and the shapes chunky so they read from a distance and are easy to fill. Leave two little dots blank where the eyes will be. Center it under the O and W so it balances the text.

  4. Paint the letters with a small flat brush

    Use a small flat brush and black acrylic or outdoor craft paint, outlining each letter first and then filling the center. Work in thin, even coats and let the first dry before a second pass for solid coverage. Rest your painting hand on a folded towel to steady it against the curve. Save the bat for last so you do not smear the fresh letters.

  5. Fill the bat in one solid coat

    Paint the bat body and wings in a single confident coat, following your pencil outline. Leave the two eye dots unpainted so the orange peeks through as friendly eyes. Touch up any ragged edges once it dries, and gently erase stray pencil lines outside the paint. Keep the coat even so the bat stays crisp against the pumpkin.

  6. Seal, stage, and photograph

    Once everything is bone dry, brush on a thin coat of clear matte sealer to protect the paint from moisture and handling. Set the pumpkin on a plaid runner or porch step and add a small LED tea light or fairy lights beside it, never a flame, since nothing is hollowed out. Because this is a no-carve pumpkin it will hold up for weeks indoors or on a covered porch. Snap your photo in soft daylight to keep the black lettering sharp.

Gather your supplies

Check things off as you get ready.

Work on a stable surface, keep your free hand out of the cutting path, and have an adult handle sharp tools.

Three levels of light

  • Leave intact

    The bare orange body of the pumpkin stays untouched as the bright background and forms the bat's two eye dots.

  • Peel & shade

    For a subtle accent you could lightly scuff a thin shadow line under the letters with fine sandpaper for a soft matte halo, though the classic look skips this.

  • Cut through

    Nothing is cut on this no-carve design, so all contrast comes from the solid black paint rather than interior light.

Learn the carving basics

Before you start cutting

How do I keep two lines of text centered and even?

Pencil a light vertical center line down the front first, then build each word out from the middle so it stays balanced left to right. Sketch both arched guidelines before any letters and count your spacing. Read it from a few feet back and adjust before committing to paint.

What paint holds up best on a pumpkin that sits out for weeks?

Black acrylic or outdoor craft paint gives solid coverage and dries fast on the waxy skin. Apply two thin coats rather than one thick one to avoid drips on the curve. Finish with a clear matte sealer so handling and dew do not lift the paint.

This is an AI concept image, so can a real pumpkin look like this?

Yes, this design is easy to recreate since it is entirely painted with no cutting involved. Any tall, smooth-fronted real pumpkin works, and the chunky bat and bold letters are forgiving for first timers. Just keep your lines on the flatter panels between deep ribs for the cleanest result.

Your take belongs here, too.

Changed a detail? Made it simpler? Share a photo of your version and tell the community what worked.

Share your pumpkin

More pumpkins like this

You've reached the end · 8 pumpkins
The Patch Report

Fresh pumpkins, in your inbox.

The best new carvings, ideas worth stealing, and how-tos for carving season. Short, seasonal, and gone by November.

A short email during carving season. Unsubscribe anytime. See our privacy policy.