Halloween Pumpkin Carving Contest · Starts October 1st · $500 in prizes
← Back to ideas
@ai_concepts
Sep 14, 2026
Happy Halloween Block-Letter PumpkinAI
0

Happy Halloween Block-Letter Pumpkin

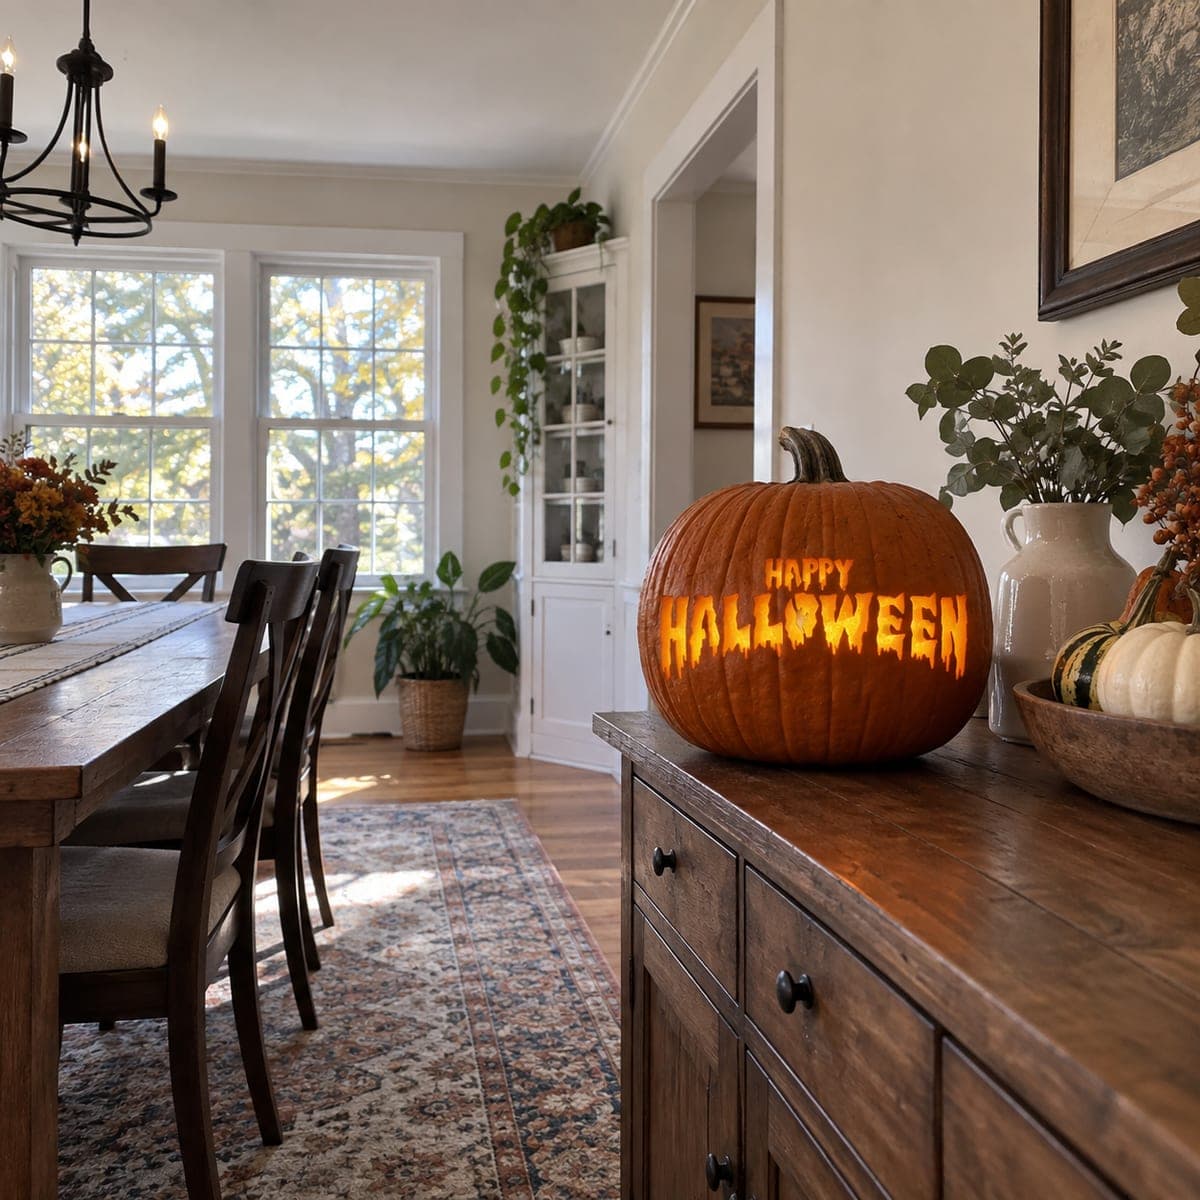
A smaller Happy sits above a wide row of tall, jagged-edged HALLOWEEN letters that span the full width of the pumpkin face in this classic Halloween word pumpkin carving idea displayed as interior decor on a sideboard. The letters use a distressed, slightly irregular style where the tops of each character have ragged notches, which makes slight imperfections in the carving look intentional rather than messy. Pencil in a horizontal guideline for each row before transferring the letters to keep both lines of text from drifting downward at one end. Because HALLOWEEN has multiple enclosed counters (A, L, O, E), pre-bridge each one with a thin skin strip before starting so the centers stay connected until the final trimming pass.

This is an AI-generated concept image: a realistic, carvable design idea rather than a photo of a finished carve. AI concepts are always labeled and sit out the leaderboard and the contest.
No ratings yet · Sign in to rate

Comments (0)

  • No comments yet — be the first.

Save without an account. Sign in to like or comment.

Our tips for carving a similar design

The trick here is treating text as two clean rows: a smaller Happy on top and a wide, tall HALLOWEEN across the belly of the pumpkin, all in a distressed block-letter style with ragged notches on the top edges. Those intentional jagged edges hide small slips, so slight wobble reads as spooky rather than sloppy. The plan is to lock in horizontal guidelines, transfer the letters, pre-bridge every enclosed counter, then cut everything through for maximum glow.

Written by PumpkinCarvingIdeas.com, inspired by the image above. These are our suggestions, not instructions from the uploader. This approach to the AI concept has not been tested on a real pumpkin.

From pumpkin to porch

  1. Pick a tall, wide pumpkin and open the back

    Choose a pumpkin with a broad, fairly flat front so the word row has room to spread edge to edge. Since no real pumpkin exists in this concept image, plan the size around your own letters rather than copying exact proportions. Cut a removable lid or a round access hole in the back, never the top, so the stem stays intact for looks. Scrape the inside of the front wall down to about one inch thick so light passes through cleanly.

  2. Pencil your guidelines first

    Before any letters go on, draw two light horizontal pencil lines around the front: a short upper line for Happy and a taller lower band for HALLOWEEN. Check them by eye and with a flexible tape so neither line drifts downward at one end. Keep the lower band tall since those letters are the star of the design. This step is what keeps both rows level and balanced.

  3. Transfer the letters and pre-bridge the counters

    Tape your stencil in place and poke the outlines with a pin or transfer tool, or draw the block letters freehand along your guidelines. HALLOWEEN has several enclosed centers in the A, L, O, and E, so mark a thin skin strip across each one to act as a bridge. These bridges hold the middles in place until your final pass. Add the ragged notches to the tops of each character as you outline so the distressed edge is planned, not improvised.

  4. Cut the small Happy row first

    Start with the upper Happy since it is smaller and lower risk. Use a fine detail saw and make slow, steady strokes, letting the blade do the work rather than forcing it. Cut each letter fully through so it glows bright. Poke the waste pieces inward and gently free them from the inside.

  5. Cut HALLOWEEN and trim the bridges last

    Move to the wide word and cut the outer edges of each letter first, saving the thin counter bridges for the very end. Work from one side across so you keep a firm grip on solid pumpkin. Once every letter body is cut, decide which bridges to trim away for full openings and which to leave for support. Clean up the ragged top notches with a small knife so they look crisp and intentional.

  6. Light it and stage the photo

    Drop in a battery LED puck or string, never a candle, especially since this sits indoors on a wood sideboard. Set the brightness so the letters read clearly without washing out. Wipe the cut edges dry and dab a little petroleum jelly on them to slow browning. Place it on a tray or riser and shoot in a dim room so the warm glow pops.

Gather your supplies

Check things off as you get ready.

Work on a stable surface, keep your free hand out of the cutting path, and have an adult handle sharp tools.

Three levels of light

  • Leave intact

    The full untouched pumpkin skin around and between the letters stays dark, framing the words.

  • Peel & shade

    Optional shallow skin-peel just inside a few ragged top notches gives a dim halo if you want softer edges.

  • Cut through

    Every letter of Happy and HALLOWEEN is cut fully through for the brightest glow, once the counter bridges are trimmed.

Learn the carving basics

Before you start cutting

How do I keep the centers of A, O, E, and L from falling out?

Pre-bridge each enclosed counter with a thin strip of skin before you start cutting, and leave those strips until the very last pass. They hold the middles connected while you work the rest of the letter. At the end you can trim a bridge away for a full opening or leave a slim one for support.

What if my letters come out a little uneven?

That is exactly why this distressed style works. The ragged notches on the tops of each character make small imperfections look intentional. Focus on keeping your two rows level with the pencil guidelines, and let the jagged edges absorb minor wobble.

Can I fit all of HALLOWEEN across the face?

Yes, but pick a wide pumpkin and lay out your guidelines first so the word spans edge to edge without crowding. Measure the band and space the letters evenly before transferring. If it feels tight, drop the smaller Happy higher up to free room for the tall lower row.

Your take belongs here, too.

Changed a detail? Made it simpler? Share a photo of your version and tell the community what worked.

Share your pumpkin

More pumpkins like this

You've reached the end · 8 pumpkins
The Patch Report

Fresh pumpkins, in your inbox.

The best new carvings, ideas worth stealing, and how-tos for carving season. Short, seasonal, and gone by November.

A short email during carving season. Unsubscribe anytime. See our privacy policy.