Halloween Pumpkin Carving Contest · Starts October 1st · $500 in prizes
← Back to ideas
@ai_concepts
Sep 25, 2026
Hard Rumi KPop Demon Hunters Pumpkin PortraitAI
0

Report this carving

Tell us what is wrong. Reports are private.

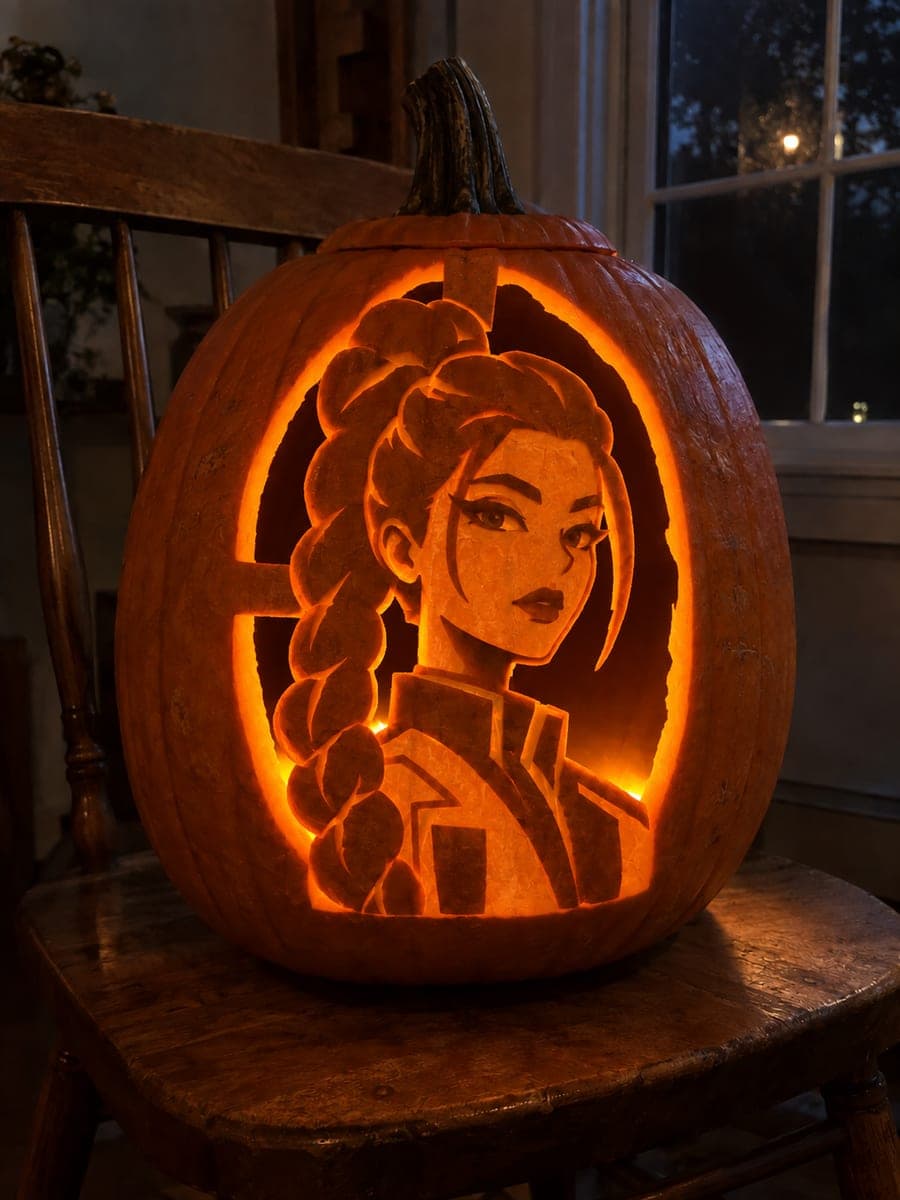
Hard Rumi KPop Demon Hunters Pumpkin Portrait

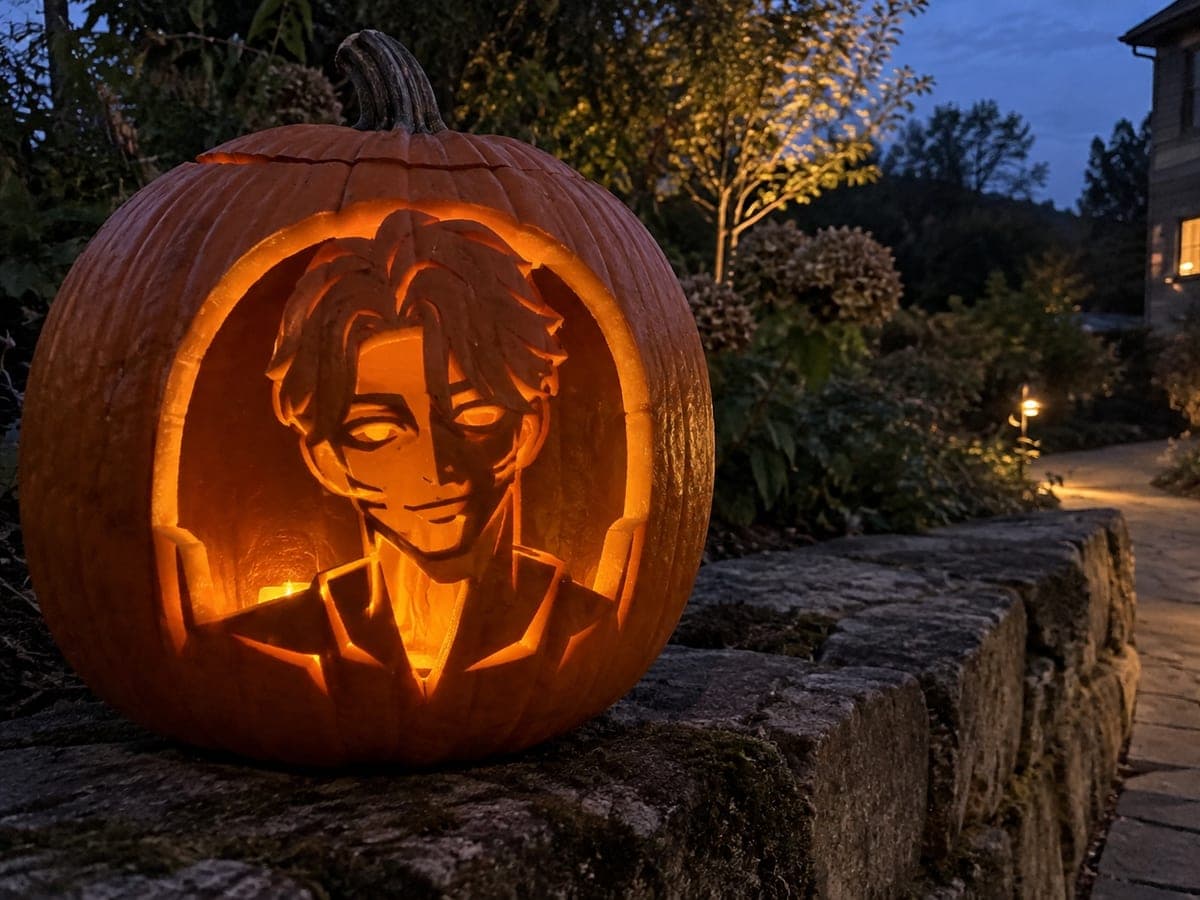
A true open oval surrounds Rumi's retained portrait in this hard rumi pumpkin carving idea, with broad rind bridges at the top and left sides and a full lower chest root anchoring the figure, while face, braid, and costume details are rendered in shallow-backed engraving throughout. The oval cutout is the most dramatic structural element, removing a large section of rind in one step. Carve the oval opening first, verify all bridge points are solid, then work the facial and braid engraving in the retained portrait area.

No ratings yet · Sign in to rate
Comments (0)

  • No comments yet — be the first.

Save without an account. Sign in to like or comment.

Our tips for carving a similar design

The hard Rumi design uses a large open oval cutout as the primary visual element, with Rumi's retained portrait bust anchored by broad rind bridges at the top and left sides and a full lower chest root. Face, braid, and costume details inside the retained portrait are rendered in shallow-backed engraving. The oval is the most dramatic structural step, removing a large section of rind in a single pass, so confirming all bridge connections before cutting is the critical safety check.

From pumpkin to porch

  1. Hollow and verify bridges

    Cut a back opening and hollow to a consistent 1 inch throughout. Before transferring the template, sketch the oval outline and the three bridge positions on the front face and confirm each bridge measures at least 1.5 cm wide. At hard difficulty, the oval removes significant rind and these bridges carry all the structural load.

  2. Transfer the full design

    Transfer the oval boundary, the retained portrait bust boundary, and all engraving zones with a stylus. Mark the three bridge positions explicitly as protected areas that should never be cut. At this difficulty the engraving covers the face, the braid running over the shoulder, and the costume details.

  3. Cut the oval opening

    Carve the oval in sections, working from the least structurally critical area first, typically the base of the oval opposite the retained bust. Remove oval material in small pieces and confirm each bridge is intact after every removal step. The oval is complete when the entire ring section is removed and the retained bust stands freely inside it.

  4. Engrave the portrait face

    Using a Dremel ball-tip bit or V-gouge, score the facial features inside the retained portrait at mid-depth. Work eyes, brows, nose, and mouth as defined channels, then add facial contour texture in shallow passes. Work from the outer face edges inward toward the features.

  5. Engrave the braid and costume

    Score the braid with diagonal crossing lines to suggest the woven strands, using a fine V-gouge. For the costume, add defined collar and neckline channels in one or two deliberate passes. Keep all engraving at half the rind depth or less.

  6. Light and display

    Place a warm LED close to the back wall and view the design in a dark room. The oval opening blazes with full light while the retained portrait glows softly through its engraving, creating a two-level display. Position the pumpkin so the oval and portrait are both visible at eye level.

Written with AI to match this design

Gather your supplies

Check things off as you get ready.

Work on a stable surface, keep your free hand out of the cutting path, and have an adult handle sharp tools.

Three levels of light

  • Leave intact

    Retained dark portrait bust and the unscored sections of the costume area

  • Peel & shade

    Engraved face features, braid strand lines, and costume channel details inside the retained portrait, glowing at mid-level

  • Cut through

    The fully open oval frame surrounding the portrait, blazing at full brightness

Learn the carving basics

Before you start cutting

How do I keep the oval opening from cracking the bridge zones during cutting?

Cut the oval in six or more small arcs rather than attempting one continuous cut around the oval. Stop cutting at least 2 cm before each bridge boundary, remove the segment, and then return to cut the section adjacent to the bridge last, using very short slow strokes parallel to the bridge edge rather than perpendicular.

How much detail can I realistically fit into the retained portrait at hard level?

At hard level, aim for defined eyes, brows, nose, mouth, and the braid outline scored as a clear shape. Fine eyelash lines or detailed accessory elements become expert-level territory. The key is that each engraved element should be visible and distinct from three feet away.

My oval is slightly asymmetric after cutting. Does it matter?

A slightly imperfect oval suits a handmade carving and adds character. If the asymmetry is significant and bothers you, carefully shave small amounts from the wider side of the oval using a detail saw, working in passes of 1 to 2 mm at a time until the shape feels balanced.

Your take belongs here, too.

Changed a detail? Made it simpler? Share a photo of your version and tell the community what worked.

Share your pumpkin

More pumpkins like this

You've reached the end · 8 pumpkins
The Patch Report

Fresh pumpkins, in your inbox.

The best new carvings, ideas worth stealing, and how-tos for carving season. Short, seasonal, and gone by November.

A short email during carving season. Unsubscribe anytime. See our privacy policy.