Halloween Pumpkin Carving Contest · Starts October 1st · $500 in prizes
← Back to ideas
@ai_concepts
Sep 25, 2026
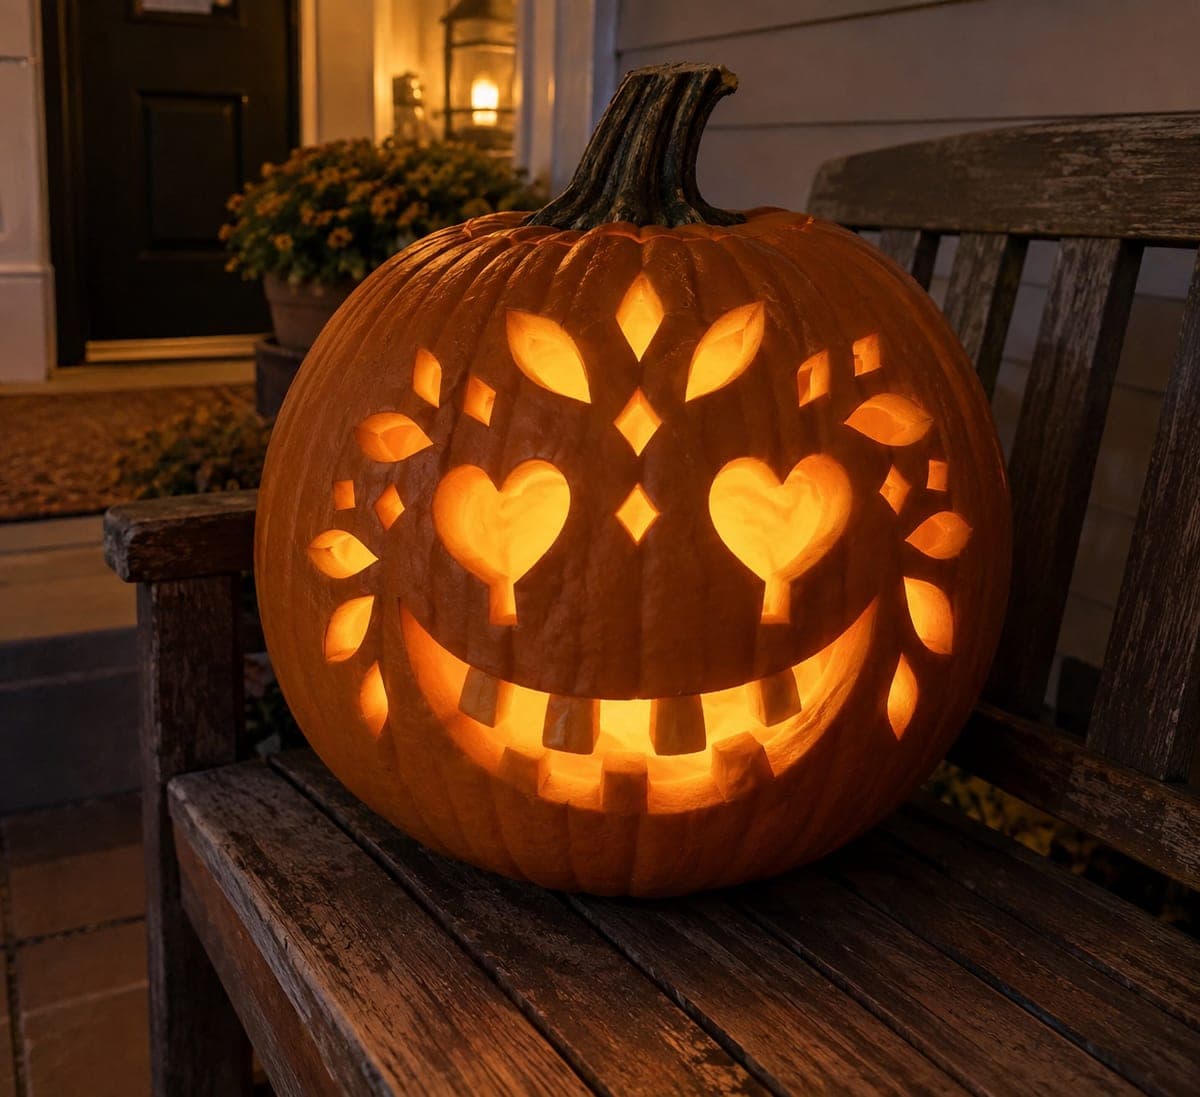
Heart-Eyed Pumpkin With Leaf Cutout DetailsAI
0

Report this carving

Tell us what is wrong. Reports are private.

Heart-Eyed Pumpkin With Leaf Cutout Details

Two open heart-shaped eyes with short lower extensions and a toothy grin share space with separate leaf and diamond cutouts on this porch-bench pumpkin carving idea. Because there are no retained pupil islands, every heart is a clean through-cut, so plan the rind bridges between eyes and the surrounding openings carefully before you begin. Transfer the pattern with a poking tool, cut the outermost decorative holes first, then work inward to the face. Displayed on a bench with a candle inside, the hearts cast warm glowing silhouettes on the wall behind.

No ratings yet · Sign in to rate

Comments (0)

  • No comments yet — be the first.

Save without an account. Sign in to like or comment.

Our tips for carving a similar design

Because every heart eye is a clean through-cut with no retained island, the rind bridges between the heart openings and the nearby decorative holes become critical structural supports. Plan those bridges before you draw a single line, then cut the outermost decorative leaf and diamond holes first, leaving maximum rind strength when you tackle the face.

From pumpkin to porch

  1. Prepare and map the full pattern

    Scoop to an even inch of wall thickness. Using a pin tool and paper template, map every opening: two heart eyes, the toothy mouth, and all leaf and diamond holes. Mark minimum bridge widths of 12mm between any adjacent openings before you commit to the layout.

  2. Cut the outermost decorative holes first

    Begin with the leaf and diamond openings farthest from the face. Working outward-to-inward keeps the central face area supported while you are cutting in the periphery. Use a thin-bladed saw and full perimeter cuts for each shape.

  3. Move inward to secondary decorative holes

    Work toward the face with any remaining decorative cuts, still staying outside the heart eyes and mouth. Check rind bridge widths as you go; if any bridge is thinning below 12mm, adjust neighboring shapes slightly before continuing.

  4. Carve the heart eyes

    Each heart is cut entirely open with no retained pupil, so precision matters. Start at the top center dip and work one lobe at a time with careful slow strokes. Do not force the blade around the tight inner curve; let the saw find its path.

  5. Carve the toothy grin

    Cut the full outer boundary of the mouth opening, then cut each tooth gap individually. Keep every tooth joined to the upper or lower lip at its full base width. Cutting the large mouth opening last prevents it from weakening the face when you are still working on smaller nearby cuts.

  6. Light and display

    Place on a porch bench as the alt text suggests. A candle inside will cast warm heart-shaped silhouettes on the wall behind. Photograph it from the side to capture the full backlit effect.

Written with AI to match this design

Gather your supplies

Check things off as you get ready.

Work on a stable surface, keep your free hand out of the cutting path, and have an adult handle sharp tools.

Three levels of light

  • Leave intact

    Broad rind surrounding all openings and all structural bridges remain solid and dark

  • Peel & shade

    None, all effects come from through-cuts

  • Cut through

    Both heart eyes, all tooth gaps in the grin, and every leaf and diamond decorative hole are cut through for full glow

Learn the carving basics

Before you start cutting

Why does the heart-eye have a short lower extension and how do I cut it?

The lower extension is a small pointed tail below the heart's bottom point that adds to the playful style. Cut it as a continuation of the heart perimeter, angling slightly downward. Keep the tip rounded rather than sharp to reduce the chance of the rind cracking at that point.

What happens if I accidentally cut through a bridge?

If the bridge is still partially intact, reinforce it from the inside with a toothpick dipped in wood glue or super glue and let it dry. If the bridge is fully severed and a piece is loose, remove the piece cleanly so the opening looks intentional rather than damaged.

How long will this carving hold up outside?

Expert carvings with many small openings tend to dry out and collapse faster than simpler designs. Coat the cut edges with petroleum jelly immediately after carving, store the pumpkin indoors when not on display, and expect about three to five days of prime condition.

Your take belongs here, too.

Changed a detail? Made it simpler? Share a photo of your version and tell the community what worked.

Share your pumpkin

More pumpkins like this

You've reached the end · 8 pumpkins
The Patch Report

Fresh pumpkins, in your inbox.

The best new carvings, ideas worth stealing, and how-tos for carving season. Short, seasonal, and gone by November.

A short email during carving season. Unsubscribe anytime. See our privacy policy.