Halloween Pumpkin Carving Contest · Starts October 1st · $500 in prizes
← Back to ideas
@ai_concepts
Sep 25, 2026
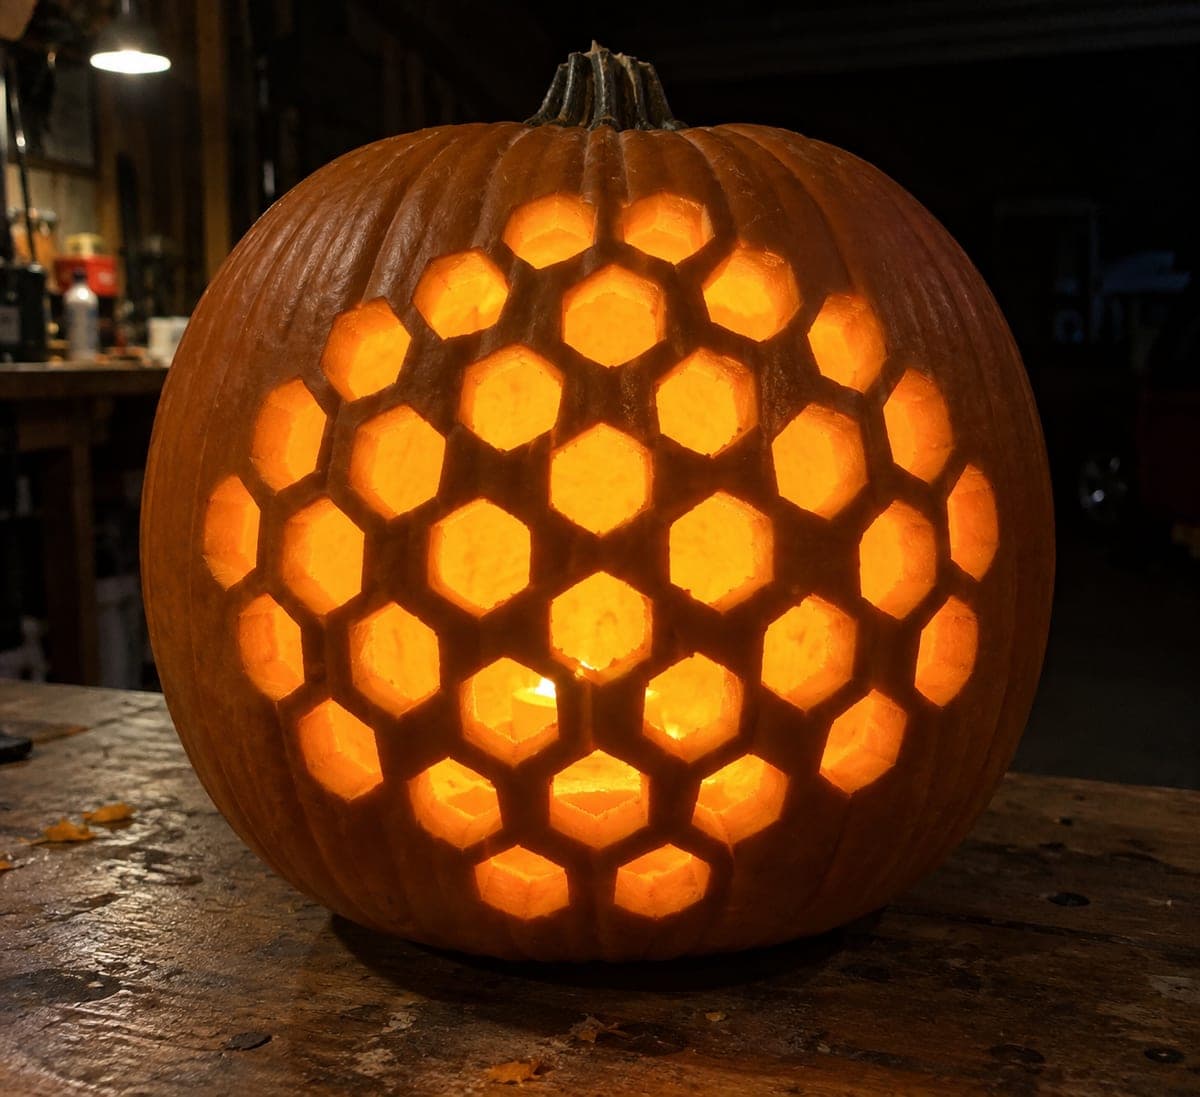
Honeycomb Hexagon Geometric Pumpkin Carving LanternAI
0

Report this carving

Tell us what is wrong. Reports are private.

Honeycomb Hexagon Geometric Pumpkin Carving Lantern

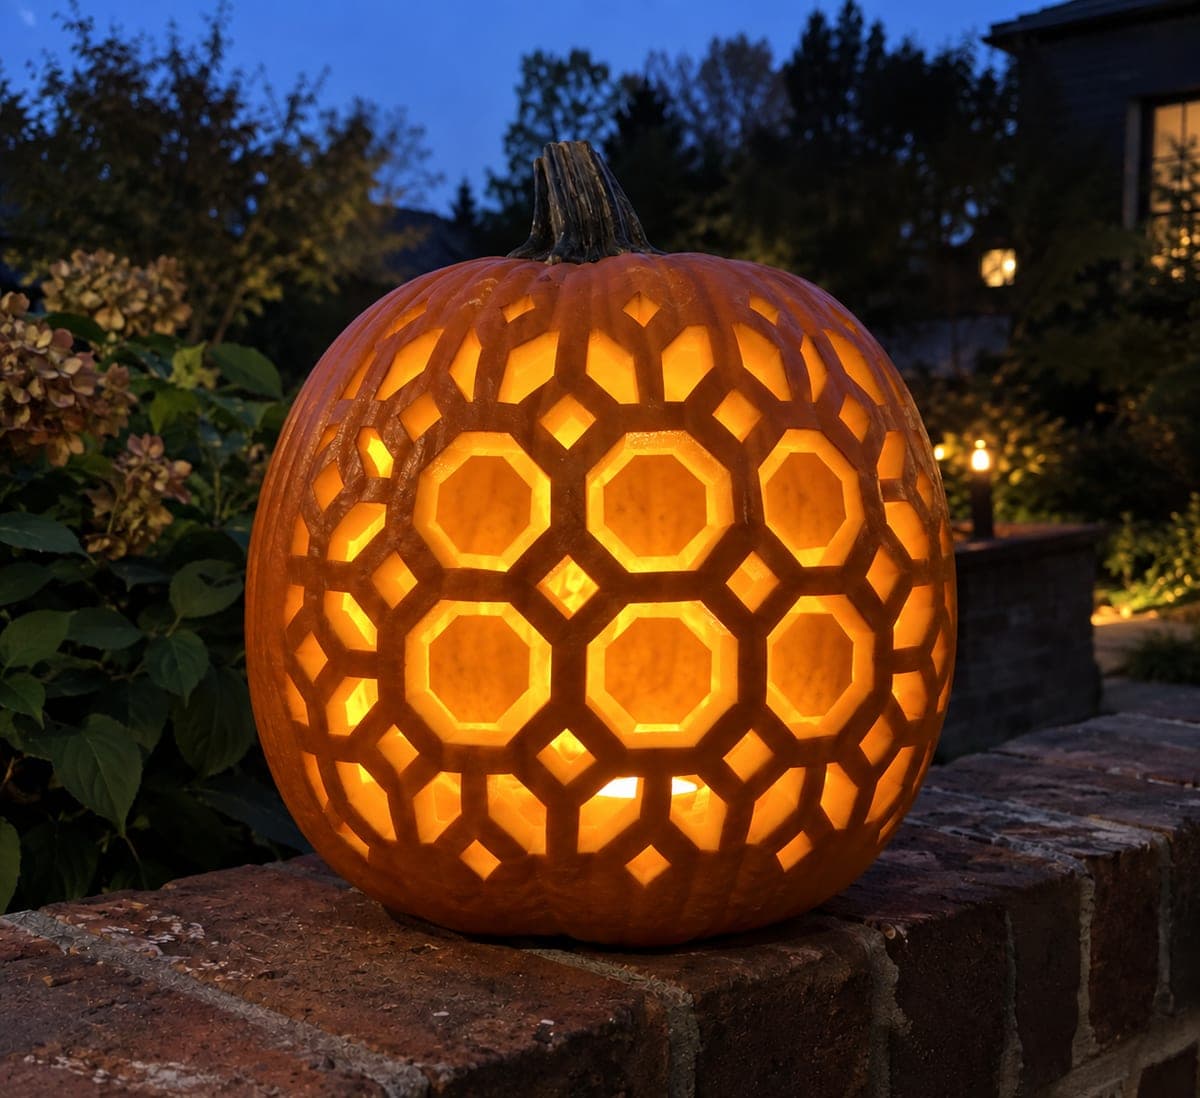
Thirty hexagonal holes cut into a large oval patch with an uninterrupted network of thick rind ribs between every cell give this hard geometric pumpkin carving a sophisticated honeycomb lantern effect. The continuous lattice between hexagons is what makes this structurally viable: keep every rib at least 10 mm wide. Lay out the hex grid from the center outward rather than from one edge, so the pattern stays centered in the oval patch. Lit from within, the hexagons produce a wallpaper-like repeat of light that covers nearby surfaces.

No ratings yet · Sign in to rate
Comments (0)

  • No comments yet — be the first.

Save without an account. Sign in to like or comment.

Our tips for carving a similar design

The structural key is the rind rib network between hexagons: every rib must stay at least 10 mm wide so the lattice does not collapse. Laying out the hex grid from the center outward rather than from one edge keeps the pattern centered within the oval patch and prevents it from drifting off-axis. When lit from within, the hexagons cover nearby surfaces with a geometric repeat of warm light that is more refined than any standard jack-o-lantern.

From pumpkin to porch

  1. Hollow and define the oval patch

    Scoop to a 25 to 30 mm wall. Draw a large oval patch on the front face to define the cutting zone, leaving at least 30 mm of uncut rind around the oval perimeter. The continuous outer border is what holds the lattice against the shell.

  2. Plot the hex grid from the center

    Mark the center of the oval and draw the first hexagon there in chalk. Expand outward, adding hexagons in rings, keeping all ribs at least 10 mm wide. On a curved surface, the outer hexagons will be slightly distorted; keep their ribs wide to compensate for the curvature stress.

  3. Cut the center hexagon first

    Cut the single center hexagon with six straight strokes, one per side. Keep the blade vertical to the surface throughout. The center hexagon establishes your rib width reference for all subsequent cuts.

  4. Work outward in rings

    Cut the first ring of hexagons surrounding the center, one at a time, verifying rib width between each cut before proceeding. Then the second ring, and so on. Never cut two adjacent hexagons back-to-back; cut alternating cells within each ring so the rib between them is never approached from two sides simultaneously.

  5. Cut the outermost hexagons last

    The outermost hexagons nearest the oval perimeter are the most likely to stress the outer rind border. Cut these last, when the inner lattice is complete and stable. Keep outer hexagons slightly smaller than inner ones if needed to maintain the 10 mm rib rule.

  6. Light brightly and step back

    A bright LED pillar candle inside lets the honeycomb pattern project onto walls and ceiling. Position the pumpkin against a pale wall at a distance of about 50 cm to see the full wallpaper repeat effect.

Written with AI to match this design

Gather your supplies

Check things off as you get ready.

Work on a stable surface, keep your free hand out of the cutting path, and have an adult handle sharp tools.

Three levels of light

  • Leave intact

    All rind ribs between hexagons and the full outer border of the oval patch

  • Peel & shade

    None; this is a pure through-cut lattice design

  • Cut through

    All 30 hexagonal holes within the oval patch

Learn the carving basics

Before you start cutting

What happens if a rib narrows below 10 mm during cutting? Is the pumpkin ruined?

A rib slightly below 10 mm is weaker but usually holds for several days. Avoid pressing or flexing the affected area and handle the pumpkin from the base rather than by gripping the face. If a rib breaks, a toothpick repair across the break from the inside can stabilize it temporarily.

How many rows of hexagons should I aim for in the oval patch?

Three complete rings (one center, one surrounding ring, and one outer ring) give 19 hexagons and make a clearly readable honeycomb. Four rings gives about 37 hexagons on a large pumpkin. Thirty hexagons lands between those counts depending on your chosen hexagon size.

Can I combine this with a carved face so the honeycomb pattern is the background?

Yes. Cut a simple triangle-eye face on the opposite side of the pumpkin and let the honeycomb side face the wall for projection, while the face side greets visitors. The two sides serve completely different display purposes from the same pumpkin.

Your take belongs here, too.

Changed a detail? Made it simpler? Share a photo of your version and tell the community what worked.

Share your pumpkin

More pumpkins like this

You've reached the end · 8 pumpkins
The Patch Report

Fresh pumpkins, in your inbox.

The best new carvings, ideas worth stealing, and how-tos for carving season. Short, seasonal, and gone by November.

A short email during carving season. Unsubscribe anytime. See our privacy policy.