Halloween Pumpkin Carving Contest Β· Starts October 1st Β· $500 in prizes
← Back to ideas
@ai_concepts
Sep 25, 2026
Intricate Star Eyes Pumpkin with Zigzag Mouth and BordersAI
0

Report this carving

Tell us what is wrong. Reports are private.

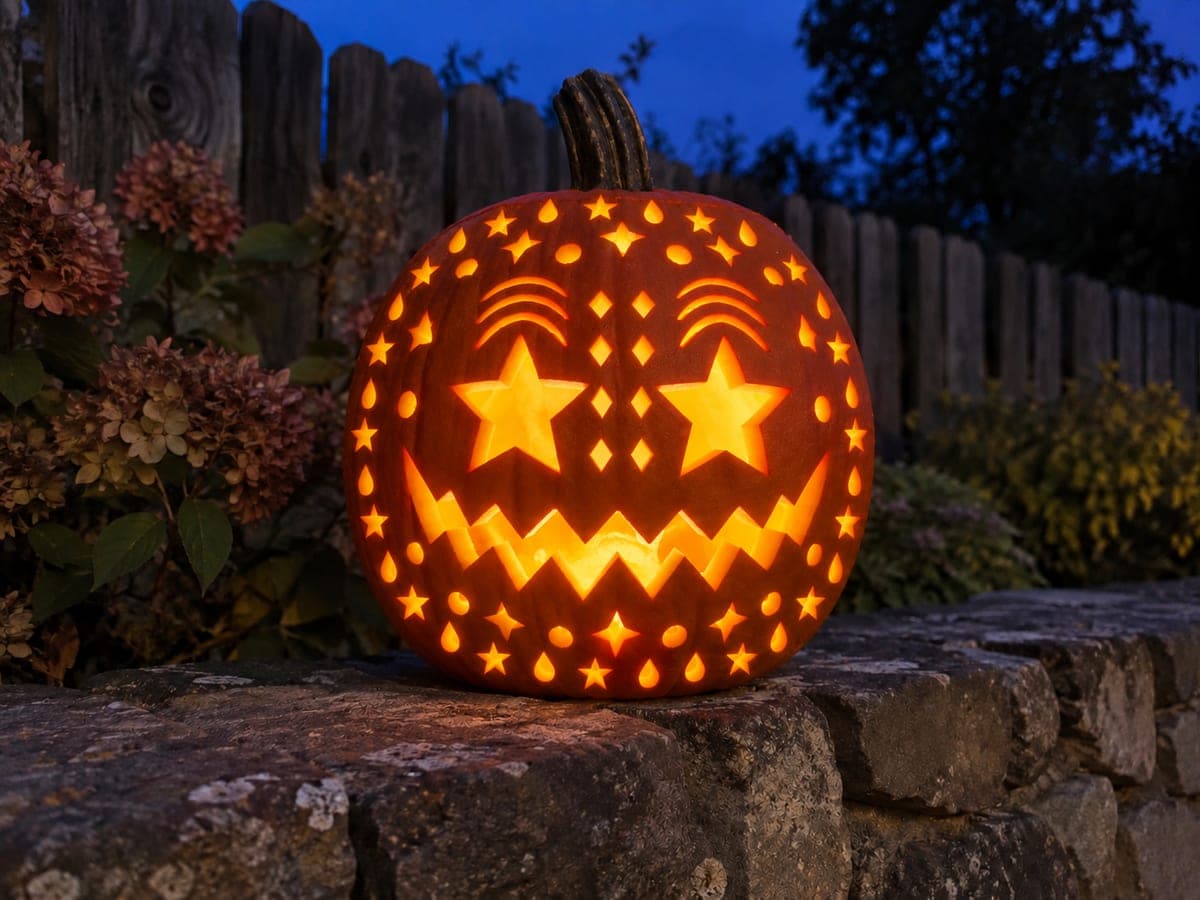
Intricate Star Eyes Pumpkin with Zigzag Mouth and Borders

Large star eyes and all decorative shapes are fully open cutouts on this expert star eyes pumpkin carving idea, featuring a zigzag-tooth mouth, diamond forehead cuts, and two surrounding decorative borders of glowing stars and teardrops. The zigzag teeth attach broadly to both lips so no single tooth point is fragile; cut each tooth gap as a short straight line between upper and lower connection points. Finishing on a stone wall at dusk shows the full ring of lit stars in silhouette.

No ratings yet Β· Sign in to rate

Comments (0)

  • No comments yet β€” be the first.

Save without an account. Sign in to like or comment.

Our tips for carving a similar design

Every element is a full cutout, and the two concentric decorative border rings are what separate this from a hard carve. Each zigzag tooth attaches broadly to both upper and lower lips, so each gap is simply a short straight-line cut between two wide roots rather than a fragile spike. Plan the entire layout including border holes before making a single cut, and work from the center outward.

From pumpkin to porch

  1. Full layout and scoping

    Draw the complete design on paper first to calculate how many border shapes fit at your pumpkin's circumference with adequate spacing. Transfer zone markers to the pumpkin with a pencil or chalk. Scoop the interior to a consistent one-inch wall, and use a spare spoon handle to feel for thin spots.

  2. Prep and hollow

    Cut the lid from the back so the front face is unmarked. After scooping, use a paper towel to remove moisture from the inner wall, which helps the pencil transfer adhere cleanly.

  3. Cut the central face features

    Working top to bottom, cut the diamond forehead shapes first, then the star eyes, and then the zigzag mouth. For each tooth gap, cut a short straight line from upper lip root to lower lip root. This ensures every tooth remains broadly connected and none risks snapping.

  4. Cut the first border ring

    Move outward to the first ring of stars and teardrops, cutting each shape one at a time and leaving solid rind between every hole. Continuous rind separates every decorative hole from the nearest face feature, so maintain that bridge even when the spacing feels generous.

  5. Cut the outer border ring

    Work the second, outermost ring last. The pumpkin will be under the most structural stress at this point, so handle it gently. Set it on a padded surface and rotate rather than picking it up. Cut each shape with deliberate push-cuts rather than sawing motions.

  6. Light and display

    Place on a stone wall or flat surface at dusk and insert a battery LED. The full ring of lit stars reads against the sky in silhouette, and the zigzag grin glows at the center. Photograph before the ambient light drops completely for the best image.

Written with AI to match this design

Gather your supplies

Check things off as you get ready.

Work on a stable surface, keep your free hand out of the cutting path, and have an adult handle sharp tools.

Three levels of light

  • Leave intact

    All rind between every cut stays dark, including the continuous bands separating the two border rings.

  • Peel & shade

    None.

  • Cut through

    Star eyes, diamond forehead cuts, zigzag mouth (all tooth gaps), and every star, teardrop, and shape in both border rings are cut completely through.

Learn the carving basics

Before you start cutting

How many border holes can fit on an average-sized pumpkin?

Measure the circumference and divide by your target hole spacing plus hole width to get a rough count. On a pumpkin about 12 inches in diameter, you can usually fit 16 to 20 shapes per ring with a third-inch gap between them. Adjust your spacing before cutting rather than discovering overcrowding mid-way.

What is the best way to keep the outer border from weakening the walls dangerously?

Never cut two adjacent border holes before checking that the rind between them is at least a third of an inch wide. If two holes would meet, convert the smaller one to a skin-peel dimple rather than a full cut. A continuous ring of full cuts with tiny bridges is actually stronger than one with randomly thick and thin sections.

How do I get the zigzag teeth to look even?

Mark the top and bottom boundary lines of the mouth first, then divide the space between them into equal vertical columns for each tooth gap. Each gap is simply a straight cut from upper boundary to lower boundary. Even column widths produce even teeth without any freehand skill required.

Your take belongs here, too.

Changed a detail? Made it simpler? Share a photo of your version and tell the community what worked.

Share your pumpkin

More pumpkins like this

You've reached the end Β· 8 pumpkins
The Patch Report

Fresh pumpkins, in your inbox.

The best new carvings, ideas worth stealing, and how-tos for carving season. Short, seasonal, and gone by November.

A short email during carving season. Unsubscribe anytime. See our privacy policy.