Halloween Pumpkin Carving Contest · Starts October 1st · $500 in prizes
← Back to ideas
@ai_concepts
Aug 6, 2026
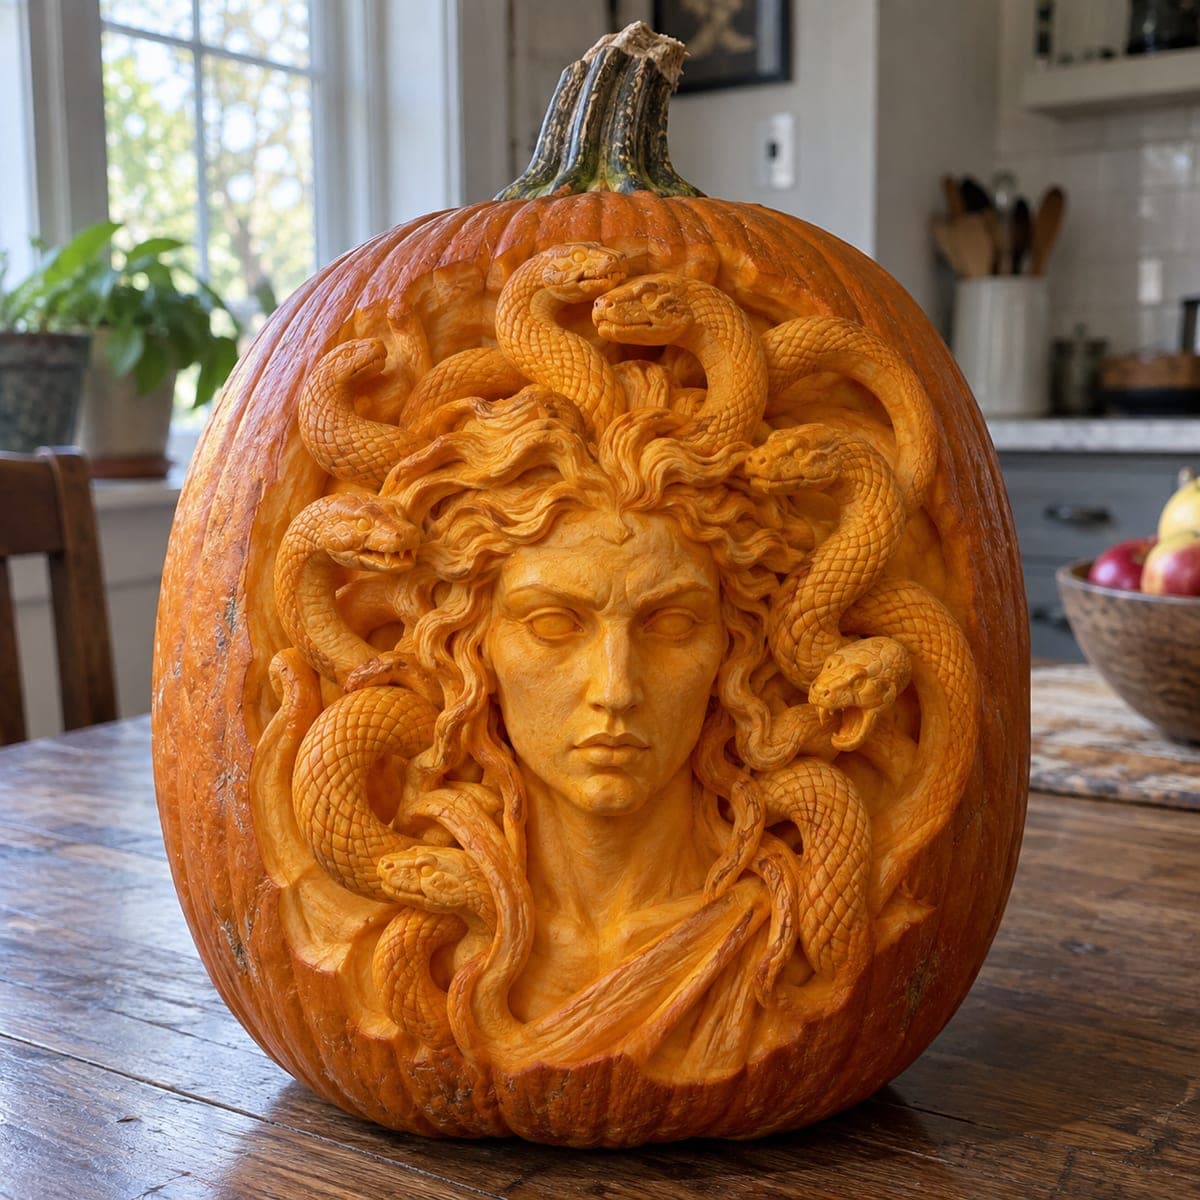
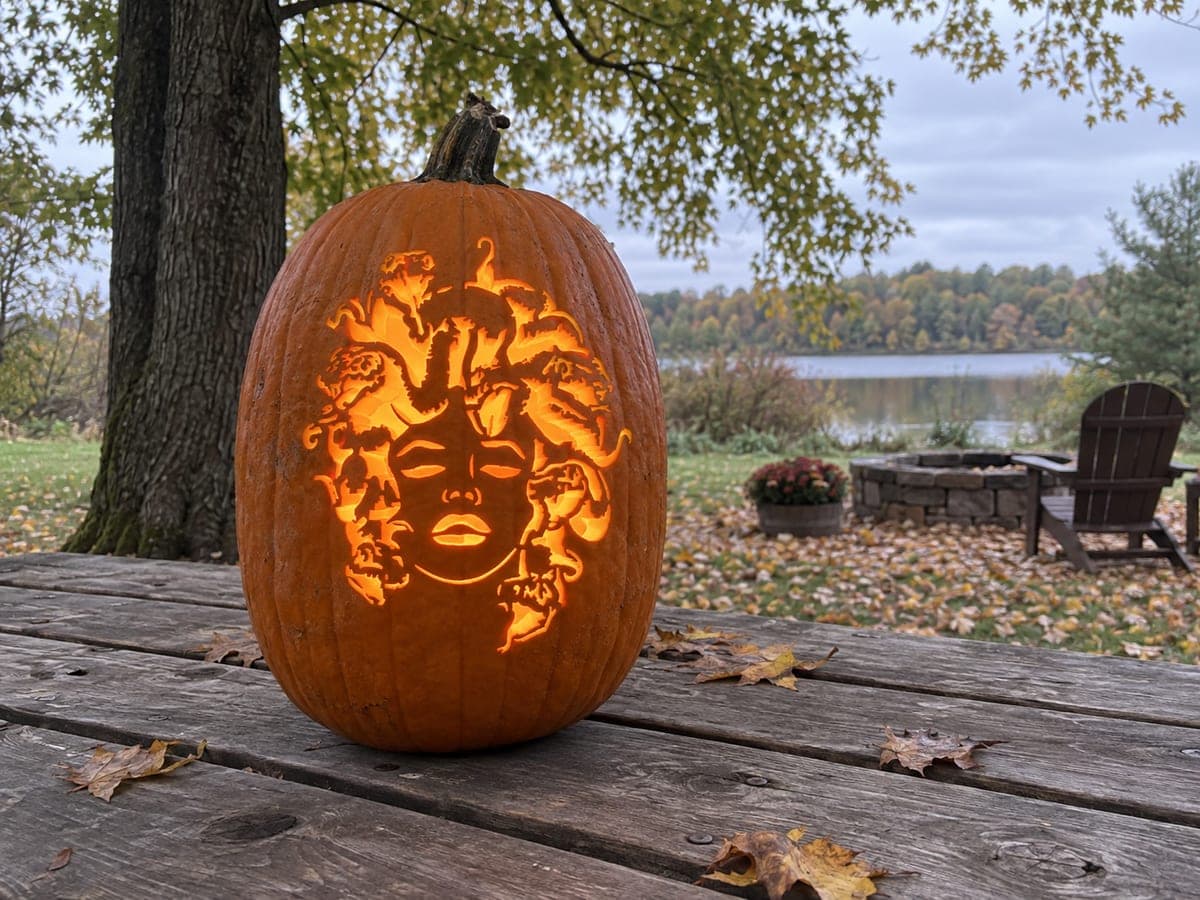
Medusa Head Sculpted Pumpkin With Coiling SnakesAI
0

Medusa Head Sculpted Pumpkin With Coiling Snakes

Medusa stares out from this fully sculpted pumpkin, her stone gaze framed by a writhing crown of individually carved snakes. This is 3D sculptural carving rather than stencil work, done with clay loop tools and ribbon tools straight into the thick wall. Rough out the face proportions before committing to any snake, keep the deepest undercuts around the hair, and mist the finished sculpt with water to keep details crisp for a party.

This is an AI-generated concept image: a realistic, carvable design idea rather than a photo of a finished carve. AI concepts are always labeled and sit out the leaderboard and the contest.

No ratings yet · Sign in to rate
Comments (0)

  • No comments yet — be the first.

Save without an account. Sign in to like or comment.

Our tips for carving a similar design

The whole illusion here rests on relief sculpting into the thick pumpkin wall rather than cutting through it, so the calm stone face reads as raised while the snakes coil in front of and behind it at different depths. Plan it as layers: the face sits mid-depth, the snakes weave in shallow and deep passes around it, and nothing punches all the way through. Rough the big shapes first and save the fine scales and undercuts for last.

Written by PumpkinCarvingIdeas.com, inspired by the image above. These are our suggestions, not instructions from the uploader. This approach to the AI concept has not been tested on a real pumpkin.

From pumpkin to porch

  1. Pick a big pumpkin and open the back

    Choose a large pumpkin with a thick, blemish-free wall on the carving face, since relief work needs plenty of material to dig into. Cut a wide access hole in the back, not the top, so the front stays intact for sculpting. Scrape the front interior wall down to an even thickness of about an inch and a quarter. This gives you room to carve depth without breaking through to the light.

  2. Transfer and rough out the face

    Lightly draw the oval of the face, the centerline, and the eye, nose, and mouth lines with a washable marker. Using a clay loop tool, shave away the skin and a shallow layer of flesh around the face to make it stand slightly proud of the snake field. Keep the features blocky and symmetrical at this stage and resist adding detail. Step back often and check proportions from a few feet away before committing.

  3. Model the calm features

    Switch to a smaller ribbon tool to round the brow, cheeks, nose, and lips into soft transitions. Scoop gentle hollows for the eye sockets and leave the eyes smooth and lidded so the gaze stays stony and blank. Work from high spots down into shadows, checking that light will catch the forehead and cheekbones. Take your time here, the face is the emotional anchor of the whole piece.

  4. Build the snake crown in layers

    Sketch the flow of the snakes as long S-curves radiating from the hairline, some crossing over others. Carve the top snakes shallow so they sit forward, then dig deeper undercuts behind them so the lower coils recede into shadow. Leave short bridges of flesh where snakes cross so nothing snaps loose, and keep each snake body attached along its length rather than free-floating. Save the tiny heads and open mouths for last, keeping fangs short, thick, and backed by flesh so they hold.

  5. Add scale texture and shading

    Press a small U-gouge or the tip of a loop tool in overlapping rows to suggest scales along each snake, and drag fine lines through the hair to echo the coils. Skin-peel broad areas of the face and drapery where you want a soft, dim glow, leaving the outer skin only on the darkest recesses. This shading contrast is what gives the sculpt its depth. Work gently so you do not thin any area to the point of breaking through.

  6. Light it, mist it, and photograph

    Set one or two warm LED lights inside, angled up so the glow rises through the peeled areas rather than blasting straight out. Mist the whole sculpt with water to firm up the cut flesh and make the scales pop for the evening. Shoot photos in low room light so the shading reads. Keep it cool between showings and mist again as needed, since detailed relief work dries out fast.

Gather your supplies

Check things off as you get ready.

Work on a stable surface, keep your free hand out of the cutting path, and have an adult handle sharp tools.

Three levels of light

  • Leave intact

    The deep undercuts behind the snakes and the darkest recesses of the hair stay as untouched skin for shadow.

  • Peel & shade

    The face, neck, and draped shoulders get skin-peeled for a soft, dim orange glow that reads as stone.

  • Cut through

    Keep full cutouts minimal, a few tiny gaps between coiling snakes at most, so the relief holds together.

Learn the carving basics

Before you start cutting

Do I cut all the way through anywhere?

Almost never on this design. It is relief sculpting, so the light comes through skin-peeled areas rather than open holes. If you want a little brightness, limit true cutouts to a few small gaps between snake coils, and cut those last so the wall stays strong while you work.

How do I keep the snake fangs and thin coils from breaking?

Keep fangs short and thick, and always leave them backed by a bit of flesh rather than carving them as free spikes. Where snakes cross, leave small bridges of pumpkin connecting the layers so nothing floats loose. Thin, deeply undercut details are the first things to snap, so err toward chunkier forms.

What if I do not feel ready for full 3D sculpting?

Start with a shallow relief version that keeps the face and a few snakes as low bumps, or use a flat Medusa stencil and rely on skin-peeling for shading. Practicing loop-tool control on a spare pumpkin first helps a lot. You can build up to the deep undercuts once the basic face proportions feel comfortable.

Your take belongs here, too.

Changed a detail? Made it simpler? Share a photo of your version and tell the community what worked.

Share your pumpkin

More pumpkins like this

You've reached the end · 8 pumpkins
The Patch Report

Fresh pumpkins, in your inbox.

The best new carvings, ideas worth stealing, and how-tos for carving season. Short, seasonal, and gone by November.

A short email during carving season. Unsubscribe anytime. See our privacy policy.