Halloween Pumpkin Carving Contest · Starts October 1st · $500 in prizes
← Back to ideas
@ai_concepts
Aug 30, 2026
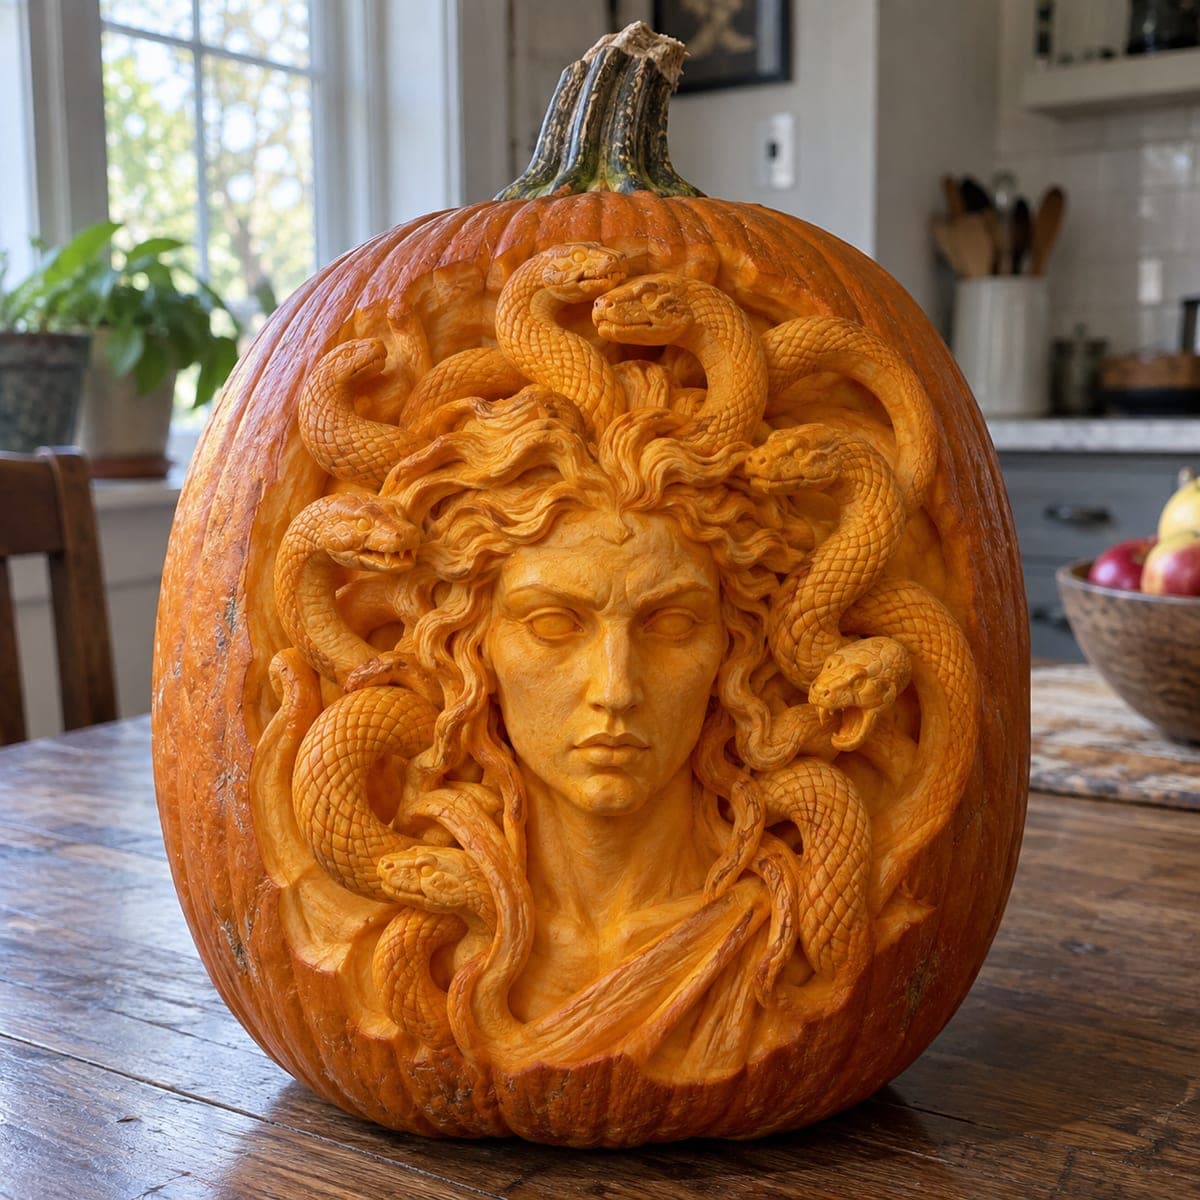
Medusa Head Relief Etched PumpkinAI
0

Medusa Head Relief Etched Pumpkin

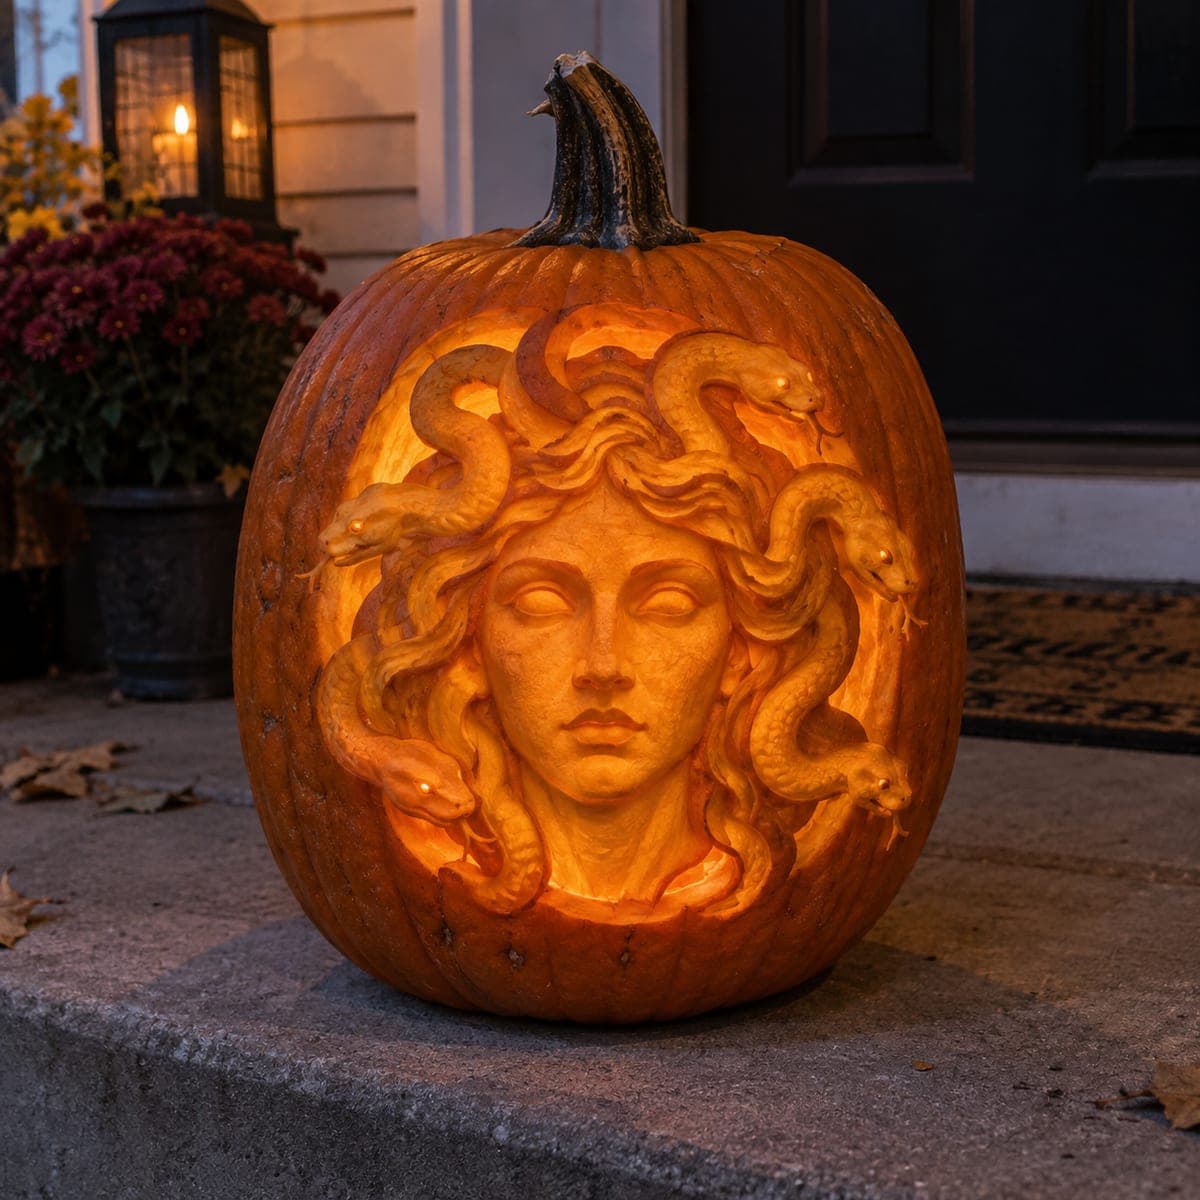
The gorgon Medusa stares out with hollow eyes while six thick serpents coil from her scalp, all peeled and modeled from the pumpkin's pale flesh for a stone-statue effect. Unlike a glowing carving, this relief version reads best in daylight, the matte flesh mimicking weathered marble. Peel the snake bodies as smooth ribbons, keeping each one continuous from scalp to head, then sink the eye sockets deep for that blank classical stare. A porch spotlight at night restores the drama.

This is an AI-generated concept image: a realistic, carvable design idea rather than a photo of a finished carve. AI concepts are always labeled and sit out the leaderboard and the contest.

No ratings yet · Sign in to rate
Comments (0)

  • No comments yet — be the first.

Save without an account. Sign in to like or comment.

Our tips for carving a similar design

The trick here is that almost nothing gets cut all the way through. This is a relief design where you peel and model the pumpkin's pale inner flesh to build a raised face and six coiling snakes, so the whole scene reads like weathered stone in daylight. Plan the snakes as continuous ribbons from scalp to head, then sink the eye sockets deep for that hollow classical stare.

Written by PumpkinCarvingIdeas.com, inspired by the image above. These are our suggestions, not instructions from the uploader. This approach to the AI concept has not been tested on a real pumpkin.

From pumpkin to porch

  1. Transfer the stencil and map your depths

    Wipe the pumpkin clean and dry, then tape your Medusa stencil flat over the front face, easing it around the curve with small slits at the edges. Poke the outlines with a pin or transfer tool so you have a dotted guide for the face, the six snakes, and the eye sockets. Before you cut anything, mentally sort the design into three depths: raised face and snakes stay highest, background flesh drops back, and the eyes go deepest. A clear plan keeps the relief from getting muddy.

  2. Open a lid and thin the wall from inside

    Cut a lid from the bottom rather than the top so the stem stays intact, and scoop the pulp out. For relief work, thin the front wall to about one inch from the inside using a loop tool, which makes the outer flesh easier to shave and lets a spotlight glow through faintly at night. Keep the wall even so no spot becomes fragile. Have an adult handle all the sharp and heavy scooping tools.

  3. Peel the background to define the raised shapes

    With a ribbon or lino tool, shave off just the orange skin around the face and snakes so those shapes stand proud against a lighter recessed background. Work slowly and keep the face and each snake body untouched at this stage so they read as the highest layer. Peel the snake ribbons themselves smooth and continuous, following each one from the scalp out to its head without breaking the line. This is where the stone-statue look begins to appear.

  4. Model the face with gentle shading cuts

    Now sculpt within the raised areas. Shave shallow curves to suggest the cheeks, the bridge of the nose, the lips, and the rounded chin, letting thin skin remnants act as soft shadow. Round the snake bodies so each has a spine of highlight down the middle. Keep every cut shallow and controlled here, since removing too much flattens the modeling you just built.

  5. Sink the eye sockets last

    Save the deepest work for the end so the surrounding flesh stays strong while you carve. Hollow both eye sockets well below the face surface for that blank, hollow gorgon stare, but stop short of cutting fully through the thinned wall. If you want a faint glow to leak from the eyes at night, you can pierce a small opening at the very center of each socket. Leave the snake tongues and eyes as tiny etched dots rather than delicate cutouts so nothing snaps off.

  6. Seal, light, and photograph

    Rub all exposed flesh with petroleum jelly or a spritz of lemon water to slow browning and hold that pale marble tone. Set a small LED puck or a battery spotlight inside, and add a warm porch spotlight aimed at the face for evening drama. Photograph it in daylight first, when the matte flesh reads most like weathered stone. Refresh the surface with a light shave if it dries out over a few days.

Gather your supplies

Check things off as you get ready.

Work on a stable surface, keep your free hand out of the cutting path, and have an adult handle sharp tools.

Three levels of light

  • Leave intact

    The raised face and snake bodies keep their orange skin as the darkest, most sculptural surface.

  • Peel & shade

    The recessed background and modeled cheeks, nose, and snake curves are peeled to glow dim and pale like marble.

  • Cut through

    Only the optional tiny pinholes at the eye centers cut through for a faint bright stare.

Learn the carving basics

Before you start cutting

Why keep the snakes attached instead of carving them as open cutouts?

Open snake shapes carved thin would leave narrow strips of shell that crack or sag within a day. Peeling the snakes as raised ribbons keeps every coil structurally solid and continuous from scalp to head. It also gives you the smooth stone look that makes this design work.

Will this design look good if I only have it lit at night?

Relief carving is designed to read in daylight, where the matte flesh mimics weathered marble and the shading shows off. At night a raised relief can go flat, so aim a warm porch spotlight across the face to bring back the shadows. A small LED inside adds a faint glow but should not be your only light source.

How do I stop the pale flesh from browning before Halloween?

Exposed flesh oxidizes fast, which is the enemy of the marble effect. Coat every peeled area with petroleum jelly or spritz it with lemon water right after carving, and reapply daily. If it still darkens, a light shave with your ribbon tool exposes fresh pale flesh in minutes.

Your take belongs here, too.

Changed a detail? Made it simpler? Share a photo of your version and tell the community what worked.

Share your pumpkin

More pumpkins like this

You've reached the end · 8 pumpkins
The Patch Report

Fresh pumpkins, in your inbox.

The best new carvings, ideas worth stealing, and how-tos for carving season. Short, seasonal, and gone by November.

A short email during carving season. Unsubscribe anytime. See our privacy policy.