Halloween Pumpkin Carving Contest · Starts October 1st · $500 in prizes
← Back to ideas
@ai_concepts
Aug 16, 2026
Medusa Snake Hair Portrait Shaded PumpkinAI
0

Medusa Snake Hair Portrait Shaded Pumpkin

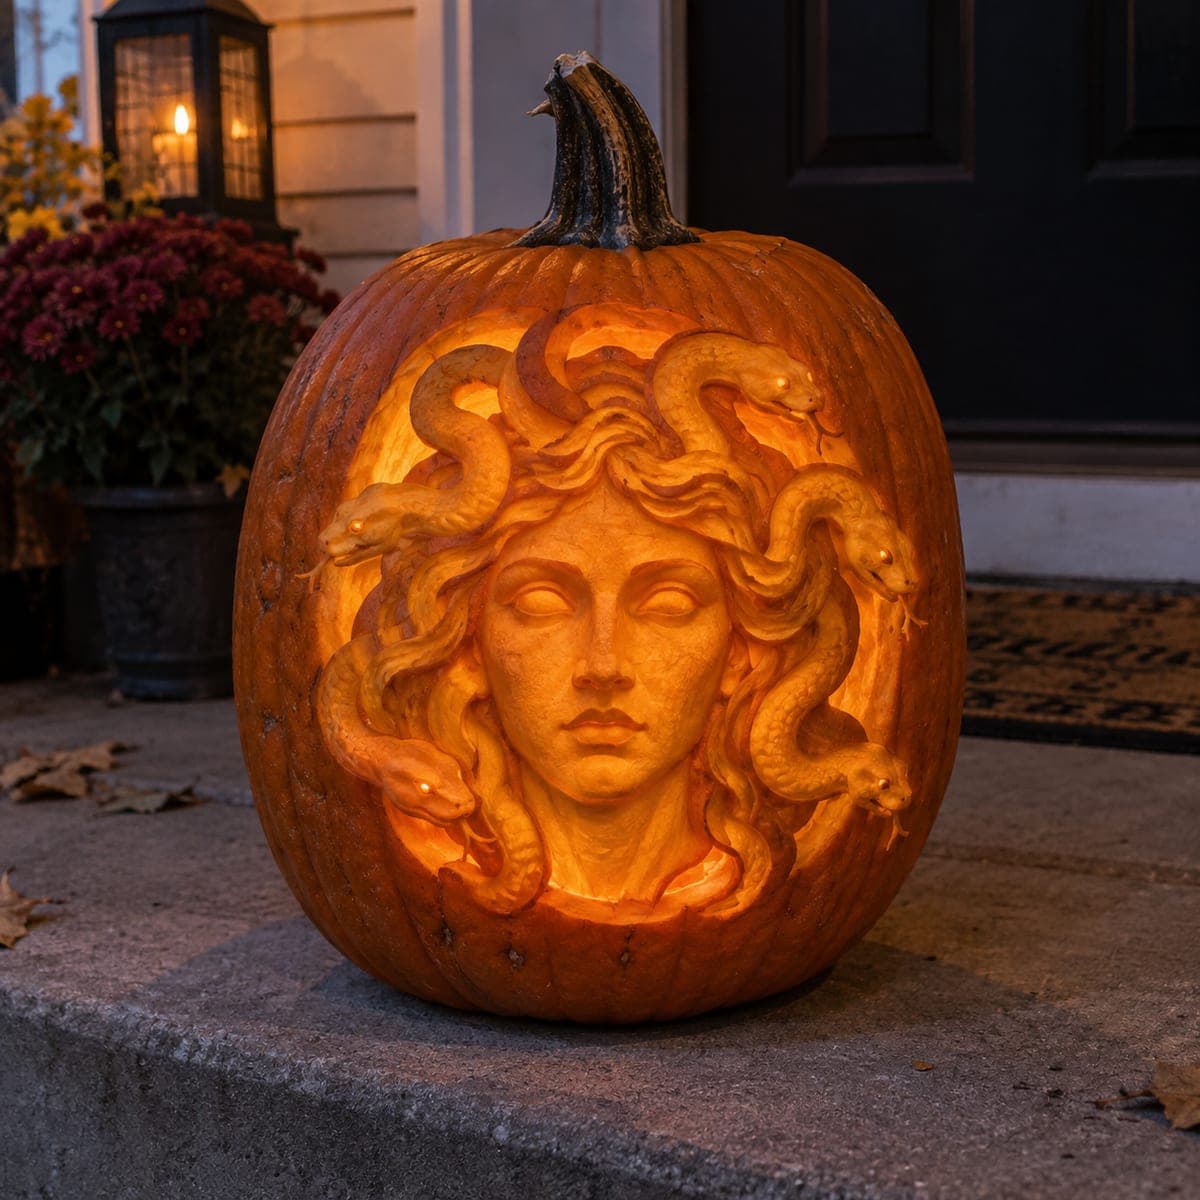
A serene Medusa face ringed by writhing snakes is carved in dimensional shaded relief on a tall pumpkin, the snakes' scales and the figure's curling hair etched at multiple depths to create a striking bas-relief effect when lit from inside. This fantasy pumpkin carving idea requires confident use of a loop tool and several hours of careful work to separate the snakes from the hair without losing detail. A bold centerpiece for a mythological or literary Halloween theme.

This is an AI-generated concept image: a realistic, carvable design idea rather than a photo of a finished carve. AI concepts are always labeled and sit out the leaderboard and the contest.

No ratings yet · Sign in to rate
Comments (0)

  • No comments yet — be the first.

Save without an account. Sign in to like or comment.

Our tips for carving a similar design

The core trick here is bas-relief shading, where you peel skin to different depths instead of cutting all the way through, so the face reads as soft lit sculpture while the snakes twist around it. Plan the deepest peels for the brightest areas and leave the thickest skin on the calm face so it stays a warm mid glow. Since this is a concept image, treat it as a target to work toward, and keep every snake connected to the flesh below so nothing snaps off.

Written by PumpkinCarvingIdeas.com, inspired by the image above. These are our suggestions, not instructions from the uploader. This approach to the AI concept has not been tested on a real pumpkin.

From pumpkin to porch

  1. Prep and mount your stencil

    Pick a tall, smooth pumpkin with a flat working face and few ribs. Cut a lid or, better for a portrait, remove a panel from the back so the front stays uninterrupted. Scrape the inside wall down to about one inch thick behind the whole design area. Tape the Medusa stencil flat and transfer the outline with a poking tool or transfer paper.

  2. Map your depths before cutting

    Study the image and decide which zones stay dark, which get shallow shading, and which cut through. Lightly shade the darkest zones with a marker so you do not carve them by mistake. The face and its features stay high and thick, the snakes sit at a middle depth, and the gaps between snakes and hair go deepest or all the way through. Working out this map now prevents over-carving later.

  3. Shape the face in shallow relief

    Use a small loop tool to gently peel the skin off the face, cheeks, and lips, staying shallow so the flesh glows an even mid tone. Round the brow, nose, and chin by leaving those areas slightly thicker than the surrounding skin. Keep the eyes as raised, unpeeled skin so they read calm and pale. Go slow and check the light often by holding an LED behind the wall.

  4. Carve the snakes and hair

    Peel the snake bodies and curling hair at a deeper level than the face so they pop forward with more glow. Etch scale texture and hair strands with the tip of the loop tool, but leave a bridge of flesh wherever one snake crosses another so nothing detaches. Vary the depth along each snake to suggest it curling over and under. This is the slow part, so take breaks to keep your cuts steady.

  5. Cut the deep gaps last

    Once all shading is done, cut fully through only the small negative spaces between snakes and around the outer edge of the hair. Save these openings for last so the pumpkin wall stays strong while you do the detail work. Keep cutouts modest in size so the raised face and snakes are framed by the brightest light. Clean up any ragged edges from the inside.

  6. Light it and photograph

    Set a battery LED puck inside, not a candle, since the thin shaded areas can scorch. Try a warm white bulb for that soft orange relief effect. Photograph at dusk on a step or porch so the interior glow reads against the darker skin. Mist the cut surfaces with water and refrigerate overnight between showings to keep the detail crisp.

Gather your supplies

Check things off as you get ready.

Work on a stable surface, keep your free hand out of the cutting path, and have an adult handle sharp tools.

Three levels of light

  • Leave intact

    The eyes and the darkest background gaps around the outer hairline stay as untouched skin.

  • Peel & shade

    The calm face, lips, and cheeks get a shallow skin peel for a soft mid glow, with the snakes and hair peeled a bit deeper.

  • Cut through

    Only the small negative spaces between the writhing snakes and along the hair edge are cut fully through for the brightest accents.

Learn the carving basics

Before you start cutting

How do I keep the snakes from breaking off?

Do not cut all the way around any snake. Leave a bridge of uncarved flesh wherever a snake crosses another snake or the hair, and keep those crossings at a middle depth rather than a full cutout. Thin, fully freed strands are what snap, so shading them into the surface keeps everything anchored.

Why keep the face high and thick instead of cutting it open?

The serene face is the focal point, and leaving it as thick, shallow-peeled flesh gives it a soft, sculptural glow rather than a harsh silhouette. Thicker skin reads as a warm mid tone, which makes the features look three dimensional. Cutting it through would flatten the whole effect into a plain window.

How long should I budget and can I pause?

This is a multi-hour project, so plan a full afternoon or split it across an evening. You can pause by wrapping the pumpkin in plastic and refrigerating it, which also slows shrinking. Finish all shading before you cut any openings so the wall stays strong while you work.

Your take belongs here, too.

Changed a detail? Made it simpler? Share a photo of your version and tell the community what worked.

Share your pumpkin

More pumpkins like this

You've reached the end · 8 pumpkins
The Patch Report

Fresh pumpkins, in your inbox.

The best new carvings, ideas worth stealing, and how-tos for carving season. Short, seasonal, and gone by November.

A short email during carving season. Unsubscribe anytime. See our privacy policy.