Halloween Pumpkin Carving Contest · Starts October 1st · $500 in prizes
← Back to ideas
@ai_concepts
Aug 28, 2026
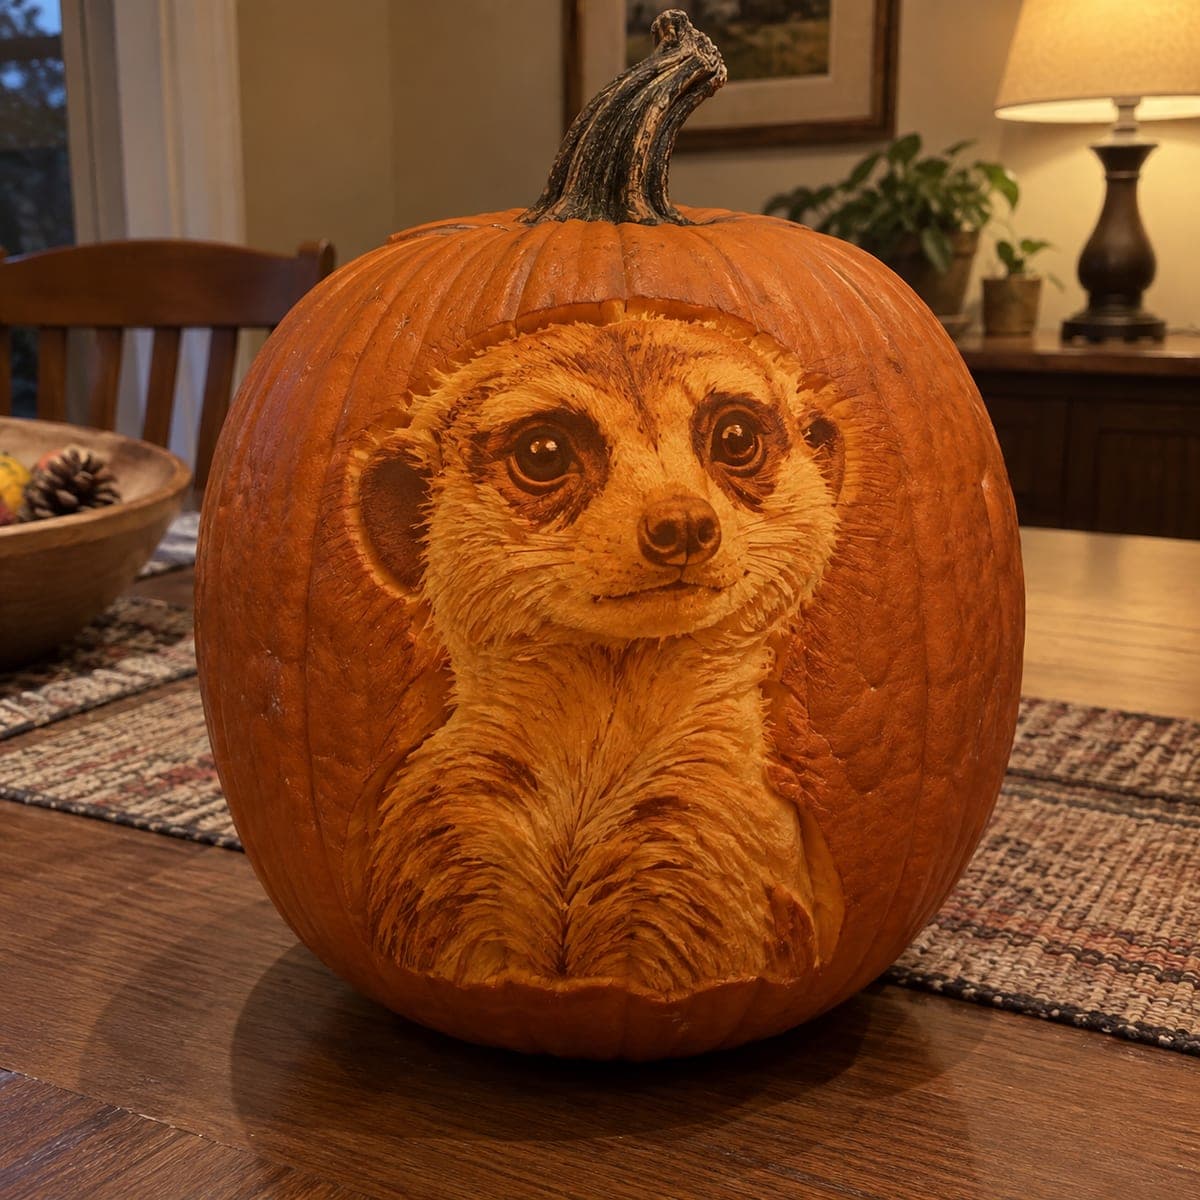
Meerkat Lookout Pumpkin Carving With Grass DetailAI
0

Meerkat Lookout Pumpkin Carving With Grass Detail

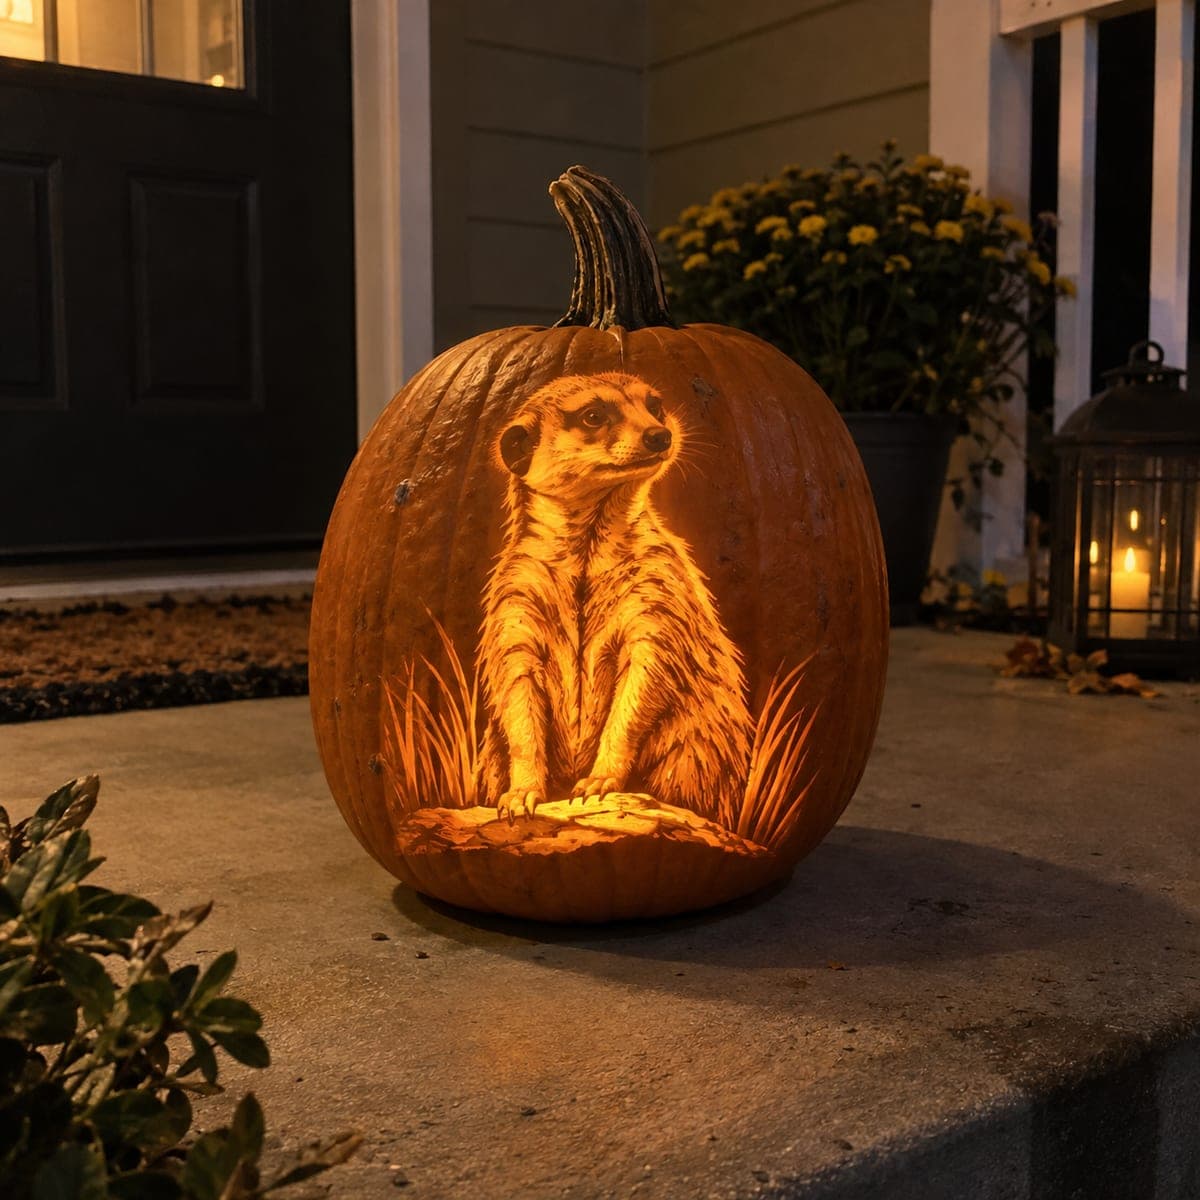
Standing tall on its rock in classic sentry pose, this meerkat glows from a bed of etched desert grass in a wonderfully detailed relief carving. Fine fur strokes and the softly graded chest show off what depth-based shading can do on a pumpkin. Etch the background grass shallow and the meerkat body deeper for separation, and angle a small spotlight puck upward inside to mimic sunrise on the savanna.

This is an AI-generated concept image: a realistic, carvable design idea rather than a photo of a finished carve. AI concepts are always labeled and sit out the leaderboard and the contest.

No ratings yet · Sign in to rate
Comments (0)

  • No comments yet — be the first.

Save without an account. Sign in to like or comment.

Our tips for carving a similar design

The core trick here is depth-based shading, where you scrape away skin at different depths so light glows through in graded tones rather than open holes. The meerkat body is carved deeper for a bright chest and face, while the grass and background stay shallow so the animal pops forward. Almost nothing is cut all the way through, which keeps the whole design strong and lets a single interior light do the work.

Written by PumpkinCarvingIdeas.com, inspired by the image above. These are our suggestions, not instructions from the uploader. This approach to the AI concept has not been tested on a real pumpkin.

From pumpkin to porch

  1. Prep and transfer the pattern

    Pick a tall, smooth pumpkin with a broad front face and scoop it from the bottom, thinning the carving wall to about one inch so light passes through easily. Tape your meerkat and grass stencil flat against the front and poke the outlines with a transfer tool or push pin. Peel the paper and connect the dots with a washable marker so you can see the fur zones, chest, and grass clearly. Keep a printout nearby to check tonal areas as you work.

  2. Outline the meerkat and set separation

    Using a fine detail loop or a small U-gouge, trace lightly around the whole meerkat silhouette to lock its edge. Etch the background just outside that line a little deeper than the grass so the animal reads as sitting in front. This early boundary keeps your shading from bleeding into the background later. Go slow around the head and ears where the shape is most recognizable.

  3. Etch the grass shallow

    Work the desert grass at the base with light, upward flicking strokes using a small gouge, barely skimming the outer skin. Shallow scraping gives a dim, warm glow that stays behind the meerkat. Vary blade length and lean the blades in slightly different directions so the bed looks natural. Leave thin ribs of untouched skin between blades to keep contrast crisp.

  4. Shade the body from dark to bright

    Now build the meerkat in layers, scraping deepest on the bright chest and the sunlit side of the face, and staying shallow in the shadowed flanks and leg creases. Remove skin gradually and hold the pumpkin up to a light often to judge the glow before you go deeper. Add fur with many short, directional strokes that follow the body, keeping them fine near the face and looser on the belly. This graded scraping is what makes the sunrise-on-the-savanna effect.

  5. Detail the face, paws, and rock

    Bring up the eyes, nose, and the fine whiskers last, using the tip of your smallest tool and leaving slim bridges of skin so the whiskers stay attached rather than snapping. Deepen the paws resting on the rock and the top of the rock itself for the brightest highlights. Keep the eye dark by leaving that skin untouched so the gaze stays readable. Resist cutting any true holes; this design lives on shading, not open cutouts.

  6. Light it and photograph

    Set a battery LED puck inside and angle it upward toward the meerkat so the chest and face catch the most light, mimicking low morning sun. Use LEDs only, never a candle, since the thin shaded areas can scorch. Take your photo at dusk on a step or porch for the warmest glow, and mist the cut surfaces with water and store cool between showings to slow browning.

Gather your supplies

Check things off as you get ready.

Work on a stable surface, keep your free hand out of the cutting path, and have an adult handle sharp tools.

Three levels of light

  • Leave intact

    The dark eye, background around the meerkat, and shadowed flanks stay as untouched skin.

  • Peel & shade

    The desert grass and the shaded sides of the fur get shallow scraping for a dim glow.

  • Cut through

    The bright chest, sunlit face, paws, and rock top are scraped deepest for the strongest light, but nothing is cut fully through.

Learn the carving basics

Before you start cutting

Do I need to cut any openings at all for this design?

No, this is a relief carving that relies entirely on scraping to different depths. Keeping the wall intact makes the whole pumpkin much stronger and lets the graded fur tones read clearly. If you want a touch of extra brightness, you can thin the chest very deeply, but stop before you break through.

How do I keep the whiskers from breaking off?

Carve them last and only as very shallow etched lines rather than open slits. Leaving the skin mostly intact means the whiskers are just thin bright scrapes with plenty of pumpkin supporting them. This is a common trick for fine details on a shaded portrait.

Why is the image an AI concept, and can I really carve this?

The picture is an AI-generated concept, so no real pumpkin was carved for it. You can absolutely carve a similar design by working the meerkat as a shaded relief and keeping details attached. Expect it to take patience, since the depth grading and fur strokes are what sell the look.

Your take belongs here, too.

Changed a detail? Made it simpler? Share a photo of your version and tell the community what worked.

Share your pumpkin

More pumpkins like this

You've reached the end · 8 pumpkins
The Patch Report

Fresh pumpkins, in your inbox.

The best new carvings, ideas worth stealing, and how-tos for carving season. Short, seasonal, and gone by November.

A short email during carving season. Unsubscribe anytime. See our privacy policy.