The 2026 contest winners are inGrand Prize, People's Choice and Most Creative, all crowned.
@ai_concepts
Sep 23, 2026
Michael Myers Pumpkin CarvingAI
0

Report this carving

Tell us what is wrong. Reports are private.

Michael Myers Pumpkin Carving

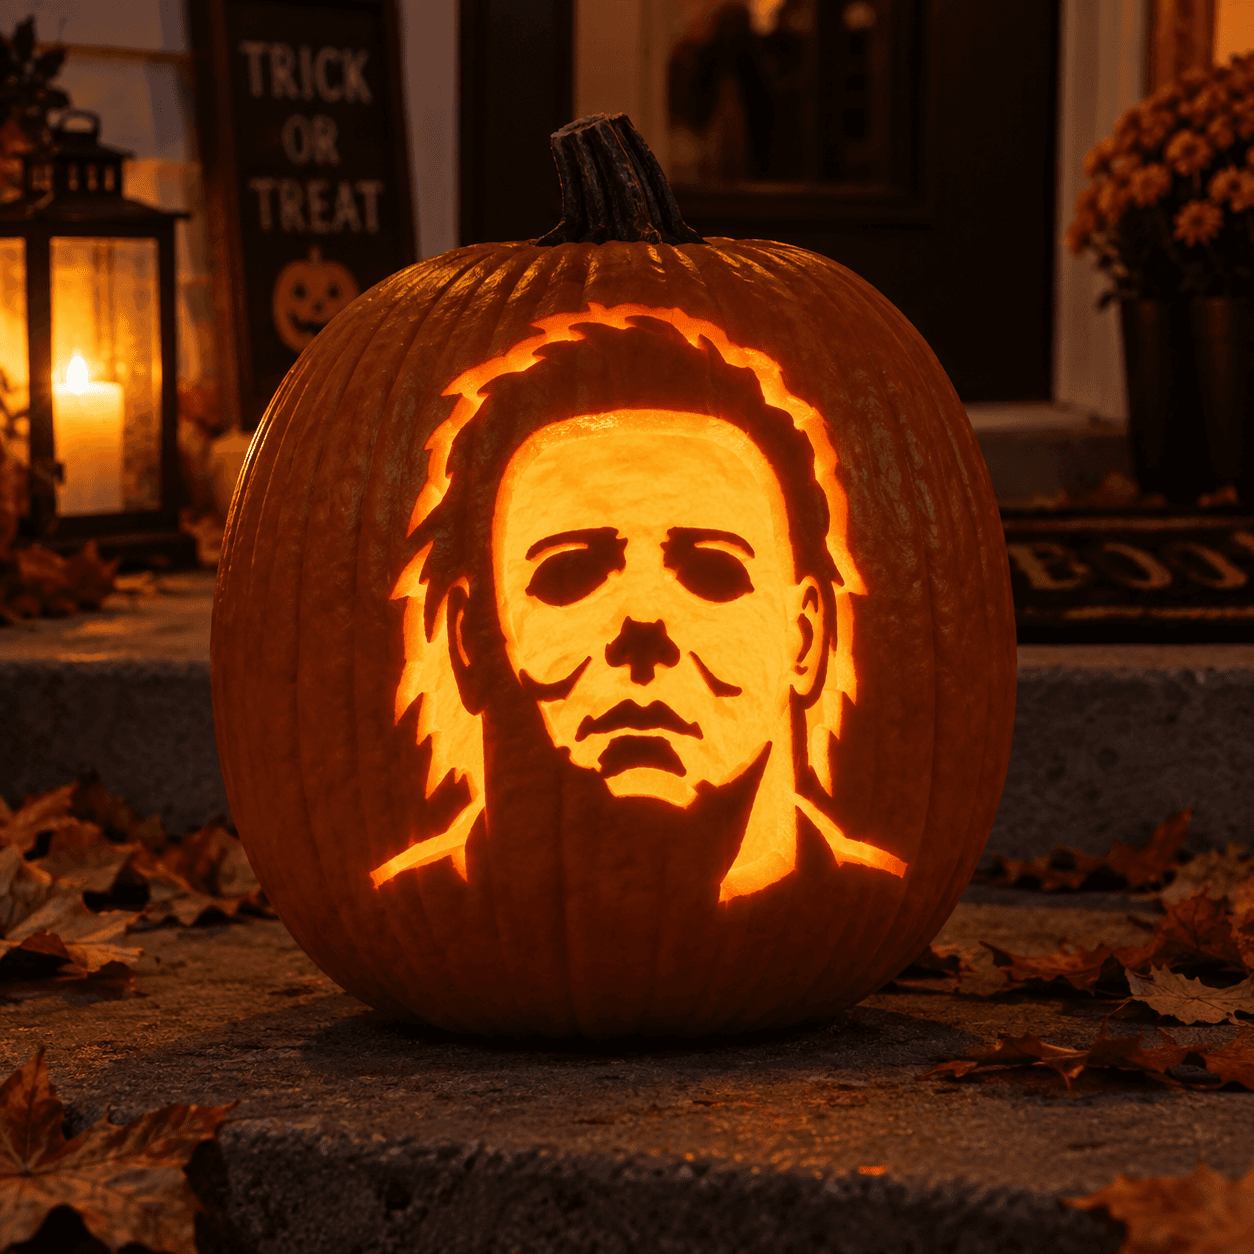
The masked face of Michael Myers stares out of this glowing jack-o-lantern, carved as a shaded portrait: the blank expression, hollow eyes, and stringy hair rendered in soft light-and-dark tones so the whole face emerges eerily once the candle is lit. An expert-level shading carve for slasher-movie fans who want the most menacing pumpkin on the porch.

No ratings yet · Sign in to rate
michael-myersthe-shapehalloween-moviemaskmasked-killerhorror-iconhorrormovieslasherscarykillerexpert

Save this design for carving night, then share a photo of your own jack-o'-lantern once it's glowing.

Michael Myers and all related characters, names, logos, and trademarks are the property of their respective owners. This is an unofficial fan carving shared by our community for inspiration only. PumpkinCarvingIdeas.com is not affiliated with, sponsored by, or endorsed by any rights holder or person depicted, and no such connection is implied.

Comments (0)

  • No comments yet. Be the first.

Our tips for carving a similar design

This is a tonal portrait: the pale mask emerges from darkness through layered surface carving, with hollow eyes as the only fully dark voids and the stringy hair kept as untouched rind. The blankness is the hard part; overworked detail makes it a face, restraint makes it Michael Myers.

From pumpkin to porch

  1. Prep a deep canvas

    Hollow a large pumpkin and leave the carving wall a generous inch and a quarter thick; a shaded portrait needs depth to build tones in. Choose the flattest face available.

  2. Transfer a tone map

    Transfer the portrait with its tonal zones marked: brightest mask areas, mid cheek planes, dark hair, and void eyes. Work from a printed reference with the tones posterized to three or four levels.

  3. Establish the brightest zone

    Peel the palest mask areas, forehead, cheekbones, chin, down until a test light glows clearly through. These anchors define the portrait; every other tone is judged against them.

  4. Build the mid tones

    Scrape the remaining mask planes to a shallower depth so they glow dimmer than the highlights. Feather the transitions with a loop tool; visible steps between tones break the eerie softness.

  5. Cut the eyes, keep the hair

    Open the hollow eye sockets as true through-cuts, the only full-dark-to-full-bright contrast on the face. Leave the stringy hair as untouched dark rind, shaping its edge where it meets the glowing mask.

  6. Light and step back

    Use a steady bright LED, not a flicker; the mask should hang motionless in the dark. Judge the portrait from ten feet away between passes, since shading reads at distance, not up close.

Written with AI to match this design

Gather your supplies

Check things off as you get ready.

Work on a stable surface, keep your free hand out of the cutting path, and have an adult handle sharp tools.

Three levels of light

  • Leave intact

    The stringy hair and the darkness framing the face stay untouched rind.

  • Peel & shade

    The entire mask is peeled at two or three graduated depths, brightest at forehead and cheekbones.

  • Cut through

    Only the hollow eye sockets are cut fully through.

Learn the carving basics

Before you start cutting

How do I get smooth tonal transitions instead of visible steps?

Feather each boundary with a loop tool after establishing the zones, and check with an interior test light every few minutes. Gradual pressure changes as you scrape blend tones better than trying to fix a hard step afterward.

Why leave the eyes as the only through-cuts?

The mask's horror is its blankness, and two black voids in a softly glowing face deliver it. More through-cuts would add sparkle and energy, which is exactly wrong for this character.

How long does a shaded portrait carve stay good?

Shaded surfaces dry faster than cut edges, so expect two to four good nights. Carve it close to the display date, wrap it in plastic in the fridge overnight if needed, and a spritz of water revives the tones before showtime.

Your take belongs here, too.

Changed a detail? Made it simpler? Share a photo of your version and tell the community what worked.

Share your pumpkin

Want more designs like this? Browse our full library of pumpkin carving ideas, or pick a free printable stencil. Every pattern and template in our own collection is free to print at home.

More pumpkins like this

You've reached the end · 8 pumpkins
The Patch Report

Fresh pumpkins, in your inbox.

The best new carvings, ideas worth stealing, and how-tos for carving season. Short, seasonal, and gone by November.

A short email during carving season. Unsubscribe anytime. See our privacy policy.