Halloween Pumpkin Carving Contest · Starts October 1st · $500 in prizes
← Back to ideas
@ai_concepts
Sep 25, 2026
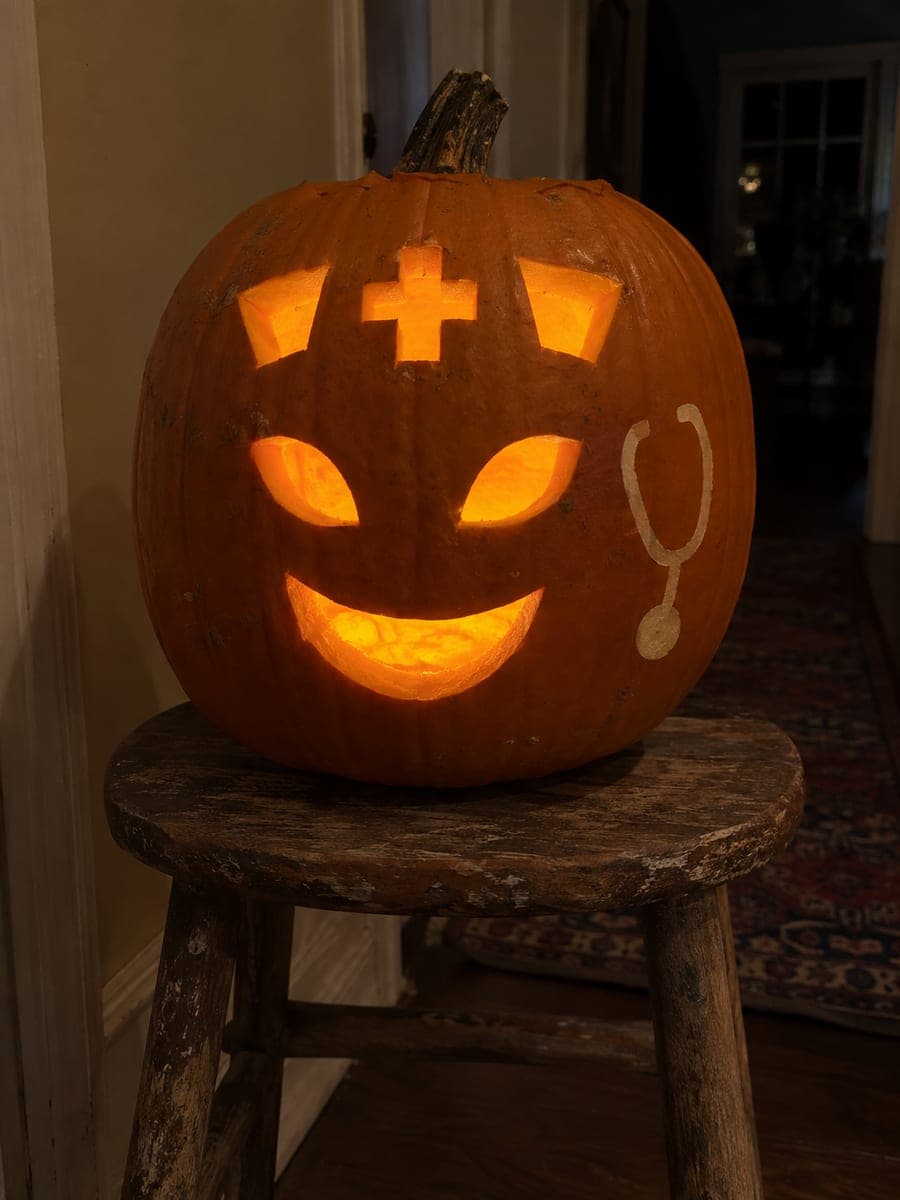
Nurse Cap and Stethoscope Pumpkin Carving IdeaAI
0

Report this carving

Tell us what is wrong. Reports are private.

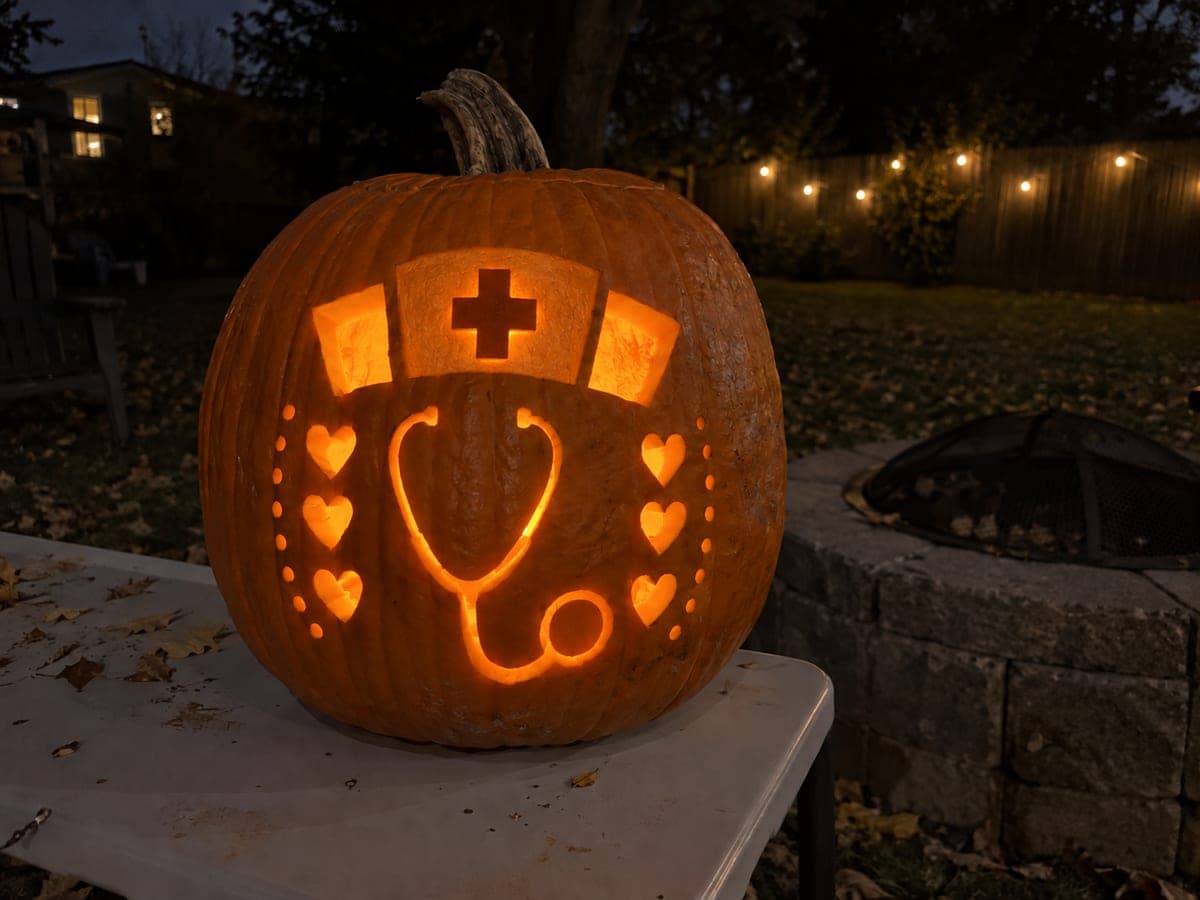
Nurse Cap and Stethoscope Pumpkin Carving Idea

A carved nurse cap with cut-through symbols and a shallow back-carved stethoscope loop create a layered nurse pumpkin carving idea that glows after dark. Cut the cap symbol, eye, and smile openings fully through first, then carve the stethoscope shape as a shallow groove on the intact rind beside the carved area so the tube reads as a relief without piercing through. Score the earpiece and diaphragm details in the same shallow pass. Keep the groove depth consistent so the stethoscope detail catches candlelight evenly across the whole piece.

No ratings yet · Sign in to rate

Comments (0)

  • No comments yet — be the first.

Save without an account. Sign in to like or comment.

Our tips for carving a similar design

This design layers two techniques: the cap symbols, eyes, and smile are cut fully through for bright direct light, while the stethoscope is back-carved as a shallow groove on the intact rind beside them for a softer glow. Keeping the groove at a consistent depth is the key skill, because an uneven trench makes the tube look patchy when lit. Plan the layout so the stethoscope loop starts where the cut section ends and the two elements feel connected without overlapping.

From pumpkin to porch

  1. Gut and prep

    Remove the lid from the back at an angle and scoop the interior down to a wall about one inch thick. A slightly thicker wall in the area where the stethoscope will be carved gives you more margin when you begin gouging. Dry the outer surface thoroughly before marking so the chalk or marker lines stay sharp.

  2. Lay out the composition

    Sketch the nurse cap symbol and the face features on one side of the pumpkin's face with chalk. On the intact rind beside it, lightly draw the stethoscope loop, earpiece lines, and diaphragm circle. Check proportions from arm's length before committing. A curved ruler or flexible tape measure helps space the earpiece lines evenly.

  3. Cut the through-openings first

    Work through all cap symbols, eye shapes, and the smile with a fine-toothed pumpkin saw. Cut each opening as a single continuous loop, keeping your wrist relaxed for smooth curves. Confirm every retained piece connects broadly to the outer shell before tapping it free. Set cut pieces aside so they do not roll into the groove area.

  4. Carve the stethoscope relief

    Switch to a small V-gouge or linoleum cutter and trace the stethoscope outline with a shallow pass, angling the blade at about 20 degrees to shave away outer skin only. Make a second, slightly deeper pass to widen the groove to about a quarter inch so it reads clearly. Carve the diaphragm circle and earpiece details in the same shallow depth. Check the glow by holding a flashlight behind the pumpkin as you work.

  5. Clean up edges

    Use a small craft knife to refine any jagged edges on the cut-through openings. Gently sand or scrape the groove edges so the transition from carved to uncarved rind is smooth rather than stepped. Remove any loose flesh from inside the pumpkin so the light reflects cleanly.

  6. Light and photograph

    Place a warm-white LED puck inside and turn off surrounding lights. The groove should glow amber while the cut sections glow brighter white-orange. Adjust the light position closer to the stethoscope side if that area looks dim. Photograph in a dark room to capture the full contrast between the two light levels.

Written with AI to match this design

Gather your supplies

Check things off as you get ready.

Work on a stable surface, keep your free hand out of the cutting path, and have an adult handle sharp tools.

Three levels of light

  • Leave intact

    The broad rind surrounding both elements and the dividing area between the cap face and stethoscope stay fully dark.

  • Peel & shade

    The stethoscope groove and diaphragm circle are shaved to a thin translucent skin for a warm mid-level amber glow.

  • Cut through

    The nurse cap symbol, eyes, and smile are cut fully through for the brightest direct light output.

Learn the carving basics

Before you start cutting

How deep should I carve the stethoscope groove?

Aim for roughly a third of the rind thickness, which on most medium pumpkins is about a quarter to three-eighths of an inch. Deeper than half the rind risks breaking through, especially on tighter curves like the earpiece bends. Test the depth by pressing a fingernail gently against the carved area; it should feel noticeably thinner but still firm.

What if the groove looks uneven when I hold a light behind it?

Bright spots mean the rind is thinner there and dark spots mean it is still too thick. Go over the dark areas with one or two more light passes of the gouge, checking frequently. It is easier to remove a little more than to add material back, so work gradually.

Can I paint the stethoscope instead of carving it?

Yes, silver or black acrylic paint applied after carving the through-cuts works well and eliminates any risk of accidentally puncturing the rind. Let the pumpkin dry fully after carving before painting so moisture does not cause the paint to peel. The painted version will be visible in daylight but will not contribute to the lit effect at night.

Your take belongs here, too.

Changed a detail? Made it simpler? Share a photo of your version and tell the community what worked.

Share your pumpkin

More pumpkins like this

You've reached the end · 8 pumpkins
The Patch Report

Fresh pumpkins, in your inbox.

The best new carvings, ideas worth stealing, and how-tos for carving season. Short, seasonal, and gone by November.

A short email during carving season. Unsubscribe anytime. See our privacy policy.