Halloween Pumpkin Carving Contest · Starts October 1st · $500 in prizes
← Back to ideas
@ai_concepts
Jul 19, 2026
Painted Sunflower No-Carve Fall Pumpkin IdeaAI
0

Painted Sunflower No-Carve Fall Pumpkin Idea

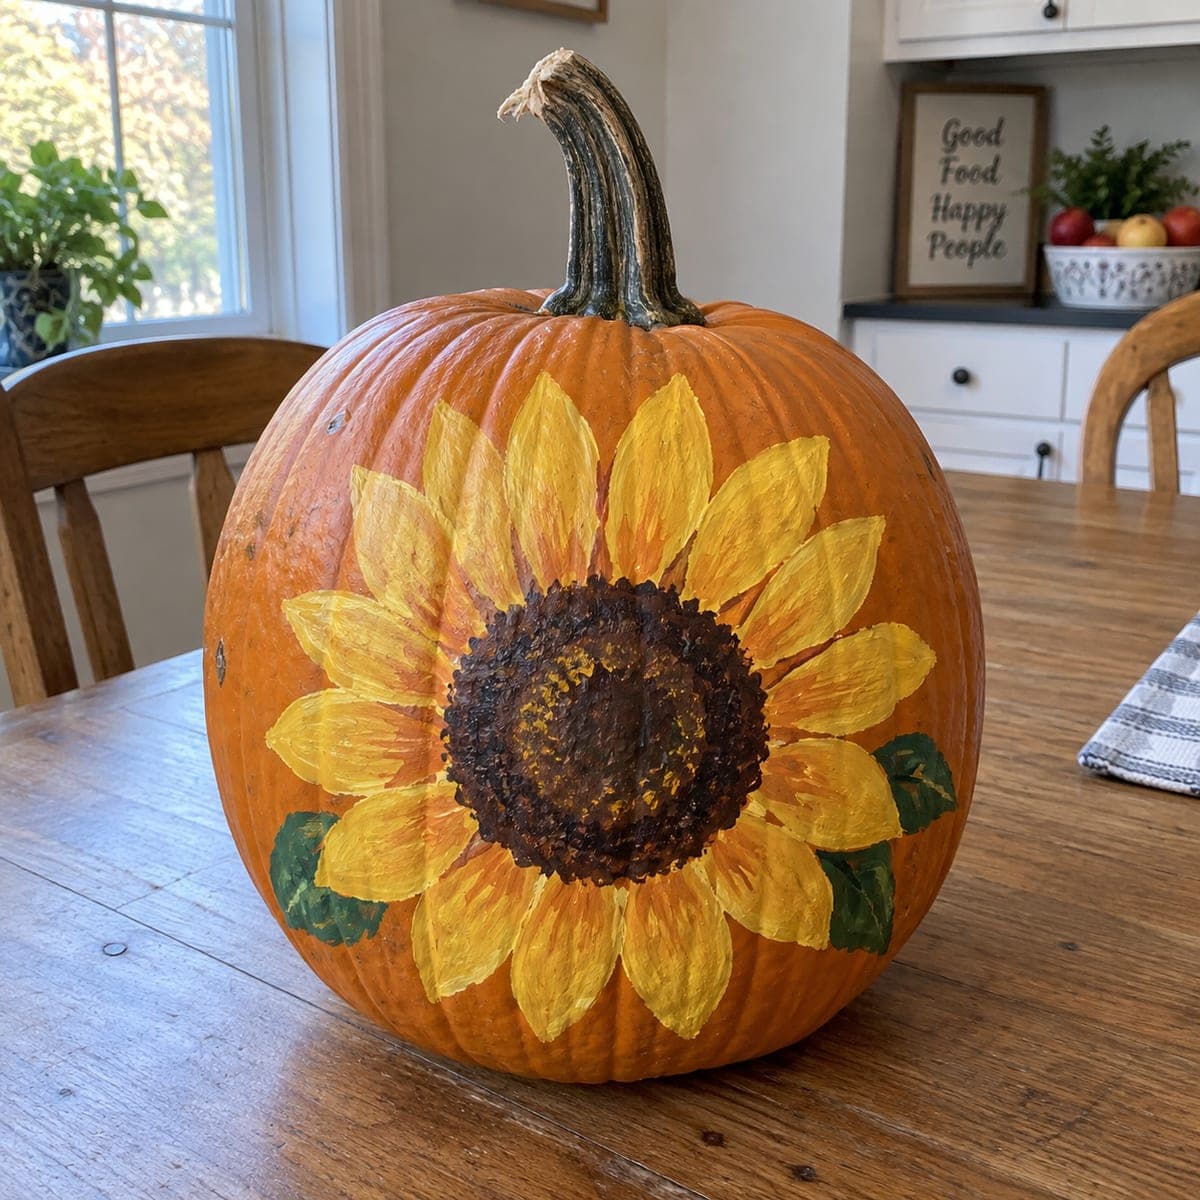
A large sunflower with golden petals and a rich brown center is painted across the front of this uncut pumpkin, the green leaf accents peeking out from behind the bloom. The no-carve painting method gives this pumpkin a warm harvest look that fits any fall decor style, from farmhouse to boho. Build up the petals with two to three layers of cadmium yellow acrylic, then add the dark brown seed head last while the petals are dry. Seal with a matte spray varnish so it holds up on a covered porch through rainy fall weekends.

This is an AI-generated concept image: a realistic, carvable design idea rather than a photo of a finished carve. AI concepts are always labeled and sit out the leaderboard and the contest.

No ratings yet · Sign in to rate
Comments (0)

  • No comments yet — be the first.

Save without an account. Sign in to like or comment.

Our tips for carving a similar design

The core trick here is building the sunflower in layers so the yellow petals read bright against the pumpkin's natural orange, with the dark seed head added last for contrast. Because this is a no-carve design, the whole pumpkin stays intact, which makes it sturdy and long lasting. Plan your bloom slightly below center on the flattest, smoothest face so the petals lie flat and the leaves can tuck behind them.

Written by PumpkinCarvingIdeas.com, inspired by the image above. These are our suggestions, not instructions from the uploader. This approach to the AI concept has not been tested on a real pumpkin.

From pumpkin to porch

  1. Clean and sketch the layout

    Wipe the pumpkin down with a damp cloth and let it dry fully so paint grips the skin. Pick the smoothest, flattest side as your canvas. Lightly sketch a circle for the seed head, then draw two rings of petals radiating out, plus a couple of leaves peeking from behind the lower petals. A pencil or washable marker works well since acrylic will cover the guide lines.

  2. Block in the petals

    Start with a base coat of cadmium yellow acrylic on every petal, keeping strokes running outward from the center. Let this first layer dry, then add a second and even a third coat so the yellow stays opaque over the orange skin. Vary a few petals with a touch of orange or gold at the base for depth. Keep the seed head area unpainted for now.

  3. Add the leaf accents

    Mix a deep green and paint the two or three leaves tucked behind the lower petals. Keep them partly hidden so the bloom stays the star. A little darker green along one edge gives them a natural shaded look. Let everything dry before moving to the center.

  4. Paint the seed head last

    Once the petals are fully dry, fill the center circle with a rich dark brown. While it is still tacky, dab a slightly lighter brown and a few specks of gold around the inner ring to suggest texture and seeds. Stippling with a stiff brush or a small sponge gives that rough, dimensional look. Work from the outer edge inward so you do not smudge finished petals.

  5. Touch up and refine edges

    Step back and check that petal edges are crisp and the yellow is even. Clean up any overlap where petals meet the brown center with a small detail brush. Add thin highlight strokes of pale yellow down the middle of a few petals to catch the light. Let the whole pumpkin cure for several hours.

  6. Seal and stage your photo

    Once dry, take the pumpkin outside or to a ventilated area and give it two light coats of matte spray varnish, letting each coat dry between passes. This protects the paint on a covered porch through damp fall weather. Set it on a wood table or hay bale in soft daylight for the warmest photo. Avoid full rain exposure even with the sealer.

Gather your supplies

Check things off as you get ready.

Work on a stable surface, keep your free hand out of the cutting path, and have an adult handle sharp tools.

Three levels of light

  • Leave intact

    The bare orange pumpkin skin stays unpainted between and around the bloom, giving a warm natural background.

  • Peel & shade

    The layered golden petals and green leaves form the mid tones, built up until they glow against the orange.

  • Cut through

    The palest highlight strokes down the petal centers act as your brightest accents, since nothing is actually cut open.

Learn the carving basics

Before you start cutting

Do I need to carve anything for this design?

No, this is a fully no-carve painted pumpkin, so the skin stays whole and sturdy. That makes it a great low-mess project for beginners or for anyone who wants a pumpkin to last several weeks. If you want a glow later, you can rest a battery LED nearby rather than cutting the pumpkin.

How do I keep the yellow from looking dull over orange skin?

Orange skin will dampen a single coat of yellow, so plan on two or three thin layers, letting each dry first. Starting with a white or pale primer coat under the petals also makes the cadmium yellow pop even more. Thin, even coats build color better than one thick, streaky one.

Will this hold up outdoors?

With two light coats of matte spray varnish it can handle a covered porch through damp fall weekends. Keep it out of direct rain and harsh sun, which can fade acrylics and soften a real pumpkin over time. A real pumpkin will still eventually break down, so treat it as a seasonal piece.

Your take belongs here, too.

Changed a detail? Made it simpler? Share a photo of your version and tell the community what worked.

Share your pumpkin

More pumpkins like this

You've reached the end · 8 pumpkins
The Patch Report

Fresh pumpkins, in your inbox.

The best new carvings, ideas worth stealing, and how-tos for carving season. Short, seasonal, and gone by November.

A short email during carving season. Unsubscribe anytime. See our privacy policy.