Halloween Pumpkin Carving Contest · Starts October 1st · $500 in prizes
← Back to ideas
@ai_concepts
Aug 9, 2026
Pink Ribbon Hope Strength Cure PumpkinAI
0

Pink Ribbon Hope Strength Cure Pumpkin

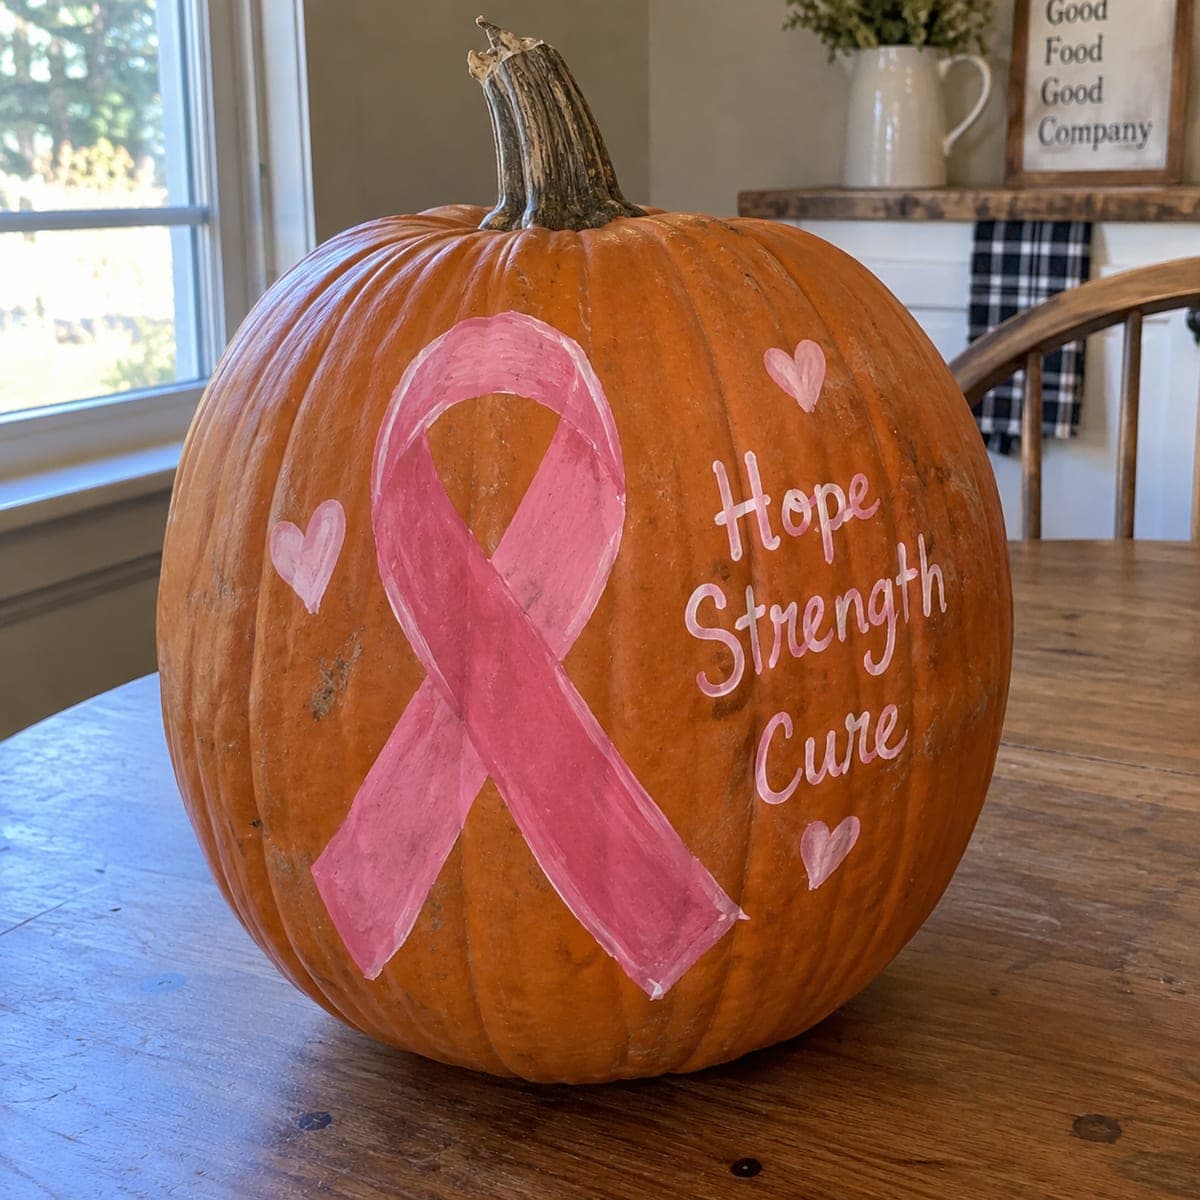
A large pink awareness ribbon shares this pumpkin with the hand-lettered words Hope, Strength, and Cure, making a heartfelt no-carve tribute for breast cancer awareness month in October. Paint the ribbon in two coats of pink, shading one edge with a deeper rose so the loop looks folded, then add the white script and small hearts with a fine round brush. Chalk your lettering first so the baseline stays even.

This is an AI-generated concept image: a realistic, carvable design idea rather than a photo of a finished carve. AI concepts are always labeled and sit out the leaderboard and the contest.

No ratings yet · Sign in to rate
Comments (0)

  • No comments yet — be the first.

Save without an account. Sign in to like or comment.

Our tips for carving a similar design

The core trick here is that nothing is carved at all, so the whole design lives on the surface in paint. A bold pink ribbon anchors the front, with one edge shaded a deeper rose so the loop reads as folded, and clean white script spells Hope, Strength, and Cure alongside small hearts. Plan your layout with chalk first, then build color in thin coats so the letters and shading stay crisp.

Written by PumpkinCarvingIdeas.com, inspired by the image above. These are our suggestions, not instructions from the uploader. This approach to the AI concept has not been tested on a real pumpkin.

From pumpkin to porch

  1. Clean and dry the surface

    Wipe the pumpkin with a damp cloth to lift dust and field dirt, then dry it fully. Paint grips best on a clean, matte skin, so skip any wax or shine spray. Set the pumpkin on a towel with the flattest face toward you. Pick a spot with even, smooth skin for the ribbon so your strokes stay clean.

  2. Chalk the layout

    Sketch the ribbon loop and its two crossing tails lightly with chalk or a washable marker. Add guide baselines for Hope, Strength, and Cure so the lettering sits level. Mark a few small heart spots to balance the composition. Chalk wipes away easily, so adjust the spacing until it feels right before any paint touches the pumpkin.

  3. Base coat the ribbon

    Fill the ribbon shape with a medium pink using a flat or round brush, following the curve of the loop. Keep the first coat thin so it dries fast without drips. Let it dry, then add a second coat for even, solid color. Two light coats look smoother than one heavy one and resist chipping.

  4. Shade for a folded look

    Mix a deeper rose or add a touch of red to your pink, then run it along one edge of each ribbon segment. Concentrate the darker tone where the loop crosses over itself so it looks folded rather than flat. Blend the edge softly with a barely damp brush while the paint is still wet. Keep the highlight side lighter to sell the fold.

  5. Add the lettering and hearts

    Load a fine round brush with white and paint Hope, Strength, and Cure over your chalked baselines. Work top to bottom so your hand does not smudge fresh letters, and keep strokes light for the thin script lines. Fill the small hearts in soft pink to echo the ribbon. Let everything dry, then gently erase any chalk still showing.

  6. Seal and stage your photo

    Once fully dry, brush on a thin coat of matte acrylic sealer to protect the paint from moisture. Set the pumpkin on a table near soft natural light for the cleanest photo of the colors. Because it is a no-carve design, there is no opening and no light inside. A battery LED tucked behind it can add a gentle glow for evening shots.

Gather your supplies

Check things off as you get ready.

Work on a stable surface, keep your free hand out of the cutting path, and have an adult handle sharp tools.

Three levels of light

  • Leave intact

    The entire pumpkin skin stays intact and dark, since this is a painted tribute with no cuts.

  • Peel & shade

    If you want a soft glow, lightly scuff a shallow ring of skin behind the pumpkin and set an LED there.

  • Cut through

    No full cutouts on this design, keep it whole so the ribbon and script read cleanly.

Learn the carving basics

Before you start cutting

Do I need to carve anything for this design?

No, this is a paint-only tribute, so the pumpkin stays whole. That makes it a great low-risk project and it lasts longer since there is no cut opening to soften. If you want light, tuck a battery LED behind the pumpkin rather than cutting into it.

How do I keep the lettering straight?

Chalk in level baselines before you paint, spacing Hope, Strength, and Cure evenly down the side. Paint over the chalk with a fine round brush, then wipe away any leftover chalk once dry. Working from the top word down keeps your hand off wet letters.

Will the paint hold up on the pumpkin?

Acrylic craft paint sticks well to clean, dry pumpkin skin, especially in two thin coats. A light matte sealer over the finished art helps it resist smudges and moisture. Keep the pumpkin out of direct sun and heat so the skin does not sweat under the paint.

Your take belongs here, too.

Changed a detail? Made it simpler? Share a photo of your version and tell the community what worked.

Share your pumpkin

More pumpkins like this

You've reached the end · 8 pumpkins
The Patch Report

Fresh pumpkins, in your inbox.

The best new carvings, ideas worth stealing, and how-tos for carving season. Short, seasonal, and gone by November.

A short email during carving season. Unsubscribe anytime. See our privacy policy.