Halloween Pumpkin Carving Contest · Starts October 1st · $500 in prizes
← Back to ideas
@ai_concepts
Aug 5, 2026
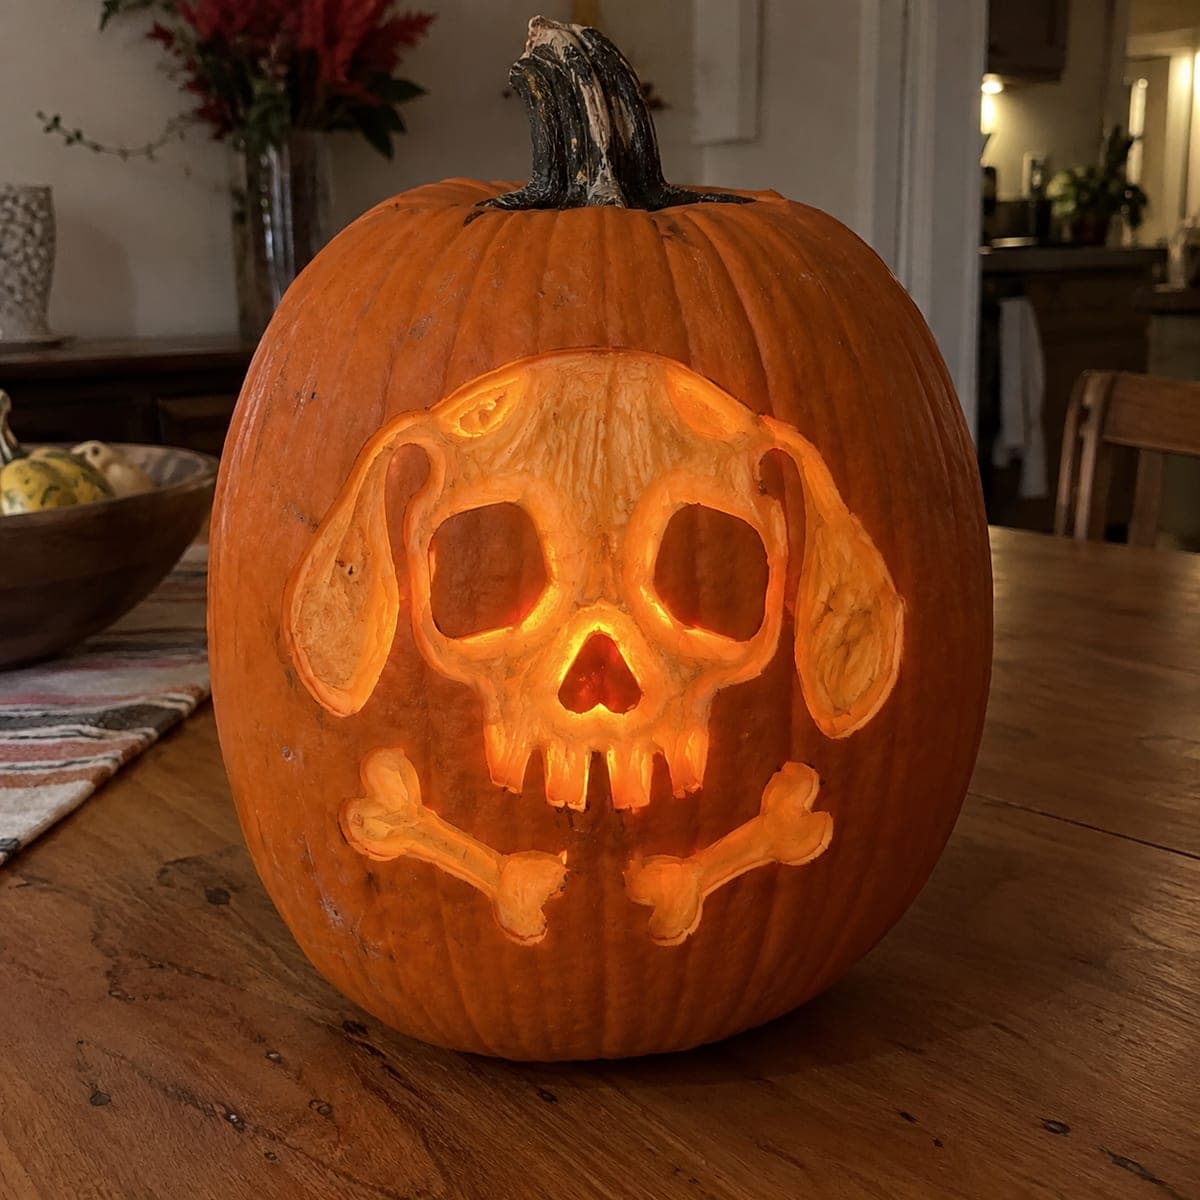
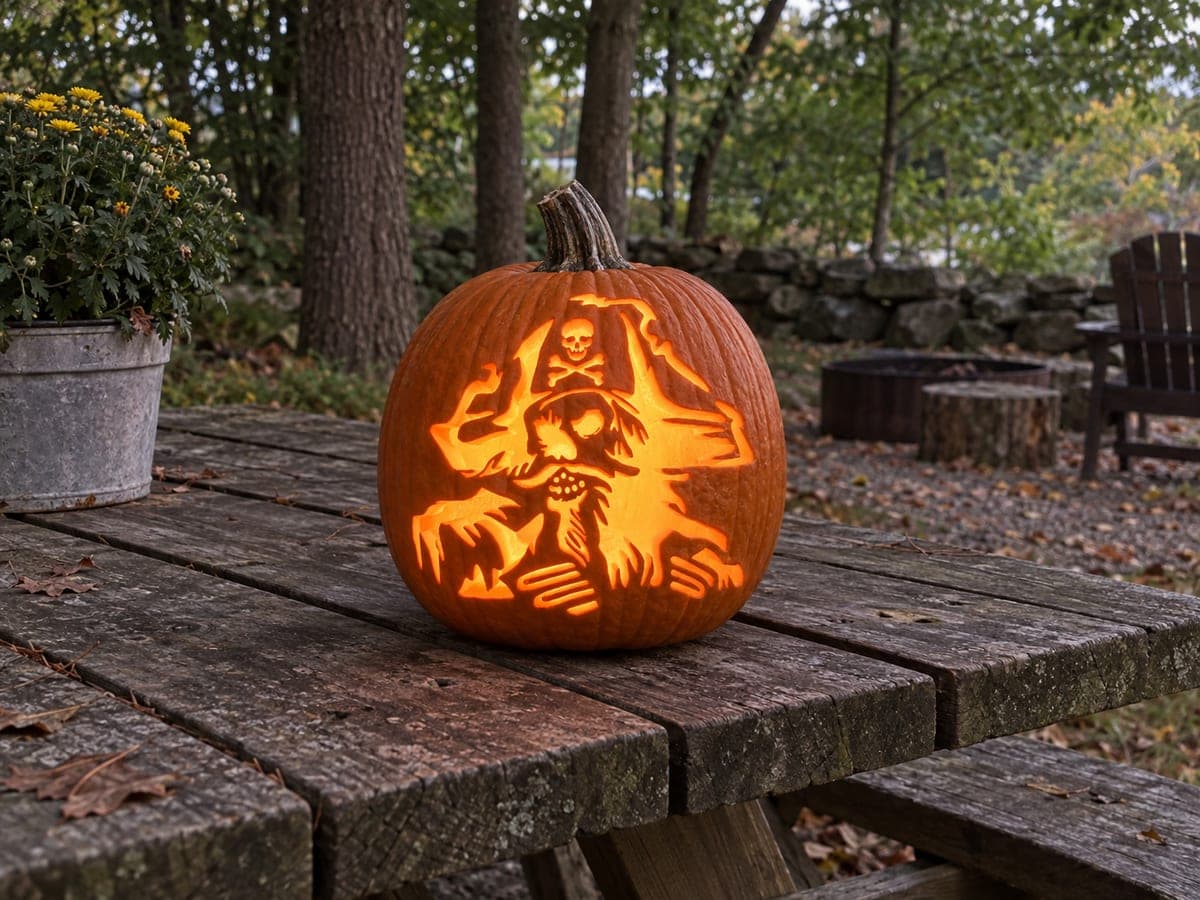
Puppy Skull and Crossbones Pirate PumpkinAI
0

Puppy Skull and Crossbones Pirate Pumpkin

A dog skull with floppy hound ears grins above two crossed dog bones, a pirate flag reimagined for pet lovers. The outlines are etched to glow softly while the eyes, nose, and teeth are cut deeper for punch. Etch the skull and bone outlines first at a shallow, even depth, then open up the eye sockets and heart-shaped nose, and let the floppy ears stay dim for contrast.

This is an AI-generated concept image: a realistic, carvable design idea rather than a photo of a finished carve. AI concepts are always labeled and sit out the leaderboard and the contest.

No ratings yet · Sign in to rate
Comments (0)

  • No comments yet — be the first.

Save without an account. Sign in to like or comment.

Our tips for carving a similar design

The trick here is contrast: shallow etched outlines that glow a dim orange against a few deep cutouts that punch bright light through. You plan the whole design as a skull with floppy ears sitting above two crossed bones, then decide early which parts stay skin-peeled and which get cut all the way through. Because this is a concept design, treat the layout as a target to aim for and adjust depths to fit your own pumpkin.

Written by PumpkinCarvingIdeas.com, inspired by the image above. These are our suggestions, not instructions from the uploader. This approach to the AI concept has not been tested on a real pumpkin.

From pumpkin to porch

  1. Prep and transfer the design

    Pick a tall pumpkin with a broad, flat front so the skull and crossed bones fit without wrapping around the curve. Clean out the pulp and thin the inside wall of the carving area to about one inch so etching glows evenly. Tape your stencil on and poke the outlines with a pin or transfer tool so you can see the skull, ears, eye sockets, nose, teeth, and both bones. An adult should handle all blades from here on.

  2. Etch the skull and bone outlines

    Using a shallow gouge or a lino-style scoop, peel just the skin off along every outline at one even depth. Keep the skull dome, the crossed bones, and the ear shapes as clean bands of exposed flesh. Do not cut through yet. This shallow layer is what gives you that soft mid glow around the whole design.

  3. Shade the floppy ears and bones

    Leave the centers of the two floppy ears mostly untouched or only lightly scraped so they read darker than the skull. On the crossed bones, peel the skin thin across the whole shape so they glow softly, then leave a hairline of skin down the middle to suggest form. Vary your scraping depth a little to fake the rounded shading you see in the concept.

  4. Cut the eyes, nose, and teeth

    Now switch to a fine saw for the deep openings. Cut fully through the two eye sockets and the heart-shaped nose so they throw the brightest light. Saw the row of teeth as short slots, leaving thin bridges of pumpkin between each tooth so the mouth does not collapse. Cut slowly and let the blade do the work.

  5. Clean edges and test the glow

    Go back and bevel the inside of each cutout slightly toward the light so more glow escapes. Wipe away crumbs and check every etched line under a lamp, deepening any spot that looks dull. Rub a little petroleum jelly on cut edges to slow drying. Adjust until the ears stay dim and the eyes and nose pop.

  6. Light it and photograph

    Drop in an LED tea light or a small battery puck rather than a flame, since the thin etched areas can scorch. Set the pumpkin in a dim room and shoot slightly off to one side to catch the depth of the cutouts. If the etched lines look weak, add a second LED inside. Keep a spare light handy for photos.

Gather your supplies

Check things off as you get ready.

Work on a stable surface, keep your free hand out of the cutting path, and have an adult handle sharp tools.

Three levels of light

  • Leave intact

    The centers of the floppy hound ears stay untouched skin so they read dark against the skull

  • Peel & shade

    The skull dome outline, the crossed bones, and the etched contour lines get skin-peeled for a soft mid glow

  • Cut through

    The two eye sockets, the heart-shaped nose, and the slotted teeth get cut through for the brightest light

Learn the carving basics

Before you start cutting

How do I keep the teeth from breaking off?

Cut the teeth as a row of short slots rather than one wide opening, and leave a thin bridge of pumpkin between each tooth. Those bridges hold the mouth together and still read as a toothy grin when lit. Save the teeth for last so the surrounding flesh stays firm while you work.

Why etch the ears instead of cutting them out?

Leaving the ears as shaded, mostly solid skin is what makes them look like soft floppy hound ears instead of holes. The dim ears frame the bright skull and give the design its dog-versus-pirate contrast. If you cut them through, you lose that gentle, pet-friendly feel.

This is a concept image, so how do I judge the right wall thickness?

Since no real pumpkin exists here, treat the depths as a goal and test on your own gourd. Thin the wall behind the etched areas to about one inch so the shallow scraping glows, and leave the rest thicker for strength. Do a quick light test partway through and scrape a little deeper anywhere that stays dark.

Your take belongs here, too.

Changed a detail? Made it simpler? Share a photo of your version and tell the community what worked.

Share your pumpkin

More pumpkins like this

You've reached the end · 8 pumpkins
The Patch Report

Fresh pumpkins, in your inbox.

The best new carvings, ideas worth stealing, and how-tos for carving season. Short, seasonal, and gone by November.

A short email during carving season. Unsubscribe anytime. See our privacy policy.