Halloween Pumpkin Carving Contest · Starts October 1st · $500 in prizes
← Back to ideas
@ai_concepts
Sep 25, 2026
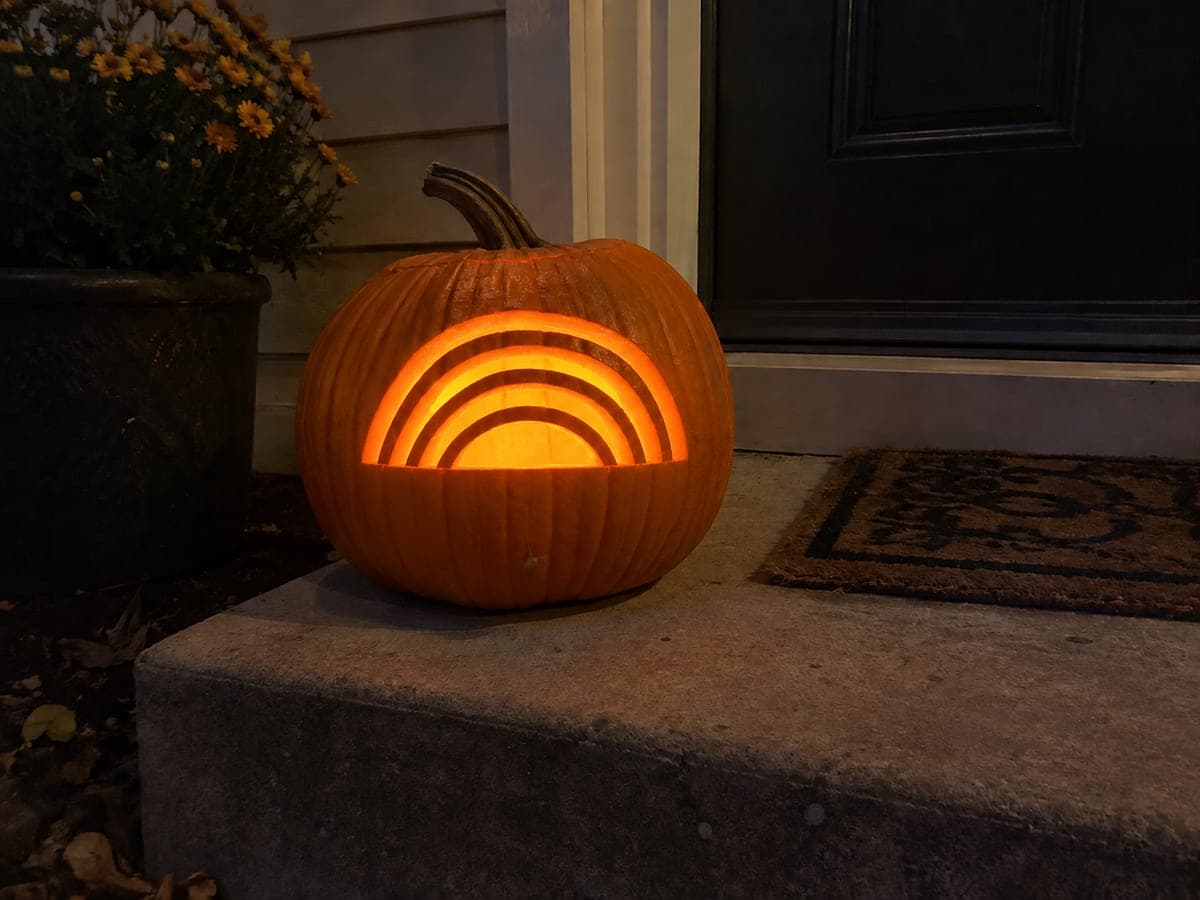
Rainbow Arc Cutout Pumpkin Glowing on a Dark PorchAI
0

Report this carving

Tell us what is wrong. Reports are private.

Rainbow Arc Cutout Pumpkin Glowing on a Dark Porch

Stacked rainbow arc openings curve across this creative pumpkin carving idea, each arch terminating cleanly into a wide horizontal band of uncut rind along the bottom so the design holds its shape. Cut each arc as an individual opening, working from the outermost arch inward, and ensure both ends of every arc merge into the thick lower wall rather than connecting to each other. Removing the cloud cutouts and replacing them with solid rind keeps the structure intact and the arcs reading as distinct glowing bands. A warm LED inside makes the arcs glow in layered intensity.

No ratings yet · Sign in to rate
Comments (0)

  • No comments yet — be the first.

Save without an account. Sign in to like or comment.

Our tips for carving a similar design

Each stacked arc is cut as an individual opening with both ends terminating into a thick intact horizontal band at the base rather than connecting to any other arc. This base band is the structural anchor for the entire design. Working from the outermost arc inward ensures the wall is strongest when the smallest and most central arcs are cut.

From pumpkin to porch

  1. Hollow and mark the base band

    Cut the lid, scoop, and scrape the front wall to about an inch. Draw a horizontal line across the lower quarter of the face that marks the top of the intact base band. Nothing is cut below this line. The base band needs to be at least two inches deep for structural integrity.

  2. Draw the arc positions

    Starting from the base band line, sketch arcs of increasing size from innermost to outermost, with each arc opening as a band of space above the one below. Each arc should have both ends terminating cleanly into the base band or the outer side border. No arc end should float or connect to another arc end.

  3. Confirm both ends of each arc anchor into solid rind

    Trace each arc with a finger and confirm both ends disappear into the base band or outer border. Any arc whose end floats in the middle of the face needs to be extended until it meets a solid anchor. Mark anchored ends with a small dot before cutting.

  4. Cut the outermost arc first

    Use a fine-toothed saw to cut the largest outer arc as one opening. Work from one anchor end to the other in a single smooth curved motion. The outer arc is the widest opening and removing it first lets you assess the remaining wall strength before committing to inner cuts.

  5. Cut remaining arcs inward

    Work inward arc by arc, completing each full arc before moving to the next. After each cut, press gently on the pumpkin face to confirm no cracking has occurred. The innermost arc may be quite small and should be cut with short strokes.

  6. Light and display

    Place a warm LED inside and display on a dark porch facing outward. Each glowing arc reads as a distinct band of light. Photographed from straight on in the dark, the stacked arcs create a vivid layered rainbow effect even without color.

Written with AI to match this design

Gather your supplies

Check things off as you get ready.

Work on a stable surface, keep your free hand out of the cutting path, and have an adult handle sharp tools.

Three levels of light

  • Leave intact

    The rind bands between arcs and the full intact base band stay solid and dark

  • Peel & shade

    None, this is a pure cutout design

  • Cut through

    Each individual arc opening from outermost to innermost

Learn the carving basics

Before you start cutting

How do I draw consistent arc curves across a round pumpkin surface?

Use a flexible tape measure bent into an arc shape and held against the surface while you trace. For each successively smaller arc, reduce the tape bend radius slightly. Alternatively, use a piece of flexible wire bent to the desired arc shape as a reusable guide.

How thick should the rind bands between arcs be?

Aim for at least three-quarters of an inch between adjacent arc openings. Thinner bands are possible on thick-walled pumpkins but increase the cracking risk significantly. If you need to choose between cutting a narrower arc or a thinner band, always keep the band wider.

Can I use colored cellophane behind the arc openings to suggest rainbow colors?

Yes. Cut strips of colored cellophane and tape them over each arc opening from inside the pumpkin before lighting. Red for the outer arc, then orange, yellow, and so on for each inner arc. The LED behind the cellophane projects subtle color onto the surrounding area.

Your take belongs here, too.

Changed a detail? Made it simpler? Share a photo of your version and tell the community what worked.

Share your pumpkin

More pumpkins like this

You've reached the end · 8 pumpkins
The Patch Report

Fresh pumpkins, in your inbox.

The best new carvings, ideas worth stealing, and how-tos for carving season. Short, seasonal, and gone by November.

A short email during carving season. Unsubscribe anytime. See our privacy policy.