Halloween Pumpkin Carving Contest Β· Starts October 1st Β· $500 in prizes
← Back to ideas
@ai_concepts
Aug 5, 2026
Realistic Red Fox Relief Pumpkin CarvingAI
0

Realistic Red Fox Relief Pumpkin Carving

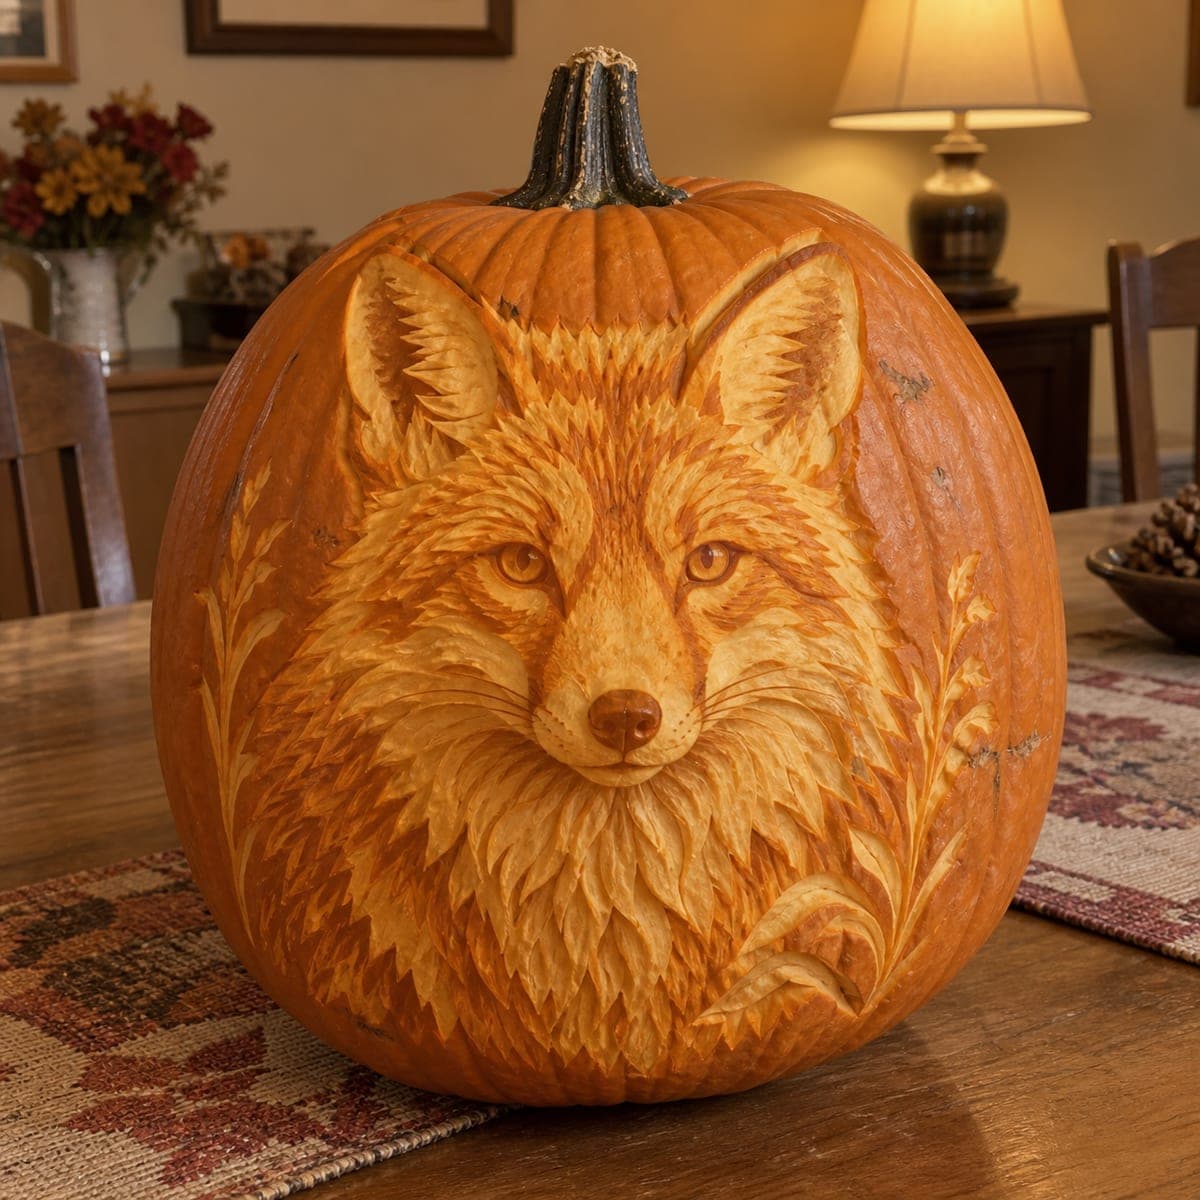
A fox gazes straight ahead from this pumpkin, its ruff and cheek fur carved stroke by stroke in museum-quality relief, framed by etched wheat stalks on either side. The layered fur effect comes from overlapping V-cuts that follow the direction of growth, deepest around the eyes and nose to build contrast. Rough out the head shape before committing to any fine texture. Display it unlit under a warm lamp so the shadows define every feathered cut.

This is an AI-generated concept image: a realistic, carvable design idea rather than a photo of a finished carve. AI concepts are always labeled and sit out the leaderboard and the contest.

No ratings yet Β· Sign in to rate

Comments (0)

  • No comments yet β€” be the first.

Save without an account. Sign in to like or comment.

Our tips for carving a similar design

The core trick here is layered relief carving, where you peel skin at different depths instead of cutting all the way through, so the whole fox glows in shades of orange under a lamp. Build the fur from overlapping V-cuts that follow the direction the coat grows, then deepen the areas around the eyes and nose to push contrast. Wheat stalks etched on each side frame the face and give the beginner-friendly parts of the design something graphic to lean on.

Written by PumpkinCarvingIdeas.com, inspired by the image above. These are our suggestions, not instructions from the uploader. This approach to the AI concept has not been tested on a real pumpkin.

From pumpkin to porch

  1. Pick a tall pumpkin and transfer the design

    Choose a large, smooth pumpkin with a flat front face and a wall thick enough for deep relief work. Since this is a shaded portrait rather than a light show, leave it whole and carve the front only. Tape your fox pattern in place and dot the main outlines through with a poking tool, marking the eyes, nose, ears, ruff, and the two wheat stalks. Step back and check the fox sits centered before you commit.

  2. Rough out the head shape first

    Before any fine texture, use a ribbon or loop tool to scrape away the outer skin across the whole face area, taking it down to the pale flesh. Establish the broad planes: the raised muzzle, the sunken eye sockets, and the outer edges of the ears. Keep the nose and brow high and press the cheeks slightly lower so shadows form. Work slowly and resist adding detail until the overall shape reads as a fox from a few feet away.

  3. Carve the fur in directional V-cuts

    Switch to a small V-gouge and cut short overlapping strokes that follow the direction the fur grows, sweeping down and out from the center of the face into the ruff. Layer the cuts so each row slightly overlaps the one below, like shingles, which is what creates the feathered look. Vary the depth to build volume, going lighter on the cheeks and heavier where the coat bunches under the chin. Let the strokes fan outward around the ears and jaw.

  4. Deepen the eyes and nose for contrast

    The eyes and nose are the focal points, so carve these deepest to catch the darkest shadow. Round the nose into a smooth raised bump and scoop the flesh around it so it stands proud. Cut tight, controlled detail around each eye to define the lids, and keep the pupils as untouched skin so they stay dark and alive. This depth contrast is what makes the face feel three dimensional.

  5. Etch the wheat and refine edges

    With the fox built, lightly score the wheat stalks on each side using shallow line cuts, keeping them delicate so they frame rather than compete. Go back over the whole portrait and clean up any rough transitions between fur layers. Blow out or brush away flesh crumbs so they do not dry in the grooves. Wipe the carved surface and check the shading reads well from across the room.

  6. Light it warm and photograph

    This design is meant to be shown unlit, so set it under a warm lamp or beside a soft-glow LED off to one side. Side lighting rakes across the fur and makes every V-cut throw a small shadow, which is the whole effect. Rotate the pumpkin until the eyes catch the most depth. Snap your photos the same evening, since relief cuts dry and dull within a day or two.

Gather your supplies

Check things off as you get ready.

Work on a stable surface, keep your free hand out of the cutting path, and have an adult handle sharp tools.

Three levels of light

  • Leave intact

    The pupils and the dark rims of the eyes and nostrils stay as untouched skin so they read as the darkest points.

  • Peel & shade

    Most of the face, ruff, and ears are skin-peeled to varying depths for the layered orange fur glow.

  • Cut through

    Nothing is cut fully through on this design; the whole effect is relief, so keep the pumpkin wall intact.

Learn the carving basics

Before you start cutting

This is shown as a concept with no light coming through. How would a real carved version actually look?

A real pumpkin carved this way would rely on relief shading, not backlighting, so you display it unlit under a lamp. The pale peeled flesh glows softly while untouched skin stays dark, and side lighting throws shadows into every fur groove. It reads best up close and in person rather than as a jack-o-lantern on a porch.

How do I keep the fur from turning into a random mess of cuts?

Always follow the direction the coat grows, sweeping down and outward from the center of the face. Work in overlapping rows like shingles so each stroke has a clear neighbor. Roughing out the head shape first gives you a map, so the texture sits on top of real structure instead of floating.

How long will a relief carving like this last?

Peeled flesh starts drying and browning within a day or two, which dulls the crisp shadows. Carve it the same day you plan to display and photograph it. A wipe of the exposed surface with lemon water can slow browning a little, but treat this as a short-lived showpiece.

Your take belongs here, too.

Changed a detail? Made it simpler? Share a photo of your version and tell the community what worked.

Share your pumpkin

More pumpkins like this

You've reached the end Β· 8 pumpkins
The Patch Report

Fresh pumpkins, in your inbox.

The best new carvings, ideas worth stealing, and how-tos for carving season. Short, seasonal, and gone by November.

A short email during carving season. Unsubscribe anytime. See our privacy policy.