Halloween Pumpkin Carving Contest · Starts October 1st · $500 in prizes
← Back to ideas
@ai_concepts
Sep 25, 2026
Scary Intermediate Jack-O-Lantern With Glowing CutoutsAI
0

Report this carving

Tell us what is wrong. Reports are private.

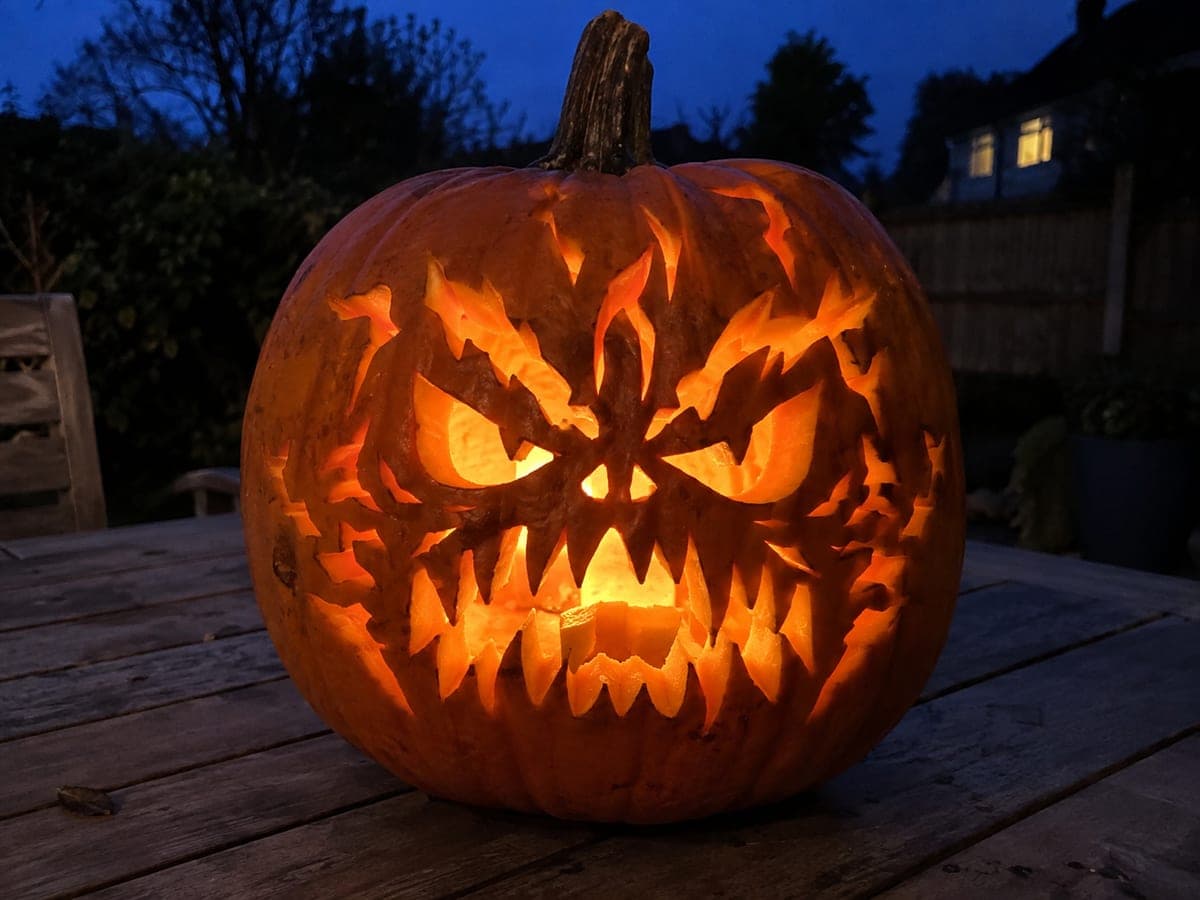
Scary Intermediate Jack-O-Lantern With Glowing Cutouts

Multiple cut-through openings arranged into a sinister expression give this intermediate scary pumpkin carving idea a more menacing look than a basic triangle face. Transfer the full design before cutting so every element is correctly sized and spaced, then cut the largest openings first while the wall is still strong. Preserve all connecting strips and border connections so the design holds together under its own weight. Viewed from the street after dark, the lit design casts a genuinely unsettling glow on surrounding surfaces.

No ratings yet · Sign in to rate
Comments (0)

  • No comments yet — be the first.

Save without an account. Sign in to like or comment.

Our tips for carving a similar design

Multiple cut-through openings working in concert build a genuinely unnerving expression that a simple three-piece face cannot achieve. Getting the full design transferred accurately before cutting, then removing the largest openings first, keeps the rind stable and the expression proportional from start to finish. Viewed from the street after dark, the lit face casts a menacing pool of light on surrounding surfaces.

From pumpkin to porch

  1. Hollow the pumpkin

    Cut the access lid from the base and scoop pulp and seeds until the wall is a consistent inch thick. Check the carving face area by pressing from outside: it should feel firm with no soft spots. A uniform wall carves more predictably across the several openings this design requires.

  2. Transfer and inspect the layout

    Tape the template in place, trace every outline with a stylus, then connect the dots with a marker. Look at the full traced design and identify every structural bridge, marking each one clearly before cutting begins. A brief inspection at this stage prevents the most costly mistakes.

  3. Cut the largest opening first

    Begin with the widest aperture, cutting steadily with a small serrated saw held perpendicular to the rind. Keep the offcut supported as it breaks free. The large opening sets the visual anchor for the rest of the expression, so take care to follow the outline precisely.

  4. Add remaining openings in size order

    Work through the remaining openings from largest to smallest, pausing after each to press the surrounding rind and check for flex or softness. Any bridge narrower than 8 mm that you notice mid-cut should be left alone: skip to an opening farther away and return to the borderline area only after the adjacent rind is fully supported by completed cuts.

  5. Refine the edges

    Use a thin paring knife to clean any rough spots inside each opening. Sharp, clean edges are especially important on a scary design since ragged rind catches shadow in ways that can blur the intended expression. Remove all debris from the cavity before testing the light.

  6. Light and place outdoors

    Insert a battery lantern and position the pumpkin where passing visitors will see it at near eye level. A dark front door or a shadowed step alcove maximizes the contrast between the glowing openings and the dark surrounding rind, giving the sinister expression the most impact.

Written with AI to match this design

Gather your supplies

Check things off as you get ready.

Work on a stable surface, keep your free hand out of the cutting path, and have an adult handle sharp tools.

Three levels of light

  • Leave intact

    All rind between and around the sinister face openings stays dark and solid

  • Peel & shade

    None, the design uses only full cutouts

  • Cut through

    Every aperture forming the sinister expression is cut completely through for full glow

Learn the carving basics

Before you start cutting

How do I make the expression look sinister rather than just neutral?

Angles are the key ingredient. Eye openings that angle sharply downward toward the nose bridge look menacing. Mouth corners that turn down or have uneven jagged edges add unease. Even shifting the two eye openings so they are not quite level with each other creates an unsettling asymmetry that reads as sinister from a distance.

Can I carve this on the same night I display it?

Yes, carving and displaying on the same evening is perfectly fine. A freshly carved pumpkin looks its best in the first twelve hours. If you need to carve in advance, store the pumpkin in a sealed bag in the refrigerator and bring it to room temperature an hour before display time.

The lit openings look great but the dark rind is hard to see. How do I make the full face more readable?

A dim external light source, such as a small uplighter or a nearby porch lamp, can subtly illuminate the dark rind without washing out the interior glow. Aim the external light from slightly below and to one side so it rakes across the pumpkin's surface and brings out the texture and color of the dark areas.

Your take belongs here, too.

Changed a detail? Made it simpler? Share a photo of your version and tell the community what worked.

Share your pumpkin

More pumpkins like this

You've reached the end · 8 pumpkins
The Patch Report

Fresh pumpkins, in your inbox.

The best new carvings, ideas worth stealing, and how-tos for carving season. Short, seasonal, and gone by November.

A short email during carving season. Unsubscribe anytime. See our privacy policy.