Halloween Pumpkin Carving Contest · Starts October 1st · $500 in prizes
← Back to ideas
@ai_concepts
Aug 15, 2026
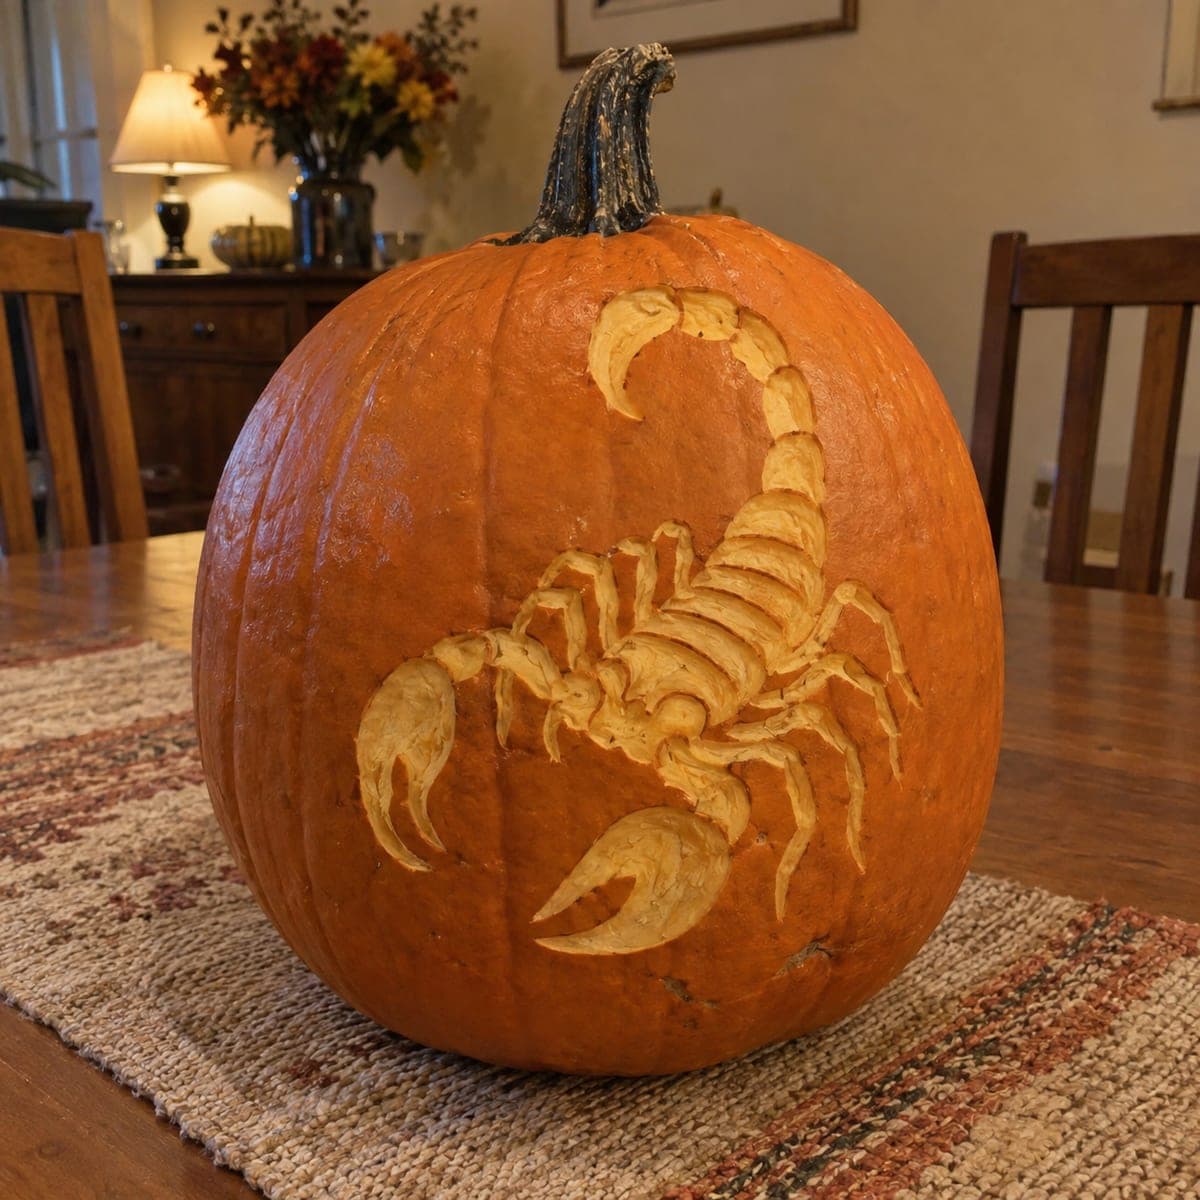
Sculpted Scorpion Relief Carved Into a PumpkinAI
0

Sculpted Scorpion Relief Carved Into a Pumpkin

Rather than cutting through the shell, this scorpion is sculpted in shallow relief, with every plate of its armored tail and pincers modeled in the pale flesh beneath the skin. Outline the body with a V-tool, then round each segment with a small loop tool, working from the tail tip down so you always carve toward fresh skin. Because nothing is pierced, it displays well indoors on a table without any light inside.

This is an AI-generated concept image: a realistic, carvable design idea rather than a photo of a finished carve. AI concepts are always labeled and sit out the leaderboard and the contest.

No ratings yet · Sign in to rate

Comments (0)

  • No comments yet — be the first.

Save without an account. Sign in to like or comment.

Our tips for carving a similar design

The trick here is that nothing gets cut all the way through the shell. The whole scorpion is modeled in shallow relief, with the armored tail plates, pincers, and legs rounded out of the pale flesh just under the skin. You control brightness entirely by how deep you peel, so plan your darkest and palest areas before you touch a blade.

Written by PumpkinCarvingIdeas.com, inspired by the image above. These are our suggestions, not instructions from the uploader. This approach to the AI concept has not been tested on a real pumpkin.

From pumpkin to porch

  1. Prep and transfer the pose

    Pick a smooth, evenly rounded pumpkin with a broad front face so the tail can arch up toward the stem. Wipe it clean and dry, then tape your scorpion pattern in place and poke or trace the main outlines. Keep the raised tail, the body, both pincers, and the walking legs clearly marked. Since you will not gut the pumpkin, leave the top intact for a cleaner tabletop look.

  2. Outline the whole body with a V-tool

    Run a small V-tool along every traced line to lock in the shape before any shading. Cut a shallow, steady groove around the tail segments, the rounded body, the pincers, and each thin leg. This outline becomes the shadow line that separates one plate from the next. Take your time on the curved tail so the segments stay even and the sting tip keeps its point.

  3. Peel the background to a dim glow

    With a loop tool, shave the skin off the areas around and between the legs to expose flesh, but keep them shallow so they read as mid tone. This makes the scorpion pop forward against a softer surround. Leave the plates of the body and tail with their skin on for now so they stay dark and define the form. Work in small passes and brush away shavings often to see your progress.

  4. Model the tail from the tip down

    Start at the stinger and round each tail segment with a small loop tool, working downward so you always carve toward fresh, uncut skin. Scoop a little deeper at the center of each plate and leave the edges higher so the segments look domed and overlapping. The deeper you scoop, the paler and brighter that spot becomes. Keep the outline grooves crisp between segments so the armor stays crisp.

  5. Sculpt the pincers, body, and legs

    Shape the two big pincers with the same rounding motion, leaving a raised ridge down the center of each claw for a highlight. Round the body plates so they catch light along their peaks, and gently taper each leg so it looks thin without carving all the way through. Keep every leg attached to the surface, since this is a surface relief and not a cutout. Vary your depth a little to give the whole animal a three dimensional, layered feel.

  6. Refine, seal, and photograph

    Step back, then deepen any spots that should read brightest and soften any harsh edges with light loop strokes. Rub a thin coat of petroleum jelly or a spritz of lemon water on the exposed flesh to slow browning. Because nothing is pierced, this piece shows off best in normal room light on a table, no light inside needed. Snap your photo the same day while the carved flesh is still pale and fresh.

Gather your supplies

Check things off as you get ready.

Work on a stable surface, keep your free hand out of the cutting path, and have an adult handle sharp tools.

Three levels of light

  • Leave intact

    The skin left on the body plates and tail segment ridges stays darkest for depth

  • Peel & shade

    Shallow-peeled flesh around the legs and background gives a soft mid tone

  • Cut through

    No full cutouts here; the deepest loop-tool scoops on the tail and pincers read as the brightest highlights

Learn the carving basics

Before you start cutting

Do I need to put a light inside this pumpkin?

No. Because the design is relief carved and nothing is cut through the shell, there is no cavity to light. It reads by shadow and highlight in normal room light, which is what makes it a good indoor tabletop piece. If you want, a small lamp aimed across the surface deepens the shadows.

How do I keep the thin legs from breaking?

Treat the legs as shallow surface relief, not as pierced cutouts. Round the flesh down a little on each side of a leg so it looks slim, but never carve all the way through, and keep it connected to the surrounding surface. Light passes with a small loop tool are safer than deep gouges.

Why carve the tail from the tip downward?

Working from the stinger down means each stroke moves toward fresh, uncut skin, which gives you cleaner control and less tearing. It also helps you keep the overlapping segments even as they curl. If you start at the base you tend to catch and lift flesh you already shaped.

Your take belongs here, too.

Changed a detail? Made it simpler? Share a photo of your version and tell the community what worked.

Share your pumpkin

More pumpkins like this

You've reached the end · 8 pumpkins
The Patch Report

Fresh pumpkins, in your inbox.

The best new carvings, ideas worth stealing, and how-tos for carving season. Short, seasonal, and gone by November.

A short email during carving season. Unsubscribe anytime. See our privacy policy.