Halloween Pumpkin Carving Contest · Starts October 1st · $500 in prizes
← Back to ideas
@ai_concepts
Sep 4, 2026
Shocked Cartoon Face No-Carve Painted PumpkinAI
0

Shocked Cartoon Face No-Carve Painted Pumpkin

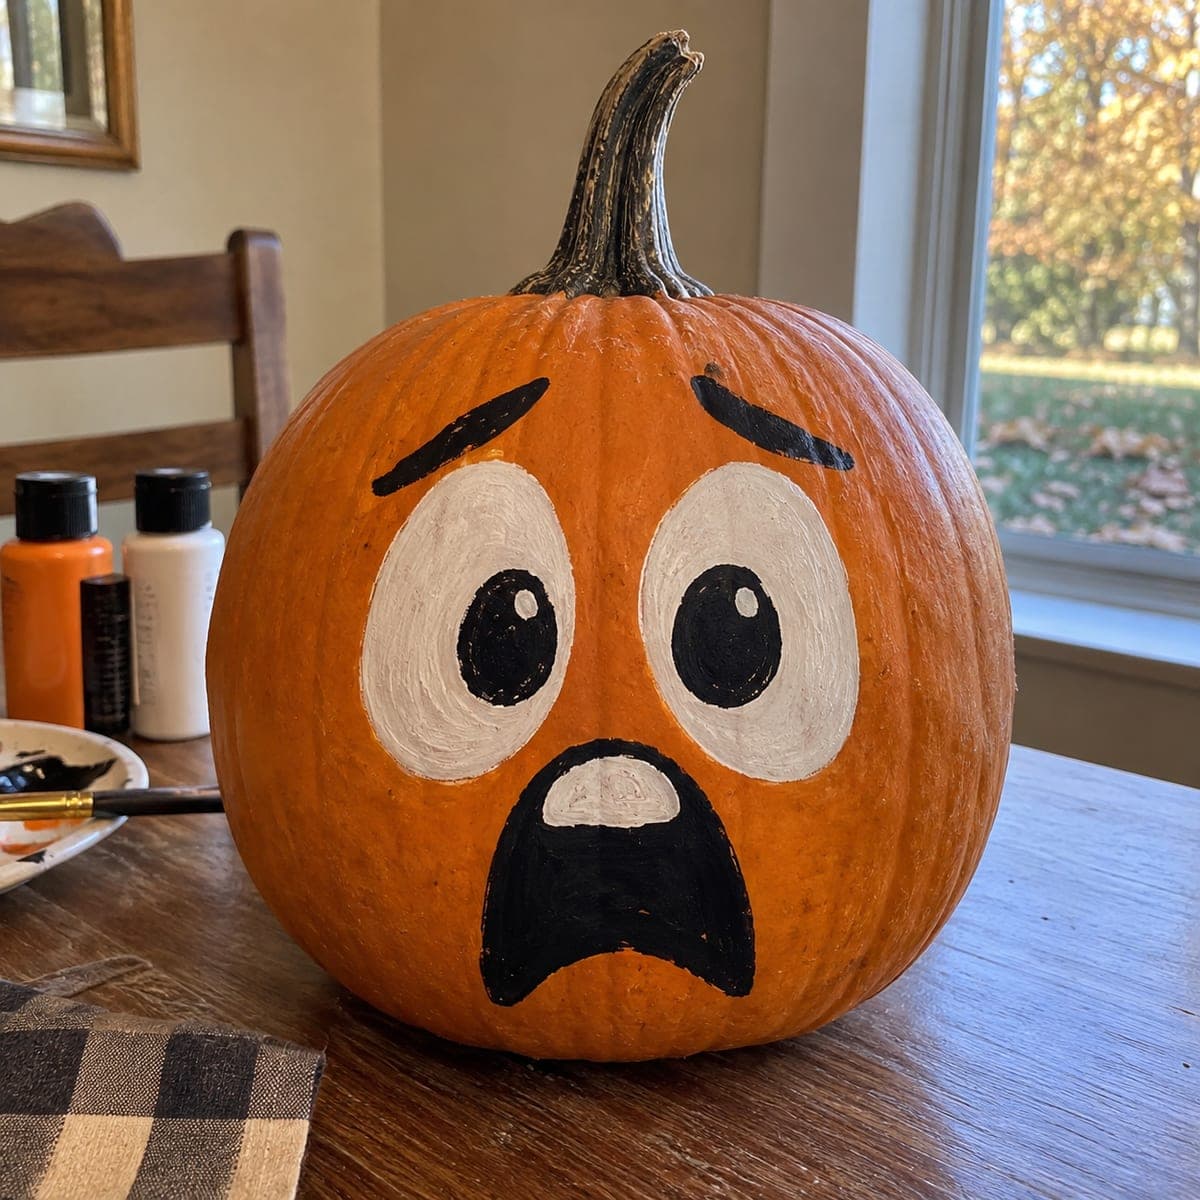
Wide white eyes, arched black brows, and an open-mouthed gasp expression painted in bold black and white give this pumpkin a hilarious surprised personality. The no-carve design uses simple graphic shapes that even young kids can help with, requiring only black and white acrylic paint and a steady hand. Sketch the circles in pencil first, block in the white eye areas and mouth, let them dry completely, then outline and add the pupils and brows in black for crisp, cartoon-style edges.

This is an AI-generated concept image: a realistic, carvable design idea rather than a photo of a finished carve. AI concepts are always labeled and sit out the leaderboard and the contest.

No ratings yet · Sign in to rate

Comments (0)

  • No comments yet — be the first.

Save without an account. Sign in to like or comment.

Our tips for carving a similar design

The whole trick here is bold graphic shapes in just two colors: big white ovals for the shocked eyes and a black open mouth with a lighter inner throat. Because it is all paint, you skip cutting entirely and build the face in layers, laying down the white areas first and letting them dry before adding crisp black pupils, outlines, and arched brows on top.

Written by PumpkinCarvingIdeas.com, inspired by the image above. These are our suggestions, not instructions from the uploader. This approach to the AI concept has not been tested on a real pumpkin.

From pumpkin to porch

  1. Clean and dry the pumpkin

    Wipe the whole surface with a damp cloth to remove dirt and any waxy film, then dry it fully. Paint grips much better on a clean, dry rind. Pick a pumpkin with a smooth, rounded front so your eye circles do not distort over deep ribs. Set it on a towel so it cannot roll while you work.

  2. Sketch the face in pencil

    Lightly draw two large egg-shaped eyes side by side, a little wider at the top, plus the arched eyebrows above them and the open, rounded mouth below. Keep the shapes big and simple so the expression reads from a distance. Step back and check that both eyes sit level before you commit. Pencil wipes off easily, so redraw until the layout feels balanced.

  3. Block in the white areas

    Fill both eye ovals and the small inner mouth patch with white acrylic paint. Use a medium flat brush and work in smooth, even strokes, adding a second coat once the first is touch dry for solid coverage. Keep the edges just inside your pencil lines so the black outline can clean them up later. Let the white dry completely before moving on, since black over damp white will smear gray.

  4. Add the black pupils and mouth

    Paint large black circles inside each white eye, leaving a rim of white showing, and dab a tiny white highlight dot on each pupil for that surprised sparkle. Fill the open mouth in black around the pale inner throat you already painted. A smaller round brush gives you more control on these curves. Let this layer dry before the final outlining.

  5. Outline and paint the brows

    With black paint and a fine brush, trace a clean line around each white eye and around the mouth to sharpen the cartoon edges. Add the two arched eyebrows up high, angled so they lift toward the center for that worried, shocked look. Keep the brush strokes confident and slightly thick so the lines stay bold. Touch up any wobbly spots once everything is dry.

  6. Seal and stage your photo

    Once fully cured, brush on a thin coat of clear matte sealer to protect the paint from moisture and handling. Set the pumpkin on a table with soft daylight or a nearby lamp, since this is a no-carve design and needs no candle. Angle it slightly toward the camera so both eyes catch the light. Snap your photo and share the goofy gasp.

Gather your supplies

Check things off as you get ready.

Work on a stable surface, keep your free hand out of the cutting path, and have an adult handle sharp tools.

Three levels of light

  • Leave intact

    The bare orange rind stays as the face background and outer skin, untouched and matte.

  • Peel & shade

    No skin is peeled on this painted design, but the pale inner mouth and white eye areas act as the soft, light-toned zones.

  • Cut through

    Nothing is cut through since this is a no-carve pumpkin, so the brightest pop comes from the white eyes and highlight dots rather than any opening.

Learn the carving basics

Before you start cutting

Do I need to carve or light this pumpkin at all?

No, this is a fully painted no-carve design, so there is no cutting and no candle involved. That makes it a safe project for young helpers and it keeps the pumpkin from rotting as fast. If you want a glow later, set it near a lamp or add a battery LED behind it, never an open flame.

How do I keep the black from smearing into the white eyes?

Patience is the whole secret. Let each white area dry fully, ideally an hour or more, before you paint any black on top of or beside it. Rushing wet white under black turns the edges muddy gray, so give it real drying time and add the crisp outlines last.

What if my two eyes come out uneven?

Sketch both eyes in pencil first and measure roughly with your fingers or a strip of paper so they sit at the same height. Pencil wipes off with a damp cloth, so fix the layout before you paint. Slightly imperfect circles actually add to the hand-drawn cartoon charm, so do not stress over perfection.

Your take belongs here, too.

Changed a detail? Made it simpler? Share a photo of your version and tell the community what worked.

Share your pumpkin

More pumpkins like this

You've reached the end · 8 pumpkins
The Patch Report

Fresh pumpkins, in your inbox.

The best new carvings, ideas worth stealing, and how-tos for carving season. Short, seasonal, and gone by November.

A short email during carving season. Unsubscribe anytime. See our privacy policy.